
A CAD or technical drawing is intended to relay clear design instructions to fabricators, product designers, builders, engineers, architects, students, and all other parties involved. The clarity and readability are pegged on a number of elements, including but not limited to the dimensioning, the views used, line weights, and the use of hatch patterns. Of these elements, hatch patterns breathe life into a drawing, helping improve the readability of the drawing.
It is through the use of hatch patterns that you can easily determine at first glance whether the drawing represents a section view or an orthographic view of a part. Similarly, hatch patterns help differentiate between the vegetation in a given area when they are used in landscape drawings. Additionally, they can be used to represent elements such as walls and furniture in architectural drawings.
Indeed, the utility of hatch patterns can, therefore, not be called into question. But how do you include hatch patterns in AutoCAD? Also, how do you create or edit custom hatch patterns in AutoCAD? This article aims to answer these questions. Let’s dive in.
Table of Contents
What is a Hatch Pattern in AutoCAD?
An AutoCAD hatch pattern is a type of standard hatch in AutoCAD characterized by the distribution of repeating designs that fill an enclosed area. The hatch pattern is activated using the ‘HATCH’ command, one of many AutoCAD commands.
It is worth pointing out that a given enclosed area can only have one type of AutoCAD hatch pattern. As such, if you want to use multiple types of hatch patterns, you must create multiple enclosed areas.
Another important point to consider is that AutoCAD has a total of three hatch types, namely:
- AutoCAD hatch pattern: As detailed above, it fills an enclosed area with a repeating design
- AutoCAD solid hatch: It fills the enclosed area with a single color
- AutoCAD gradient hatch: It displays a color gradient within the enclosed area. This gradient is based on the gradient colors selected in the Gradient Color 1 and Gradient Color 2 drop-down menus
History of AutoCAD Hatch Patterns
The concept of hatch patterns is not entirely new. They were still in use back when hand drafting and drawing was the only means of representing ideas. At that time, designers, engineers, and architects still had to visually indicate the material that was to be used in a particular section. They, therefore, drew repeating patterns that closely resembled the actual material, be it concrete, masonry wall, wood, and so on.
The launch of AutoCAD by Autodesk in December 1982 helped simplify the otherwise tedious manual processes. The introduction of the hatch command, however, was not immediate. Much like how users had to wait a few years to enjoy the full perks of viewports, as detailed in our extensive guide to AutoCAD viewports, they also had to wait for the hatch command. But this time, the wait was shorter – just a few months. Autodesk introduced the HATCH command in October 1983 as part of the fourth release of its now popular software: AutoCAD 1.4. The developer has significantly improved upon the feature since.
How to Add and Edit Preloaded Hatch Patterns in AutoCAD
AutoCAD allows you to add and edit hatch patterns from a library of preloaded patterns.
How to Add Preloaded Hatch Patterns in AutoCAD
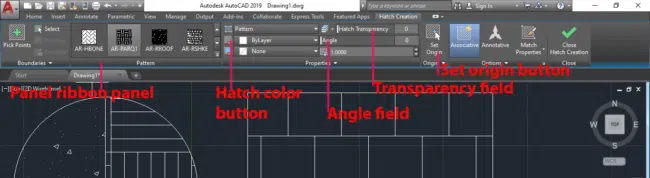
Hatch Creation and Editing Tools in AutoCAD Hatch Creation Ribbon Tab
To add an AutoCAD hatch pattern from the preloaded selection stored in the AutoCAD library, follow this procedure:
- Ensure the section within which you want to add the hatch pattern is enclosed
If it is not enclosed, AutoCAD will not add the pattern. - Click the Hatch icon on the Draw ribbon panel or type ‘HATCH’ on the command line
- Select the hatch pattern that best describes the material from the Pattern ribbon panel
The Pattern ribbon panel is found on the Hatch Creation contextual ribbon tab that appears once you click on the Hatch button in step 2. You can select architectural patterns that represent concrete, bricks, sand, and more. You can even expand the displayed options by clicking the drop-down arrow to the right of the panel. - Pick the internal point, i.e., the enclosed area within which you want to fill with the AutoCAD hatch pattern
AutoCAD automatically fills this area with the pattern you will have selected in step 3. - Click the Close Hatch Editor button to end the ‘Hatch’ command.
How to Edit Hatch Patterns in AutoCAD
In addition to adding the pattern, AutoCAD allows you to edit the hatch pattern. And there are several options to boot. For instance, you can change the color, angle, and transparency of the pattern. You can also shift the hatch pattern to align with a particular origin point. Or you can change the existing hatch pattern outright. To edit an AutoCAD hatch pattern, follow these steps:
- Click on the pattern
Doing this highlights the pattern and, if you were in a different ribbon tab, opens the Hatch Creation ribbon tab to allow you to edit the pattern - Next, press the right mouse button, which opens a menu
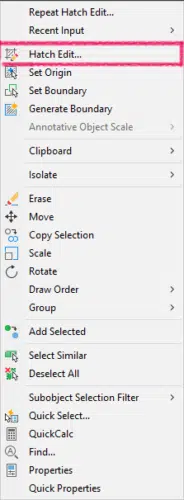
Right-Click Hatch Options in AutoCAD
- Click the Hatch Edit option, which opens the Hatch Edit pop-up window
This window combines the various editing options in one location. For example, you can change the pattern type, color, angle, spacing, origin, and transparency within this window.
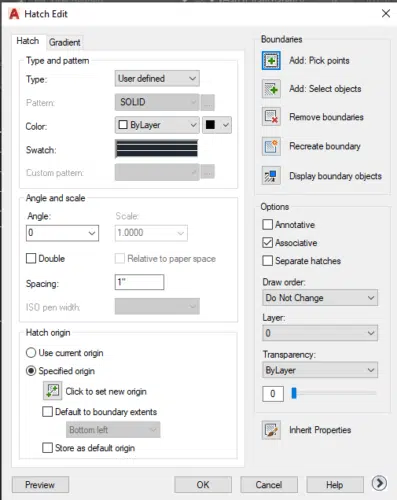
Hatch Edit Pop-up Window in AutoCAD
- Click OK to effect the changes.
Alternatively, you can opt to use the various editing options on the Pattern, Properties, and Origin ribbon panels. Here’s a breakdown of how you can perform the edits:
- To change the pattern, select a different pattern from the Pattern ribbon panel
- To change the color, click the Hatch color drop-down arrow on the Properties ribbon panel, and on the drop-down menu that pops up, select your desired color.
- Ro change the angle or transparency, simply fill in the desired angle or transparency figures in the Angle and Transparency fields within the Properties ribbon panel. Next, click enter.
- To set a new origin, click the Set Origin button on the Origin ribbon panel
Next, set the new origin point by left-clicking on the point within the enclosed area you want to set as the origin. AutoCAD will then automatically set the selected point as the new origin point. - To delete the hatch pattern, simply click on the pattern to highlight it and then press the Delete button on your keyboard.
How to Create and Edit Custom Hatch Patterns in AutoCAD
While Autodesk has attempted to represent as many materials as it can through the preloaded hatch patterns, it still has left out scores more. This necessitates the creation of custom hatch patterns. At the same time, you can choose to import hatch patterns or simply create them from scratch. So, how do you go about either of these options?
How to Create Custom Hatch Patterns in AutoCAD
AutoCAD allows you to create a custom hatch pattern using the SuperHatch tool. This tool allows you to add a custom hatch from an image, block, Xref attachment, and more. Our procedure below details how to create a custom AutoCAD hatch pattern from a block.
- Create a block of the pattern you want to add as a custom hatch pattern:
- Draw the pattern using the Draw tools. The pattern could include a square, lines, rectangle, or circle.
- Select the objects you had drawn in step 1a above and click the Create block button on the Block panel in the Home ribbon tab
- In the Block Definition window, specify the name of the block, set the base point, and click OK. AutoCAD will add the block to the library.
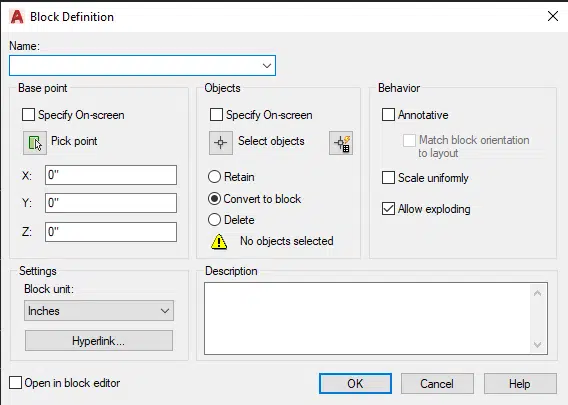
Block Definition Pop-up Window in AutoCAD
- Draw the pattern using the Draw tools. The pattern could include a square, lines, rectangle, or circle.
- Click the Express Tools ribbon tab, and on the Draw ribbon panel, select SuperHatch
This opens a SuperHatch window.
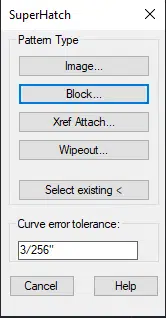
SuperHatch Options Pop-up Window in AutoCAD
- Select the Block option
- Next, on the SuperHatch – Insert pop-up window, select the block you want to use as a hatch from the library
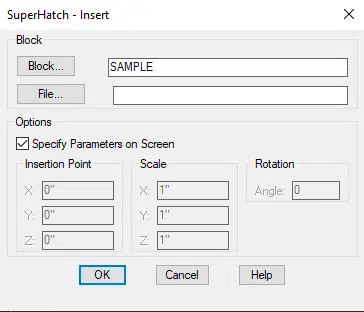
SuperHatch – Insert Pop-up Window in AutoCAD
- Click OK.
- Set the scale factor and the rotation angle and hit Enter
The scale factor depends on the size of the block relative to the size of the enclosed area - Set the opposite ends of the block, which sets the extent of the custom AutoCAD hatch pattern.
Hit enter to complete this step. AutoCAD will ask you to confirm - Specify the enclosed area you want to add the custom AutoCAD hatch pattern by clicking any point within this area and pressing enter.
- AutoCAD automatically adds the pattern
The SuperHatch approach, however, has a few downsides. First, the custom pattern cannot be transferred to another AutoCAD file. Secondly, the custom pattern cannot be modified or edited. To solve this problem, you can simply import a pattern (.PAT) file that contains a custom hatch pattern created using third-party software such as Notepad.
How to Import Custom Hatch Patterns in AutoCAD
Do note that you must first create the pattern using third-party software and save it as a .PAT file before importing it. Here, we are assuming that you already have a PAT file. If not, you can check out this tutorial on how to create a .PAT file using Notepad. Alternatively, you can download the .PAT files from websites, but keep in mind that some sites may contain malicious content.
To import custom AutoCAD hatch patterns, follow the procedure below:
- Add a new Support File Search Path
To do this, right-click any open area within the AutoCAD model space and select Options. Next, click on the Files tab and select + button beside the Support File Search Path option. This option allows you to specify the folders in which AutoCAD should look for the custom hatch pattern. Next, click on Browse. Then, on the Browse for Folder pop-up window, scroll to the folder with the .PAT files and then click OK, and, finally, Add.
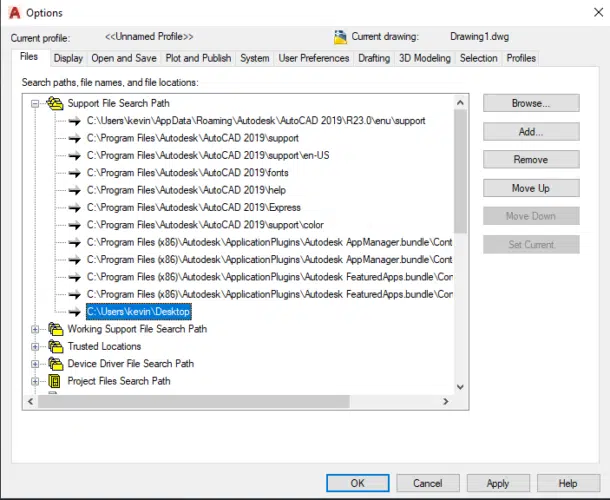
Options Pop-up Window in AutoCAD
- On the Options window, click Apply and then click OK.
This step ensures that AutoCAD now recognizes the directory path defining the location of the .PAT file and can, therefore, read it. - Add custom hatch patterns contained in the PAT files
To do this, follow the first two steps outlined in the How to Add Preloaded Hatch Patterns in AutoCAD section above. Next, hit the drop-down arrow. Then, scroll to the name of the custom hatch pattern you want to add. Finally, click the custom AutoCAD hatch pattern. AutoCAD will automatically use this pattern to fill the enclosed area.
To edit the custom hatch pattern added via the PAT-files approach, refer to the section entitled How to Edit Hatch Patterns in AutoCAD above.
However, at times, the custom hatch patterns may not show up as part of the patterns in AutoCAD. This could be due to a number of reasons, including the fact that the .PAT files are stored in the cloud, or the directory path is locked, not recognized as a support path by AutoCAD, or given a different name post-addition. Alternatively, the .PAT files may have formatting or syntax issues or feature poorly defined patterns. Fortunately, you can get around these problems by testing various .PAT files, checking the pattern definitions and formatting, unblocking the .PAT files, or ensuring you use the correct paths.
Conclusion
The HATCH command is a handy drawing tool. It enables you to visually represent the materials you wish to use in a building, part, or assembly. In addition, it allows readers to easily establish whether a particular drawing represents a section or orthographic view. There are numerous preloaded AutoCAD hatch patterns. But did you know that you can create and import custom hatch patterns into AutoCAD? In this article, we have detailed how you can do this, and we hope you are more informed on how to use either the preloaded or custom hatch patterns in your AutoCAD drawing.
