
In practice, drawings are created and then checked for errors and mistakes. And once the errors have been corrected, the drawing is approved. This is why the title block often features the following separate terms: ‘drawn by,’ ‘checked by,’ and ‘approved by.’ Ordinarily, as a professional designer, architect, engineer, product designer, or fabricator, you will often have to create, edit, or approve large drawings. In such instances, a tool that lets you highlight the areas of the drawings that feature inconsistencies and errors comes in handy. In AutoCAD, this tool is known as the Revision Cloud.
This article will discuss how revision clouds are used as well as how to create and edit these clouds. We will also explore the various types of revision clouds you can use and the changes that Autodesk, the developer of AutoCAD, has introduced over the years for this vital tool.
Table of Contents
What is an AutoCAD Revision Cloud?
An AutoCAD revision cloud is a cloud-shaped object made up of a collection of conjoined arc segments. It is used to call attention to sections of a drawing, thereby aiding in revision, review, or markup. Therefore, it enables you to easily highlight the changes that have already been made to a drawing during the revision stage. It also allows you to highlight sections within which changes should be made.
History of AutoCAD Revision Cloud
By some accounts, the AutoCAD revision cloud was originally introduced as a bonus tool as part of AutoCAD Release 14 in 1997. At that time, however, it was simply known as the Cloud tool. The developers, however, improved on it, officially introducing the Revision Cloud via the Express Tools. Further polishing and development led to the launch of the standalone RevCloud command that enabled AutoCAD LT users, who typically do not have access to Express tools, to use it. In addition to making the tool universal, the polishing and additional development throughout AutoCAD’s storied history improved the capabilities of the revision cloud.
Improvements to AutoCAD Revision Cloud
At first, the command was difficult to use and control as it created an object with grips on every intersection (vertex). This made it difficult to edit the entire object because holding and moving one of the grips only edited one polyline rather than the entire cloud. But this eventually changed. Presently, the RevCloud command draws symmetrical objects that feature easy-to-use grips. This means that you can easily edit these objects.
Still, Autodesk developers have continually improved the tool, with AutoCAD 2021 introducing a way to set the arc length. Previously, it was impossible to set this length, which was even worse when using the drawing tools on the Draw panel. It meant that, in some cases, the arcs of the revision cloud were not clearly visible, especially when zoomed out, and appeared to have thick lines.
To edit the arc length in previous versions of AutoCAD, you had to specify the arc length using the command line. You first had to type REVCLOUD into the command line, and press Enter > type the letter A, which represents the arc length command > specify the minimum arc length > specify the maximum arc length. As you can tell, this was a tad cumbersome.
Fortunately, AutoCAD 2021 changed this. When creating a revision cloud for the first time, AutoCAD now automatically sets the arc length as a percentage of the diagonal length of the current view. This means that the cloud will always be visible regardless of the display size or the magnification level. Additionally, AutoCAD 2021 made it easy for users to set the arc length by including this option in the RevCloud properties dialog panel.
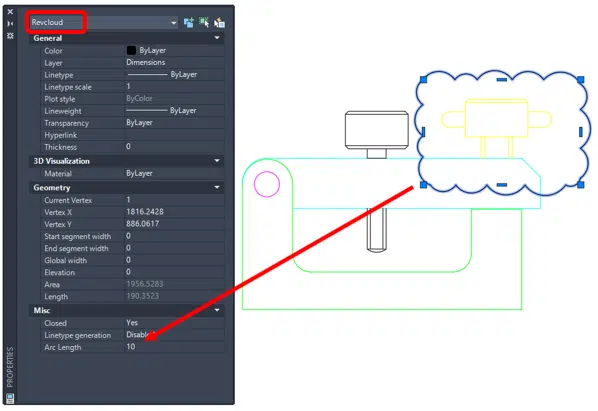
RevCloud Properties Dialog Panel (source)
Types of Revision Clouds in AutoCAD
There are four types of revision clouds:
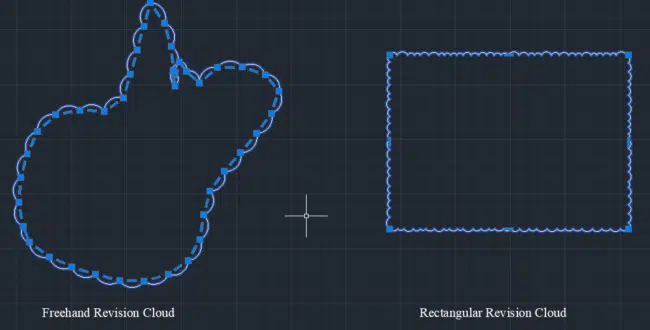
1. Rectangular Revision Clouds
The rectangular revision cloud creates a four-sided cloud. To create this revision cloud in AutoCAD, you must specify the opposite corners of the rectangle. Alternatively, as detailed below, you can create a rectangular cloud from an existing rectangle.
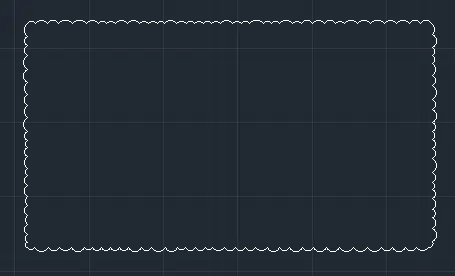
Rectangular Revision Cloud in AutoCAD
2. Polygonal Revision Clouds
The polygonal revision cloud has an unspecified number of sides. This means you can create a cloud that is shaped like a triangle, pentagon, hexagon, octagon, and so on.
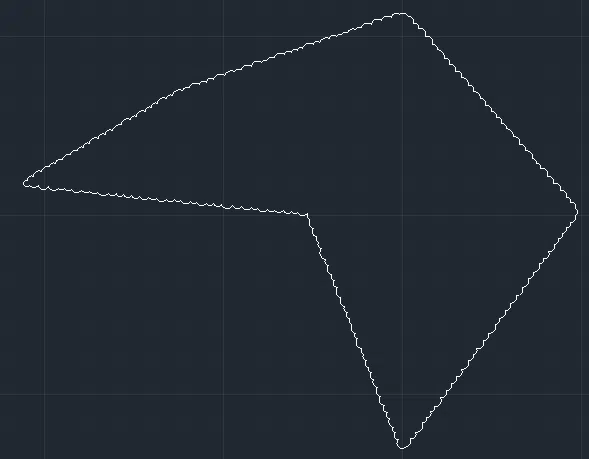
Polygonal Revision Cloud in AutoCAD
3. Freehand Revision Clouds
A freehand revision cloud is irregularly shaped. It is created by moving the mouse, with the mouse movement defining the shape of this cloud. To finish drawing the freehand revision cloud, simply press Enter. Do note that the freehand cloud doesn’t have to be enclosed.
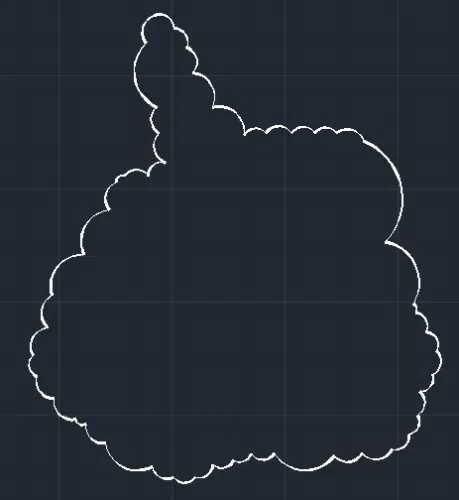
Freehand Revision Cloud in AutoCAD
However, the freehand revision cloud has a downside. While the other aforementioned types of AutoCAD revision clouds create a limited number of grips that ease the editing process, the freehand cloud creates an unlimited number of grips, as shown below. This makes it difficult to edit, as you have to move each grip to change the size of them.
Grips in Different Revision Clouds
4. Object-Defined Revision Clouds
An object-defined revision cloud is created by converting any object, such as a circle, square, or spline, into a cloud. We have discussed below how to create the object-defined revision cloud.
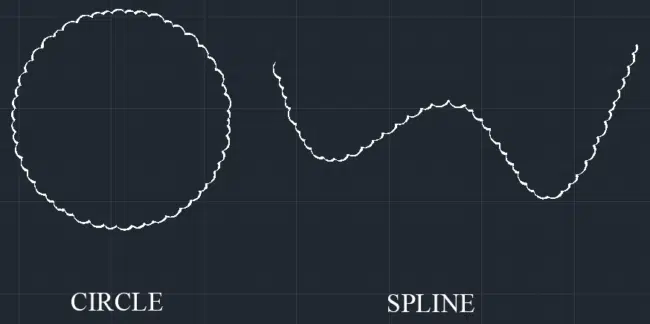
Object-Defined Revision Clouds in AutoCAD
How to Create Revision Clouds in AutoCAD
This section will discuss how to create each of the four types of AutoCAD revision clouds. Let’s dive in.
How to Create Rectangular Revision Clouds in AutoCAD
To create rectangular revision clouds in AutoCAD using the drawing tools on the Draw panel, follow the procedure below:
- On the Home ribbon tab, head over to the Draw ribbon panel and click on the drop-down arrow to display the other drawing tools
- Click on the Revision Cloud drop-down icon and select the Rectangular option
- Specify the first corner of the rectangular cloud by clicking a specific point on the screen
- Next, drag your mouse to define the length of the rectangular revision cloud’s diagonal dimension
- Specify the other opposite corner of the cloud if and when you are satisfied with the size based on step 4
Alternatively, you can create the rectangular revision cloud using the command line:
- Type REVCLOUD on the command line and hit Enter
- Type the letter R, which represents the rectangular revision cloud, and press Enter
- Specify the first corner of the rectangular cloud by clicking a specific point on the screen
- Next, drag your mouse to define the length of the rectangular cloud’s diagonal dimension
- Specify the other opposite corner of the revision cloud if and when you are satisfied with the size based on step 4
How to Create Polygonal Revision Clouds in AutoCAD
To create a polygonal revision cloud in AutoCAD using the drawing tools in the Draw panel, follow the steps below:
- Click the arrow button on the Draw ribbon panel in the Home ribbon tab to display the additional drawing tools
- Click on the Revision Cloud drop-down icon and select the Polygonal option
- Specify the first vertex of the polygon by clicking a specific part on the model space
- Specify the location of the additional vertices by clicking on different parts of the model space
- Enclose the polygon by clicking the first vertex you specified in step 3
Like the rectangular revision cloud, you can create a polygonal cloud using the command line. To do this, simply follow the procedure below:
- Type REVCLOUD on the command line and hit Enter
- Type the letter P, which represents the polygonal revision cloud, and press Enter
- Specify the first vertex of the polygon by clicking a specific part on the model space
- Specify the location of the additional vertices by clicking on different parts of the model space
- Enclose the polygon by clicking the first vertex you specified in step 3
How to Create Freehand Revision Clouds in AutoCAD
To create a freehand revision cloud using the drawing tools in the Draw panel, use the procedure below:
- Click the arrow button on the Draw ribbon panel in the Home ribbon tab to display the additional drawing tools
- Click on the Revision Cloud drop-down icon and select Freehand
- Specify the first point of the freehand revision cloud
- Guide the crosshairs along a path of your choice by moving the mouse cursor
- Press Enter to stop drawing the freehand revision cloud
The freehand cloud does not have to be enclosed - If you want to close the freehand revision cloud, return the cursor to the starting point
To create a freehand revision cloud using the command line, follow these steps:
- Type REVCLOUD on the command line and hit Enter
- Type the letter F, which represents the freehand revision cloud, and press Enter
- Specify the first point of the freehand revision cloud
- Guide the crosshairs along a path of your choice by moving the mouse cursor
- Press Enter to stop drawing the freehand revision cloud
The freehand revision cloud does not have to be enclosed - If you want to close the freehand revision cloud, return the cursor to the starting point
How to Create Object-Defined Revision Clouds in AutoCAD
To create a revision cloud from an existing object, follow the steps below:
- Create an object using any of the drawing tools on the Draw panel
You can use the line, spline, arc, ellipse, or polyline tools. However, note that the object you draw does not have to be enclosed. - Type REVCLOUD on the command line and hit Enter
- Type the letter O, which represents the object-defined revision cloud, and press Enter
- Select the object you want to convert to a revision cloud
- Specify whether or not you want to reverse the direction of the arcs by selecting either Yes or No
How to Edit Revision Clouds in AutoCAD
You can edit the revision clouds by stretching the sides or vertices and moving the clouds. Alternatively, you can redraw segments of this cloud. Here’s how to edit the existing revision clouds in AutoCAD:
To stretch the AutoCAD revision cloud, follow the steps below:
- Click on the cloud you want to edit to highlight it
- Hover your mouse cursor above any of the grips. If the grip is located at a vertex, you will observe the following options: Stretch Vertex, Add Vertex, and Remove Vertex. Likewise, if the grip is located along a particular side, you will observe two main options: Stretch and Add Vertex.
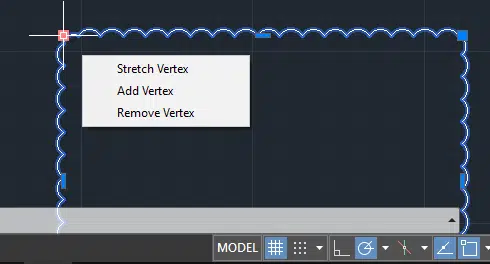
Revision Cloud Editing Options in AutoCAD
- To stretch the vertex, simply select the Stretch Vertex option and specify the location of the new vertex
- To add an extra vertex, select the Add Vertex option and specify the location of the new vertex
- To stretch the side, select the Stretch option and move the mouse either outward or inward to increase or reduce the size of the AutoCAD revision cloud, respectively
To modify the revision cloud by redrawing parts of it, follow the procedure below:
- Type REVCLOUD on the command line and hit Enter
- Type the letter M, which represents the word modify, and press Enter
- Select the revision cloud or polyline you want to modify and press EnterBe careful where you place your mouse while selecting the cloud, as this point acts as the first point of a cloud you will be redrawing.
- Specify the next points/vertices
- Enclose the redrawn point cloud by clicking one of the sides of the old revision cloud
- Pick a side to erase (as shown in the image below)
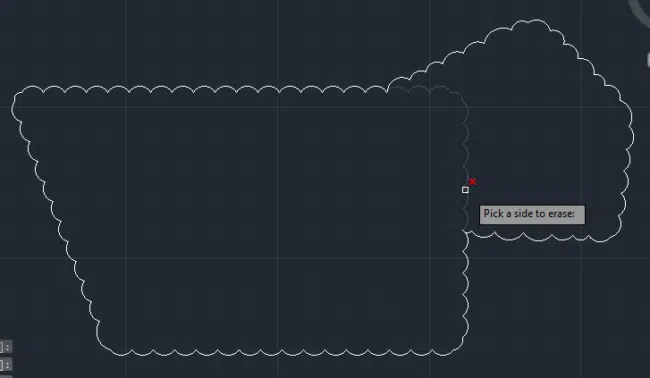
Modify Revision Cloud in AutoCAD
- Specify whether or not you want to reverse the direction of the arcs
Press Enter if you do not want to reverse the direction, or select Yes if you want to reverse the direction.
As we have highlighted above, the rectangular and polygonal revision clouds have fewer grips than the freehand cloud. But in some instances, you may want to edit individual arc and chord lengths of a revision cloud. So, how do you go about this? The answer lies in the use of the REVCLOUDGRIPS command. To modify the lengths of individual arcs in a revision cloud by adding individual grips, follow this procedure:
- Type REVCLOUDGRIPS at the command line and press Enter
- Type 0 or OFF to display a grip for each arc segment. If you want to reduce the number of grips, type 1 or ON
- Select the cloud you want to edit.
If it is a rectangular or polygonal revision cloud, you will notice that AutoCAD has introduced grips for each segment - Move the grips along any desired path to modify the length of the arc or chord
Conclusion
The AutoCAD revision cloud is a handy tool during revision or review. It enables engineers, architects, and designers to highlight sections that need to be changed or parts in which changes have been made. This, therefore, calls the attention of the reviewers to these specific sections, easing the review process. In this article, we have detailed the various types of AutoCAD revision clouds as well as how to create and edit these clouds in AutoCAD.
