
If you are an AutoCAD user, there is a high likelihood that you have come across the term viewports. This could be while watching video tutorials or reading through the release notes that accompany a new version of AutoCAD. You may have even seen the word within the software’s interface. While you may have encountered the term AutoCAD viewport in multiple ways, the meaning may not be clearly defined from the onset. In this article, we will explain what viewports are, the types of viewports, how to create a viewport in AutoCAD, how to modify the properties of viewports, and more.
Table of Contents
When was AutoCAD Viewport Introduced?
Throughout AutoCAD’s now 40 years’ history, its developer, Autodesk, has progressively added new features packaged as new versions, with newer features building on the capabilities brought by the features that came before them.
In 1984, as part of AutoCAD Version 2.0 (Release 5), for example, Autodesk introduced a new command called VIEW, whose use enabled the creation of named views. However, it was not until October 1988 that Autodesk included the VIEWPORTS (VPORTS), REGENALL, and REDRAWALL with the launch of AutoCAD Release 10. The VPORTS command enabled users to create and control multiple viewports. REDRAWALL refreshes the display of all viewports, while REGENALL regenerates all models in the viewports. Based on the release notes, the first iteration of AutoCAD Viewport was released in 1988.
Since then, the command and the associated viewports feature have been progressively improved. For instance, AutoCAD Release 11, released in October 1990, revamped viewports by introducing a system variable known as TILEMODE. Used to enable paper space, TILEMODE helped modify the meaning of Viewports.
TILEMODE specifically achieved this by ensuring that Viewports now displayed the objects contained in the model space rather than being simple partitions of the display graphics area. (A model space refers to the limitless drawing area on AutoCAD.)
In addition, as part of Release 11, users could now include multiple views of a model in a single plot or paper space, complete with title blocks, annotation text, and so on. This version also boasted Viewport-specific layer visibility. In this regard, modern-day AutoCAD viewports – as we know them today – were first introduced in October 1990. Against this backdrop, what is a Viewport?
What is AutoCAD Viewport?
Prior to 1990, an AutoCAD Viewport was simply a partition of the display graphics area. It did not show what was contained in the model space. But following the launch of Release 11, Viewports took on a new meaning.
So, currently, an AutoCAD Viewport displays different scaled views or sections of a 2D drawing or 3D model. This feature is specifically designed to help you reduce the time you would ordinarily need to pan or zoom in on a single view, especially when working with complex or large drawings. This is because you can set multiple zoomed-in views of different parts of the drawing or model, which you can then switch between easily and quickly, with the main view remaining unchanged. This way, AutoCAD viewport enables you to easily identify errors you would have otherwise missed if you were looking at the entire drawing.
Benefits of AutoCAD Viewport
As you may have already established from the section above, the AutoCAD Viewport feature offers numerous benefits. These include:
- It eliminates the need to pan or zoom into particular sections every time you want to assess the minute details, thereby saving time
- AutoCAD Viewport makes it easy to spot errors you would have otherwise missed
- This feature eliminates the need to draw the various orthogonal projections of a 3D object for each of the six main viewing angles
Types of AutoCAD Viewports

AutoCAD User Interface
There are two types of AutoCAD Viewports:
- Model Space viewport
- Layout viewport
1. Model Space Viewports
Before defining what a model space viewport is, let’s first discuss what a model space is. When you first launch AutoCAD and subsequently hit ‘New Drawing,’ the software opens a drawing area containing gridlines, which is located in the Model tab. This drawing area is limitless in that it covers somewhat of an infinite area and can be zoomed in or out endlessly. It is this drawing area that is known as a model space.
The model space lets you draw any 2D drawing or 3D model you desire. But first, you must define the unit you want to use – whether millimeters, centimeters, inches, or feet. Here, one drawing unit represents one millimeter, one centimeter, one inch, and so on. Simply put, the scale is always 1:1.
By default, the model space usually has a single drawing area known as a model space viewport. This viewport generally enables you to view your drawing. Depending on the complexity of the drawing, however, you can split the drawing area into more than one drawing area using one of the two procedures detailed below.
When dealing with multiple model space viewports, AutoCAD highlights the one on which you are working – the current viewport – using a blue border. Do note that some commands like zooming and panning only apply to the current viewport. However, if you add a geometric object or dimension, this change will apply to all viewports. This means you can begin a command in one viewport and complete it in another.
How to Create a Model Space Viewport in AutoCAD
There are two methods you can deploy to create a model space viewport. These include:
- Using VPORTS command
- Using Viewport Controls button, which is denoted by a minus sign encased in box brackets [-] on the top left section of the model
To create a model space viewport using the VPORTS command, simply follow the procedure below
- On the command line, type VPORTS and hit enter
- Select the number and configuration of viewports you want to add on the Viewports pop-up window
Here you can add up to four viewports, with the option to decide the location of the viewports relative to each other - Click OK
To create a model space viewport using the Viewports Control button, follow these steps:
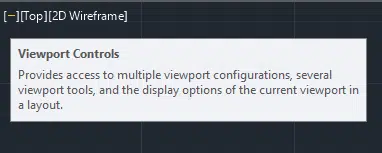
- Click the Viewports Control button
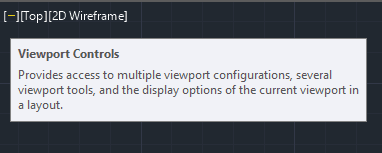
Viewport Controls Button in AutoCAD
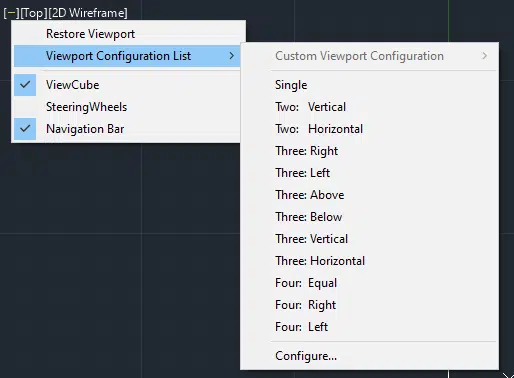
- Select the Viewport Configuration List option on the resultant dropdown menu
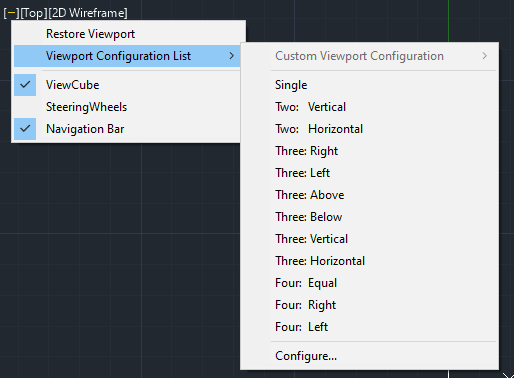
Viewport Configuration List in AutoCAD
- Choose the configuration you want to choose from the list displayed
The model space will automatically refresh to include the new configuration
2. Layout Viewports
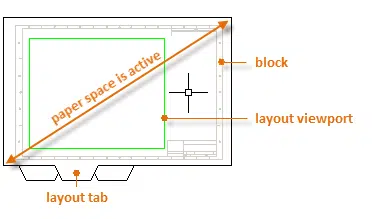
The layout viewport is to paper space what model space viewport is to model space. This means a layout viewport can only be accessed when you are on the paper space (in the layout tab). The layout viewport allows you to scale the model space views based on the paper space.
Layout Viewport in AutoCAD (source)
Unlike the model space, which is limitless and enables you to draw using the 1:1 scale, the paper space is limited based on the paper size you select in the page setup manager. The paper space allows you to include the title block and notes. Additionally, it lets you specify the extent of the layout viewport. And based on the available area, you can include multiple layout viewports within the area shown in green in the image. The viewports can be fashioned from regular shapes such as rectangles or irregular shapes. You can also create a layout viewport from an existing object, as detailed in the procedure below.
By creating multiple layout viewports in the paper space, you can include as many views of the 2D drawing or 3D model as possible. Do note, however, that because the paper space is meant to aid in plotting or printing, you should define the scale of each view. Always keep in mind that the scale in the layout viewports is based on the paper size and level of magnification.
How to Create a Layout Viewport in AutoCAD
There are two approaches you can use to create a layout viewport, namely:
- Using VPORTS command
- Using creation tools on the Layout contextual tab
To create a layout viewport using the VPORTS command, follow the procedure below:
- Click on the layout tab
- On the command line, type VPORTS and hit enter
This opens the Viewports pop-up window, which shows that the paper space supports fewer viewports than the model space. - Select the number and configuration of viewports you desire and click OK
- Specify the extent of the paper space
AutoCAD lets you do this by clicking the first corner and drugging the mouse to the opposite corner. Upon specifying the extent, AutoCAD automatically separates the area based on the number of viewports selected.
To create a layout viewport using the tools on the Layout contextual tab, follow this procedure:
- Click on the layout tabs to move from the model space to the paper space
Alternatively, you can create a new layout by clicking the plus (+) button to the left of the status bar. This second approach enables you to choose the paper size as well as define the plot area, given that you can access the Page Setup Manager.
Toggling the layout tab on creates a new contextual tab atop the software interface. - Tap the Layout ribbon tab on the ribbon bar
This tab contains several ribbons, including Layout, Layout Viewports, Create View, Modify View, Update, and Style and Standards.

Layout Contextual Ribbon and Panels in AutoCAD
- Select the Rectangular, Polygonal, or Object button on the Layout Viewports ribbon panel
The title of the button will depend on whether you will have selected one of these options before. The Rectangular option allows you to create a rectangular viewport, while the polygonal option lets you create a regularly-shaped or irregularly-shaped viewport. Lastly, the Object option enables you to create a viewport from any objects in your drawing. With this last option, you can create a fancy viewport like the one shown.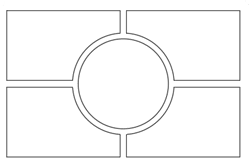
Fancy Layout Viewport in AutoCAD (source)
- Define the size of the viewport by clicking the opposite corners of the rectangle, drawing the polygon, or selecting a pre-existing object.
Once you have defined the size, AutoCAD will automatically create the viewport. Do note that you can rotate the rectangular or polygonal viewport as detailed below.


Always ensure that you have a dedicated layer for the viewports. This is because AutoCAD associates the viewport with the current layer of the drawing. And because you do not want the boundary of the viewport to be printed or plotted – as the viewport should essentially be on a transparent layer – it is important to keep a keen eye every time you create a viewport. To change or assign a viewport:
- Click on the viewport in the paper space to highlight it
- Head over to the click the Home ribbon
- Select the viewport layer on the layers dropdown menu in the Layers panel
How to Rotate a Viewport in AutoCAD
AutoCAD allows you to rotate the rectangular or polygonal viewport. Doing so changes not only the orientation of the viewport but also the drawing displayed therein. To rotate the viewport:
- Click on the rectangular or polygonal viewport to select it
- Hit the right mouse button
- Select the Rotate option on the menu that pops up
- Specify the base point that will act as the center of the rotation
- Next, you can either specify the rotation angle in the command line or manually rotate the viewport.
- Hit Enter to end the rotate command
How to Lock a Layout Viewport in AutoCAD
As detailed above, the scale of the layout viewport is based on the paper size and level of magnification. This means that you have to scale the model space views based on the size of the sheet of paper you will have selected in the page setup manager – one unit in the paper space is equal to the actual distance, in millimeters or inches, on the paper. AutoCAD automatically adjusts the scale of the drawing based on the size of the viewport. The software also adjusts the scale if you zoom in or out. This is why it is important to lock the viewport, as detailed below.
However, if you are not careful, it is easy to change the scale you had set earlier, even by accident. For instance, the scale will automatically change if you accidentally click a particular layout viewport and scroll the mouse wheel. This shows the importance of locking the viewport. Locking the layout viewport ensures that you cannot zoom in or out of the model space in the layout tab. Instead, zooming in or out simply changes the level of magnification of the entire paper rather than the drawing.
There are two ways you can lock the viewport, both of which only work when you are in the layout tab:
- The status bar approach
- The Layout-Viewports-ribbon-panel approach
To lock the viewport using the status bar approach, follow the procedure below:
- Ensure you are on the layout tab
- On the status bar, click the button labeled PAPER
Hitting this button lets you view the model space via the different viewports on the paper space. To verify that you are in the model space, the PAPER icon will change to MODEL.
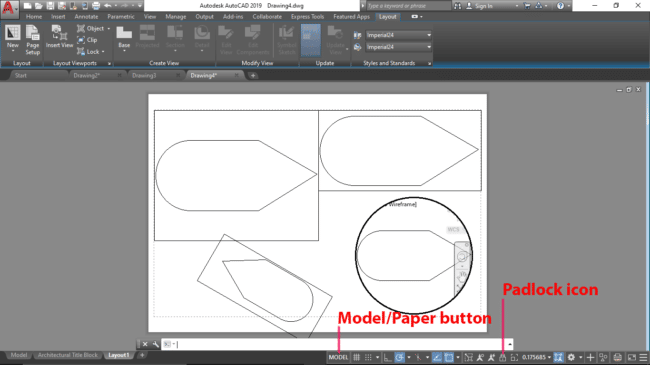
AutoCAD Paper Space with Multiple Layout Viewports
- Click on the padlock icon on the status bar
If the viewport is locked, the padlock will have a blue background. But if it is unlocked, the padlock will have a transparent background.

To lock the viewport using the Layout Viewports ribbon panel approach, use the following procedure:
- Ensure you are on the layout tab
- Click on the Layout ribbon and head over to the Layout Viewports ribbon panel
- Select the Lock or Unlock button
Like all other AutoCAD operations, the software will either display Lock or Unlock depending on whether you have previously selected one of these options before. - To lock the viewport, simply hit Lock
Conclusion
AutoCAD viewports are essential when drawing an object or planning how to print or plot it. In this comprehensive guide to viewports in AutoCAD, we have highlighted what an AutoCAD viewport is, the two main types of them and how to create or modify viewports.
