
If you have ever worked with a PDF of a drawing scanned from a physical print, you will agree with me on several things, more like problems or limitations. And to solve them, you have to convert an image to lines for AutoCAD using Scan2CAD, a leading conversion software. But first, let’s discuss the limitations.
Table of Contents
Common Limitations of Scanned Raster Images
First, you cannot use AutoCAD’s PDF Import feature that would ordinarily let you convert a vector PDF to DWG. This is because the tool does not work with raster PDFs. Secondly, online conversion tools will let you down. Like AutoCAD, most of these tools cannot convert drawings stored in raster PDFs to vector formats.
Thirdly, the scanned image is made up of pixels. In fact, you can confirm this by zooming into a particular section. As you will notice, the quality of the image will reduce drastically the more you magnify the drawing. Fourthly, raster images contain block versions of drawings. In contrast, vector drawings such as those created using AutoCAD are made up of constituent lines with snappable endpoints – of course, this is the case unless you opt to create a block. This fourth problem means that you cannot delete, move, shorten or lengthen existing objects and neither can you add new objects.
Fortunately, with Scan2CAD, you can convert an image to lines for AutoCAD in such a way that you can individually select every line. What’s more, Scan2CAD automatically does what you would have manually done had you opted to use AutoCAD’s Overlay function. Simply put, Scan2CAD supports automatic tracing while AutoCAD supports manual tracing.
Tracing in Computer-Aided Design
Also known as vectorization, tracing or image tracing refers to the process of converting a raster image to a vector image. At its core, it entails creating vector lines atop the outline of the raster drawing. Notably, the conversion process (tracing) can be accomplished in two ways:
- Manual tracing
- Automatic tracing
Manual Tracing
Manual tracing entails using a mouse or graphics pen to create a new vector drawing. This approach mainly relies on the raster image’s outline as a guide while drawing the vector version. However, this process is quite time-consuming, and the arduousness in fact increases with the complexity of the drawing. This is because you have to individually create every aspect of the drawing using the available tools.
As stated, AutoCAD’s Overlay function, which lets you create a vector version of an existing raster drawing, involves manually tracing over the outline. To use it, you have to define the scale of the image. This means that if this information is not readily available, you might end up creating an overlay that isn’t to scale.
Additionally, manual tracing does not convert text-based objects. For this, you have to manually insert text boxes and then type the text. Put together, these processes consume too much unnecessary time. With automatic tracing, however, you can conveniently avoid these problems.
Automatic Tracing
While manual tracing is considered arduous and time-consuming, automatic tracing is the opposite. It saves on time and is substantially simpler. It is worth noting that, unlike manual tracing, which is done by hand, automatic tracing is completed using conversion software such as Scan2CAD.
The software identifies the outline of the drawing stored in the raster image. Next, it draws new vector objects such as lines, curves, and more arcs atop this outline, creating a vector version of the drawing. Notably, the software draws the geometric objects precisely as they appear on the original drawing. For instance, if the raster image had dotted or hatched lines, the software will trace each of them accordingly. Finally, the software saves the converted file using vector formats such as DXF or DWG.
It is noteworthy that some software applications are also equipped with a feature known as object character recognition(OCR) that enables them to detect and convert text-based objects as true-type text. Being one such program, Scan2CAD offers unmatched vectorization capabilities. It supports automatic tracing as well as text recognition and conversion. But as we have detailed below, these features are only the tip of the iceberg.
About Scan2CAD
Scan2CAD towers over other vectorization products. It delivers numerous capabilities that make it stand out in a world where service providers promise truckloads of features but only deliver a fraction of what they had pledged.
For instance, Scan2CAD can seamlessly convert raster images, whereas most online converters cannot. It also enables you to clean up the raster image before hitting the Convert button. This helps eliminate imperfections that would otherwise slow down the vectorization process. In addition, Scan2CAD lets you edit the converted drawing prior to saving it – online converters do not offer this functionality.
With Scan2CAD, there are no ifs, and, or buts. The software application delivers what we promise on our website, blogs, and YouTube channel. In addition, our developers consistently make improvements, releasing software updates that improve the user experience as well as introduce new features. But what are some of these capabilities? One of them is the ability to convert an image to lines for AutoCAD.
How to Convert a Raster Image to Lines for AutoCAD
As we hinted earlier, vector drawings are composed of constituent lines that can be independently deleted, moved, shortened, or lengthened. With raster images not enjoying this attribute, converting the image to lines for use on AutoCAD is essential. By importing the saved vector file into AutoCAD, you can edit the lines however you wish.
This section will focus on how you can convert a raster image to lines for AutoCAD using Scan2CAD. Let’s get into it.
Step-by-Step Guide
- Launch Scan2CAD and import the raster image you intend to convert to lines for AutoCAD.
- Click the Clean raster image button, which opens the Clean Raster Image window. If the original image is not black and white, tick the Threshold (Black & white) box – if it is already black and white, you will notice that Scan2CAD will have grayed out this section of the window. Next, under the Clean Image section, tick the Remove Speckles & Holes, Thicken Lines, or Smooth boxes accordingly, depending on the quality of the raster image. For instance, speckles and holes are common in cases where the raster image to be converted is created by scanning a physical copy of a printed drawing. A low resolution may introduce unwanted elements that can be removed by ticking the appropriate box on Scan2CAD. Next, click OK if you are satisfied with the outcome of the cleanup exercise.
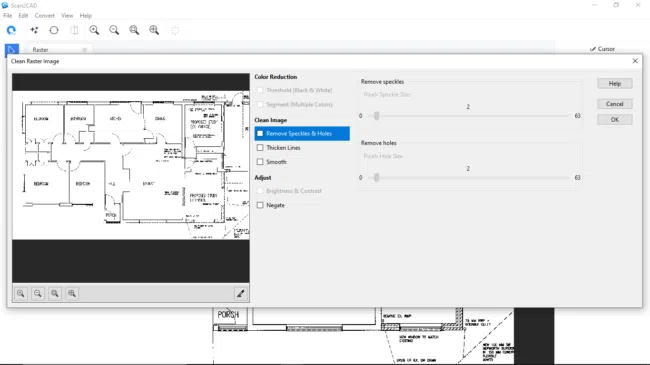
Clean Raster Image Window
3. Click the Convert raster image button, upon which the Convert Raster Image window pops up. Here, check the Vectorize and OCR option under the General tab if your drawing contains both text-based and geometric objects. Also, you can choose the Vectorization present depending on the type of drawing you are converting – for instance, select Architectural if you are working with a floorplan. Next, toggle the OCR tab, where you will then set the maximum character size of the drawing. Also, set the Character Rotation – if your drawing features vertical or angular text, check the vertical or angular boxes, respectively.
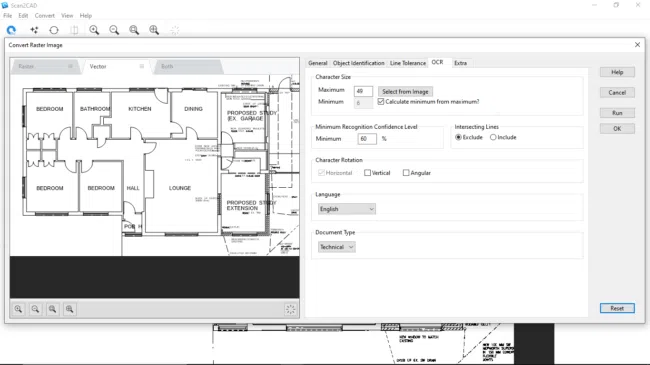
Convert Raster Image Window
4. Click on Run, prompting Scan2CAD to vectorize the raster image. This step creates a preview that lets you make the necessary edits to help improve the appearance of the converted drawing. If satisfied with the outcome, click OK.
5. Next, click Export to save the converted vector file. As you have converted the raster image to lines for AutoCAD, save the drawing as a DWG file, a proprietary file format that Autodesk created for AutoCAD. Click Save.
6. A window titled DXF/DWG Export Options pops up upon clicking Save. Do not make any changes to the default settings. However, pay attention to the AutoCAD Compatibility section, keeping in mind the background color on your software application. If your AutoCAD program has a dark background, check the Convert black vectors to white box. Otherwise, leave it unchecked. Finally, click OK.
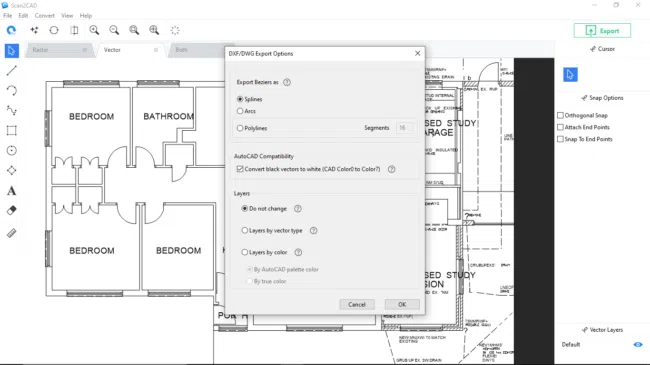
DXF/DWG Export Options Window
Video Tutorial: How to Convert an Image to Lines for AutoCAD
Parting Shot
With Scan2CAD, you can convert a raster image to lines for AutoCAD. In fact, this leading conversion software lets you clean up the image as well as customize the vectorization process. Together, these capabilities create a clean vector drawing that needs minimal to no edits when you finally open it using AutoCAD.
What’s more, you can enjoy Scan2CAD’s diverse features and tools for free for 14 days. To begin your free trial, click here.
