The world is home to over one billion active iPhones (as of 2021) and more than three billion active Android users (as of May 2021). For Matterport, a company that helps its clients to create 3D virtual twins of various types of spaces, this segment presented a growth opportunity. So, in late 2019, the company announced it would extend the number of devices that support its Matterport Capture app to include iPhones and Android phones; the Matterport Capture app was initially available only on iPads. With this move, the company aimed to achieve full Matterport camera and capture ubiquity, allowing it to provide a holistic digitization solution.
Years after the rollout of the application on both the Apple App Store (May 2020) and Google Play Store (April 2021 – although the Beta version was available as early as October 2020), the Matterport Capture app has garnered hundreds of thousands of downloads. And if you are among those who have downloaded the application but are unsure how to use it to scan 3D spaces, this Matterport capture basics article is meant for you. But first, what is Matterport Capture?
Table of Contents
About Matterport Capture
History of Matterport
Founded by Matt Bell and Dave Gausebeck in 2011, Matterport aimed to provide solutions for rapidly scanning spaces and objects, creating digitized 3D models. To achieve this vision, the company created and launched a 3D camera – invented by Matt – and an interactive viewing platform – Dave led the team that engineered this system, which supported hardware integration.
Matterport Capture
Over the years since, Matterport released new solutions and tools that helped improve the user experience. In 2014, for example, Matterport developed and launched the Matterport Capture app for the iPad in 2014 to help users capture and control the Matterport Pro1 3D camera. The app communicated with the camera’s firmware allowing users to execute various functionalities. The Matterport Capture app’s initial features included:
- Control the operation of the Matterport Pro1 3D camera
- View, move, or delete scans
- Upload the scans to Matterport Cloud for processing
- Add or edit mirrors, windows, or trim marking (discussed below)
- Label floors
- Automatic global alignment (Matterport assisted alignment)
The rollout of the Matterport Capture app 2.1 in 2015 brought a few additional features, including:
- Real-time diagnosis and suggestions: it analyzed the model identifying potential problems with the model before alerting the user on what corrective measures to take
- Marking tips and hints on how to add or edit mirrors, windows, and trim the area
- In-app user guide
Combined, the platform, Capture app, and camera have so far helped the company amass a Matterport library containing billions of individual data points and 3D images. In total, Matterport notes, the platform has captured over 15 billion square feet of spatial data. And it is this pool of vital spatial data that the company used to train its AI and machine learning (ML) technology named Cortex, which in turn powers the expanded functionality of the Matterport Capture platform.
These solutions have helped Matterport emerge as a leader in the virtual tours space, outpacing other Matterport alternative platforms or Matterport competitors.
What is Matterport Capture?
The current generation of smartphone cameras does not include 3D sensors. As such, smartphones usually take 2D (flat) photos, which do not contain depth information. This means that converting such flat images to 3D models would be impossible if not for the power offered by Cortex. With the training from billions of 3D images, this AI technology learned how to estimate, to a great degree of accuracy, the depth of specific sections of a 2D image.
In this regard, Matterport Capture is an application that converts two-dimensional smartphone and iPad cameras into 3D cameras using the Cortex engine. It also enables users to use these devices to control select 3D and 360º cameras. These include Matterport’s very own Pro1 and Pro2 3D cameras, as well as third-party cameras developed by Insta360, Leica, and Ricoh Theta. So, with all these capabilities, is the Matterport capture app free?
The Matterport Capture application is 100% free to all users. And, given that Matterport offers a free package as one of its pricing tiers, clients can use its software platform and mobile phone app for free. Still, you need to create a free account with Matterport. Moreover, the company offers additional features and privileges at a fee – here is a breakdown of Matterport pricing.
Matterport Capture Basics
Matterport Capture Basics: Supported Devices
Matterport recommends that the app be used on the following devices:
- iPhone devices: iPhone 6S or newer running iOS 14 or higher (iPhones with an ultra-wide-angle camera – iPhone 11 or newer – are preferred)
- iPad devices: iPad Pro (1st, 2nd, 3rd, or 4th generation), iPad (7th or 8th generation), iPad Air (2nd, 3rd, or 4th generation)
- Android devices: phones running Android 8.0 or higher with 3GB of RAM or more and a gyroscope (for the best results, Matterport recommends a recently launched high-end model with an ultra-wide camera)
Matterport Capture Basics: Getting Started
How do you use the Matterport Capture app? To get started, simply follow the steps below:
- First, create a Matterport account via the company’s website, although you can also create the account using the Matterport Capture app
- Secondly, head to App Store (for the Matterport iPhone and iPad versions) or Play Store (for the Matterport Android version)
- Next, type “Matterport Capture” on the search bar and click Install
- Sign in to your Matterport account before creating a scan. You can still scan your space without logging in. However, the app will prompt you to sign in to your account in order to upload the scan.
- Set up the application for the first scan – discussed below
- Scan your space (simple or complete scan) – discussed below
- Upload the scan to the Matterport Cloud for processing
Matterport Capture Basics: Setting up the Application for a Scan
- First, open the Matterport Capture app on your phone
- Use the Matterport login button to sign in to your account. Alternatively, you can wait until you have to upload the scan to the cloud. This is because you first have to log in to your account in order to upload the scan.
- Next, click the + button at the bottom section of the screen to create a new job; this opens a New Job window that displays the location information. The app automatically populates the location information for you. However, it also lets you edit this information according to your preferences.
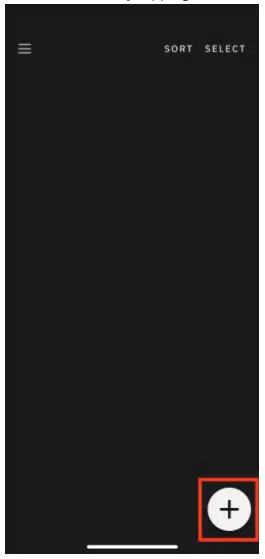
Matterport New Job Button (source)
- Click the Save button at the top-right section of the screen
- Next, tap the Options button on the left-hand side of the Capture button. This lets you choose between a Complete Scan and a Simple Scan (the differences are detailed below). You can also elect to capture a 3D scan or a 360º image on the Scan Options menu. To capture 3D scans, select the former option.

Matterport Scan Options (source)
- Finally, the Matterport Capture app lets you choose whether you want to use the phone camera or an external camera (3D or 360º camera). You can achieve this by tapping the Android Camera or iPhone button (above the Capture button). This step displays the Select Source menu, enabling you to choose which camera you wish to use. Then, simply tap the mobile phone option. Alternatively, you can tap the Connect External Camera button to connect to a 3D or 360º camera via Wi-Fi.
Matterport Capture Basics: Simple Scan vs. Complete Scan
As mentioned earlier, you have the liberty to choose between a Simple Scan of a Complete Scan. What does each entail?
- A Simple Scan lets the Capture app scan the section of the space directly in front of the camera – including the walls and the furniture in the room; this option blurs out the ceiling and floor area (this is because the simple scan uses one 360º rotation – a single horizontal ring)
- A Complete Scan, which uses two 360º rotations (vertical and horizontal rings), scans the walls and furniture as well as the floor and ceiling area
Matterport Capture Basics: Capturing Matterport 3D Scans
To capture a Matterport 3D scan using the Capture app, simply follow the steps below:
1. Click the Capture button

Matterport Capture Button (source)
2. The screen will display a series of spaced small circles. Each circle represents a specific section of the space whose scans you should take to create a 360º image. First, align the larger capture circle such that it encloses one of the small ones to begin the scan. Next, repeat this step for each of the remaining small circles to complete the 360º scan.
It is noteworthy that the small circles are only positioned horizontally in a simple scan. In this regard, you will have to make a single 360º rotation. On the other hand, Matterport Capture displays small circles along a horizontal and vertical axis. This means you have to make two 360º rotations.
- Next, the Matterport Capture app will process the image by stitching the various images.
- Move to a new scan location, five to eight feet away from your initial scan. Then, click the Capture button to begin a new scan. The app automatically aligns the various scans, provided the scan locations are spaced five to eight feet away.
- The app will create a 2D mini-map that displays the stitched scan, showing the various scan locations.
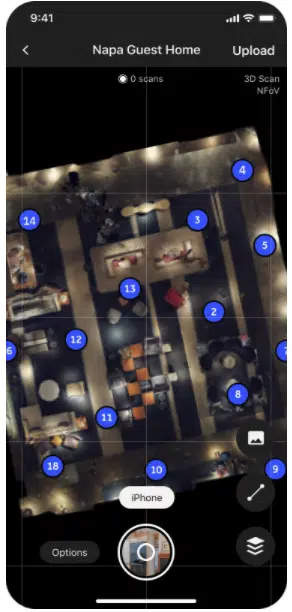
Matterport 2D Mini-Map (source)
- You can edit the mini-map by adding mirrors and windows. You can also use the trim marking feature, which enables you to specify the boundaries of a room.
- Upload the scan to the cloud. If you had not signed in to your Matterport account earlier, you should log in at this point.
- Use Matterport Workshop, an online toolbox, to edit and improve your scan. Here, you can add measurements, tags/labels (Matterport mattertags), and more.
Parting Shot
Matterport is a versatile platform. It enables users to capture Matterport 3D scans of various spaces that, when processed, create 3D virtual tours. The company offers integrated software and hardware solutions that, combined, offer a seamless user experience. The Matterport Capture application, for instance, is one of these solutions. Available on iPads, iPhones, and Android devices, the app enables users to capture 3D scans using their mobile phone cameras. And in this article detailing Matterport capture basics, we have tackled the application’s capabilities. We have also explored how to install and use it.
