
In Onshape, like in most CAD software, certain tasks require a lot of actions before they can be executed. If you want to draw a line, for example, you have to click on the sketch tab, click on Line, move your mouse to the drawing area, click on the drawing area, and drag the mouse cursor till you get the size you want. All to draw a line! While these may seem like very short processes, they are repeated numerous times during design. When added up, they account for a lot of design time, and time is very important to designers. Fortunately, many CAD software have keyboard shortcuts that enable you to execute various tasks at the touch of one or two keyboard keys. Onshape is not an exception. There are over 70 Onshape keyboard shortcuts for various tasks in this software. These shortcuts are one of the most efficient ways to hasten design in Onshape.
In this article, we will be going through the various Onshape keyboard shortcuts, how to activate them, and what tasks they execute. However, before we go into the shortcuts themselves, we must learn about the software and its capabilities. This will enable us to understand the importance and purpose of each shortcut.
Table of Contents
About Onshape
Onshape is a CAD software platform that is dedicated to product design processes. This software primarily focuses on MCAD, (Mechanical Computer-aided Design) for industries that manufacture mechanical components, consumer electronics, carry out 3D printing, and many more
One of the things that make Onshape stand out is the fact that it is one of the pioneer CAD packages that is delivered over the internet, via a SAAS ( software as a service). As a result of this, download and installation are not required as the software can be easily accessed and utilized through compatible web browsers on the Mac, Windows, IOS, and Android platforms. Also, maintenance and upgrades are not needed as updates to Onshape are immediately affected in the web interface. The software is available in English, Korean, and Chinese languages.
Onshape’s features can be classified into CAD, data management, collaboration, security and audit controls, analytics and reporting, and integration and partners.
Using Onshape’s CAD features, you can model standalone parts and also complex assemblies of several parts. Also, these features enable you to create 2D working drawings that are highly-detailed and contain annotations, dimensions, datum, tables, and part lists. Using these features, you can also import & export various industry file formats. Furthermore, the CAD features include intelligent custom features, configuration options, standard content libraries, and simultaneous sheet metal tools.
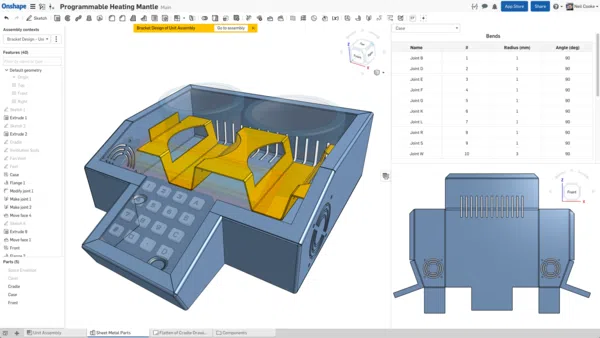
3D modeling in Onshape (Source)
Data management. The PDM (Product Data Management) features of Onshape ensure that you don’t require a standalone PDM system. These features enable you to carry out release management, advanced workflows, branching/merging, and version control. They also enable you to create and manage bills of materials while simultaneously working on an assembly in real-time. It’s crucial to get the data management part of the design process right in order to save time and effort.
Collaboration. With collaboration tools, multiple users can collaborate with the lead designer in real-time. These tools allow team members to review designs as they are created in real-time. Whether it is with customers, business associates, suppliers, design teams, you can share your project securely for live commenting and review. Also, You can assign tasks in the same project to different people. For even greater control you may limit access to only viewing, commenting, or editing models.
Security and audit controls. Few CAD platforms offer the level of security and audit control that Onshape does. First, all files are securely stored in the cloud. Also, with Onshape, you can prevent unauthorized access to your design, using role-based access controls, two-factor authentication, high-level AES-256 & TLS v 1.2 encryption, and comprehensive audit logs. Any alteration of your design is monitored and recorded for review, and, if the need arises, reversing.
Analytics and reporting. The analytics features enable you to properly monitor projects’ status with the activity overview, project, user, and release dashboards. These dashboards provide in-depth analysis and reports on projects, documents, and users. You also get news-feed-styled activity reports, as well as complete design history and changelogs
Integration and partners. Onshape recognizes its limitations in functionality and allows you to make up for them through integrations and partners. Using PLM (Product lifecycle Management), ERP (Enterprise Resource Planning), CAM, and simulation add-ons from the Onshape App Store, you can increase the functionality of Onshape. These add-ons are provided by Onshape integrated cloud partner apps and have unified purchase, licensing, and sign-on mechanisms. All Onshape partner apps do not require download, installation, or updates.
Onshape Keyboard shortcuts
Onshape has various keyboard shortcuts that make your work easier. To access a full list of these shortcuts in the user interface, click on the help (question mark “?”) icon in the top right corner of Onshape to drop down the help menu. Click on “Keyboard Shortcuts” and a separate window with a list of all keyboard shortcuts will be displayed. A faster way to access this list of Onshape keyboard shortcuts is via a keyboard shortcut! Simply type “Shift” + “?” on your keyboard. As at the time of writing this blog post, Onshape’s keyboard shortcuts cannot be customized. However, the company is working to make this possible.
To activate a shortcut, type the associated key(s) on the keyboard. When two keys are involved, hold down the first then press the second. The following tables contain the Onshape keyboard shortcuts, their titles, and the tasks they execute. For shortcuts involving two buttons in these tables, the buttons are separated by a “+”. Note also that some of these shortcuts are interface-sensitive. A keyboard shortcut that executes a particular action in the part creation interface may execute another in the assembly interface. Also, the same action may require different shortcuts depending on the interface you are in.

General
These shortcuts execute general actions such as undo, redo, and toggle command. They are not interface-sensitive and so they apply to all interfaces.
|
Key(s) |
Command |
Description |
|
Shift +? |
Keyboard shortcuts |
Opens a list of all Onshape keyboard shortcuts |
|
Ctrl + Z |
Undo |
Undoes the most recent action |
|
Ctrl + Y |
Redo |
Redoes a recently undone action |
|
Delete |
Delete selection |
Deletes the selected objects |
|
Space bar |
Clear selection |
Clears the selected object |
|
Esc |
Cancel command |
Cancels the activated command. |
|
Enter |
Accept command |
Confirms and applies the activated command |
|
Shift + Enter |
Accept and repeat a command |
Applies the activated command and reactivates it. |
|
S |
Shortcut toolbar |
Opens a menu of context-sensitive shortcuts |
|
Shift + Click |
Open in new window |
Opens a document in a new window |
|
Ctrl + Click |
Open in new tab |
Opens a document in a new tab |
|
Ctrl + U |
Feedback/Report a bug |
Reports an error alongside the appropriate feedback |
|
Alt + T |
Search tab |
Allows you to search for the desired tab among several open tabs |
Sketch
These shortcuts are for creating 2D sketches. All models and designs, no matter how complex, begin with sketches. The sketch shortcuts are usable only when sketching or creating a part.
|
Key(s) |
Command |
Description |
|
Shift |
Suppress inferencing |
Reduces the level of inferencing when |
|
L |
Line |
Activates the line command |
|
G |
Corner rectangle |
Activates the corner rectangle command |
|
R |
Center point rectangle |
Activates the center point rectangle command |
|
C |
Center point circle |
Activates the center point circle command |
|
A |
3 point arc |
Activates the 3 point arc command |
|
Shift + F |
Fillet |
Fillets the selected area |
|
M |
Trim |
Trims the selected area |
|
X |
Extend |
Activates the extend command |
|
O |
Offset |
Activates the offset command |
|
U |
Use |
Projects (or convert) a portion(s) of a part or sketch onto the active sketch plane. |
|
D |
Dimension |
Activates the dimension command |
|
I |
Coincident |
Makes a selection coincident to another |
|
B |
Parallel |
Makes a selection parallel to another |
|
T |
Tangent |
Makes a selection tangent to another |
|
H |
Horizontal |
Places a selection in the horizontal position |
|
V |
Vertical |
Places a selection in the vertical position |
|
E |
Equal |
Makes a selection equal in size to another |
|
Q |
Toggle construction |
Creates construction geometry |
Part studio
These shortcuts are only active in the Part Interface and are dedicated to Part creation. They are shortcuts to many of the clickable commands found in the Part creation interface.
|
Key(s) |
Command |
Description |
|
Shift + S |
Sketch |
Creates a sketch on an existing part |
|
Shift + E |
Extrude |
Extrudes a sketch or a section of a part |
|
Shift + F |
Fillet |
Fillets the selected portion of a part |
|
Ctrl + M |
Mate connector |
Activates the mate connector(s) of a part(s |
|
Shift |
Lock mate inference |
Stops further inference of already mated objects |
|
A |
Flip primary axis |
Flips the stipulated primary axis of a part |
|
Q |
Reorient secondary axis |
Reorients the secondary axis of a part |
|
K |
Hide/show mate connectors |
Display or hide mate connectors |
Assembly
These shortcuts are dedicated to assembly creation and work only in the Assembly interface
|
Key(s) |
Command |
Description |
|
Shift |
Lock mate inference |
Stops further inference of already mated objects |
|
Ctrl + C |
Copy |
Copies a selection/part |
|
Ctrl + V |
Paste |
Paste a copied selection/part |
|
M |
Mate |
Mates two or more parts |
|
Ctrl + M |
Mate connector |
Activates the mate connectors |
|
I |
Insert dialog |
Opens up the insert dialog |
|
Shift + S |
Snap mode |
Toggles snap mode on or off |
|
A |
Flip primary axis |
Flips the stipulated primary axis of an assembly |
|
Q |
Reorient secondary axis |
Reorients the secondary axis of an assembly |
|
J |
Hide/show mates |
Displays or hides mates in an assembly |
|
K |
Hide/show mate connectors |
Displays or hides mate connectors in an assembly |
Drawing
The drawing shortcuts help you create highly detailed working drawings with ease. These drawings are active in the Drawing interface
|
Key(s) |
Command |
Description |
|
Shift + Z |
Zoom in |
Zooms in the drawing on the screen |
|
Z |
Zoom out |
Zooms out the drawing on the screen |
|
F |
Zoom to fit |
Zooms the drawing to fit the screen |
|
W |
Zoom to window |
Zooms the drawing to fit the window |
|
P |
Projected view |
Displays the projected view of the drawing |
|
D |
Linear dimension |
Allows you to specify a linear dimension |
|
Shift + R |
Radial dimension |
Allows you to specify a radial dimension |
|
Shift + D |
Diameter dimension |
Allows you to specify diameter dimension |
|
Shift + Q |
Quad and Mid snap points |
Snaps to the mid and quad snap points of arcs and circles |
|
N |
Note |
Allows you to add a note to a drawing |
|
Ctrl + Q |
Update drawing |
Updates a drawing to reflect any modification made in its part or assembly file |
|
L |
Line |
Activates the line command in the Drawing interface |
|
Ctrl + S |
Display sheet menu |
Displays the sheet menu |
|
Pg dn |
Next sheet |
Opens the next sheet in a drawing document |
|
Pg up |
Previous sheet |
Returns to the previous sheet in a drawing document |
|
Home |
First sheet |
Opens the first sheet of a drawing document |
|
End |
Last sheet |
Opens the last sheet of a drawing document |
View
Like the general shortcuts, the View keyboard shortcuts are not interface-sensitive and are usable in all interfaces
|
Key(s) |
Command |
Description |
|
Shift + Z |
Zoom In |
Zooms in the object on the screen |
|
Z |
Zoom out |
Zooms out the object on the screen |
|
F |
Zoom to fit |
Zoom the object to fit the screen |
|
W |
Zoom to window |
Zoom the object to fit the window |
|
← → ↑ ↓ |
Rotate |
Rotate the object on the screen in the specified direction |
|
Shift + ← → ↑ ↓ |
Pan |
Pans the object on the screen in the specified directions |
|
Shift + 1 |
Front view |
Displays the front view of the object on the screen |
|
Shift + 2 |
Back view |
Displays the back view of the object on the screen |
|
Shift + 3 |
Left view |
Displays the left view of the object on the screen |
|
Shift + 4 |
Right view |
Displays the right view of the object on the screen |
|
Shift + 5 |
Top view |
Displays the top view of the object on the screen |
|
Shift + 6 |
Bottom view |
Displays the bottom view of the object on the screen |
|
Shift + 7 |
Isometric view |
Displays the isometric view of the object on the screen |
|
Shift + 8 |
Section view |
Displays the section view of the object on the screen |
|
N |
View normal to |
Displays the object on the screen, normal to a sketch plane |
|
P |
Hide/show planes |
Displays or hides the different drawing planes |
|
Y |
Hide selected part |
Hides a selected part |
|
Shift + Y |
Show selected part |
Displays a previously hidden part |
In conclusion
Onshape keyboard shortcuts are very efficient in speeding up design. There are not very much when compared to keyboard shortcuts of some other CAD software. For this reason, they are relatively easy to memorize. If you are not a fan of memorizing on the spot, you have nothing to worry about as you’ll surely memorize all of them as you continue to apply them. We have also created a PDF cheat sheet which you can save on your device or print out and hang somewhere visible
