SketchUp is a popular, versatile 3D modeling program that’s used around the world by students, hobbyists and professionals in a wide range of industries and sectors. Offering both a free and pro version to users, SketchUp can be used to create precise, to-scale 2D and 3D models for engineering, architecture and much more. If you’ve not had the chance to try it out before, you might struggle getting to grips with SketchUp basics.
To make things nice and simple for you, Scan2CAD has put together an essential guide to learning SketchUp basics in 1 hour. We’ll look at everything from SketchUp’s interface to its drawing and editing tools to additional resources and much more!
And don’t forget the keyboard shortcuts for SketchUp which can help you navigate the interface and features more fluidly.
SketchUp basics: orientation
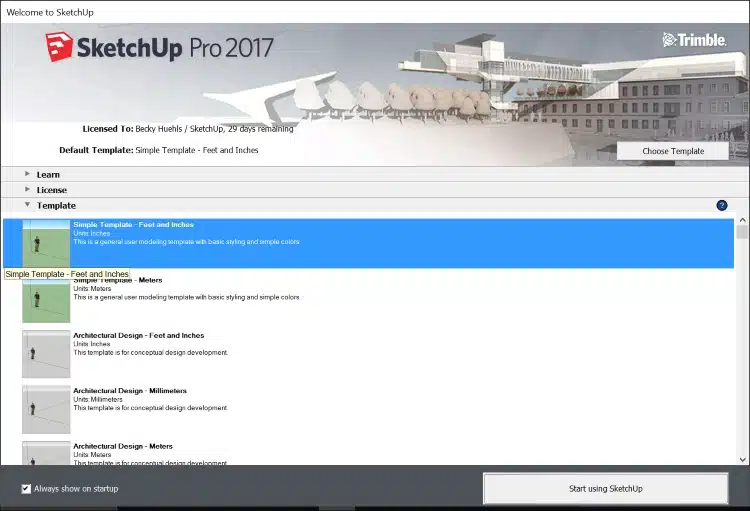
Image source: SketchUp Help
Whilst it might be incredibly tempting to just throw yourself into SketchUp straight away, you should first try to make sure you’ve gotten to grips with the basics. You can’t expect to become an expert in a software package if you’ve not got the basics sorted. After all, you won’t get far with creating a model if you don’t know where to find a specific tool or command! Fortunately, we’ve done most of the legwork for you—we’re going to take you through an overview of SketchUp’s interface. It should take you around 10-15 minutes to complete.
When you first open SketchUp, you’ll be met with the Welcome to SketchUp dialog box. There are three tabs: Learn, License and Template. Before you start, you should make sure you pick a template. This template will define aspects like unit of measurement and model background. As such, the template you choose will depend entirely on the type of model you’re creating. Take your time and select the option that’s best suited to your model. If you’re in a hurry to get started, you can opt for ‘Simple Template – Meters’. If you select ‘Always show on startup’, you can change the template whenever you open up SketchUp.
Once you’re happy, click ‘Start using SketchUp’ and you’ll be almost ready to start modeling!
Menus
SketchUp, like many other software packages, comes with plenty of menus and toolbars for you to sink your teeth into. For starters, you’ll undoubtedly recognize the menu bar at the top of the page, with standard Windows controls like File, Edit, View etc. Just below this menu is the Getting Started toolbar. This contains all the essential tools you’ll need at your disposal to start creating 3D models in SketchUp. We’ll discuss SketchUp’s menus and toolbars in more detail below.
Drawing area & axes
One of the first things you’ll notice about SketchUp is the axes in the drawing area. These axes are red (X axis), blue (Z axis) and green (Y axis)—the point at which they intersect is the center of the drawing area. This enables users to get a sense of direction in their 3D workspace. You’ll also notice a 3D model of a person, further solidifying your sense of direction. The default angle setting on SketchUp is ‘ISO’ which enables you to view your drawings from above the right-front corner. If you’re drawing from this default angle, then you’re essentially drawing your project on the floor. If you need to change it, you can opt for a different view: top, bottom, front, back, left, right etc.
Before you get started on drawing, however, we’d advise you take a few minutes to get accustomed to SketchUp’s movement controls.
To pan, simply select the pan icon ![]()
![]()

Before you start drawing
Looking to create accurate models? The key to accuracy is using correct measurements. Fortunately, it couldn’t be any easier to sort out measurements with SketchUp. You can usually find the measurements box in the bottom right corner. This box will display dimensions as you draw. You can choose to work in any unit of your preference, and even use the box to manipulate selected entities, e.g., creating a line of a certain length. Can’t find your measurements box? Don’t worry—click the maximize button at the top. Alternatively, it will reappear once you’ve finished with the taskbar.
On the right-hand side of your screen, you’ll find the Default Tray. This contains a tray of panels that includes Entity Info, Materials, Components, Styles, Layers and so on. If you head to the basic ribbon toolbar at the top and click on Windows > Default Tray, you can customize the tray to suit your needs. One of the most useful tools found in this tray, however, is undoubtedly the Instructor.

Image source: SketchUp Help
As the name suggests, the Instructor teaches you how to use SketchUp. More specifically, it teaches you how to use the tools on offer. When you select a tool in SketchUp, you can turn on the Instructor—or click on the question mark icon in the status bar—to figure out how the tool works. Once you’ve done so, the Instructor will offer you:
- A basic description of what the tool can do
- An animation showing the tool in action
- A step-by-step process on how to use it
- Modifier keys that can be used in conjunction with the tool
- A link to further resources in the Help Center
If you’re not interested in it, you can close by clicking the Close button—head to Window > Default Tray if you’d like to find it again.
Tool palettes
Image source: SketchUp Help
If it’s your first time using SketchUp, you’ll find the default Getting Started toolbar at the top of your screen. This toolbar will contain all of the basic tools you need to get started on your first model in SketchUp. If you’re looking for more capability, you can opt to display additional toolbars by heading to View > Toolbars. Once you’ve done so, a dialog box will appear, showing all of the toolbars you have at your disposal. Examples include:
- Advanced Camera Tools
- Construction
- Getting Started
- Large Tool Set
- Layers
- Standard
- Warehouse
If you’ve got the time, it’s certainly worth playing about with each toolbar and customizing your workspace to suit your modeling needs and preferences. To start with, however, you might want to opt for the Large Tool Set—it’s great for when you need an all-purpose toolbar.
Remember, if you don’t recognize an icon or you’re not entirely sure what it does, use the Instructor feature to get to grips with it. You should also keep an eye on the important status bar at the bottom of the screen. It allows you to undo, redo, select help, change language and look at feedback/status.
Drawing and editing
Once you’ve got all of the basics sorted out, you can finally move onto the more fun aspect of SketchUp—the drawing! It’s safe to say that it will take you a few days or more to actually get to grips with every tool and capability at your disposal. If you’ve used software like DraftSight or AutoCAD, however, you’ll already be familiar with most of the drawing tools available. Let’s take a look at the some basic drawing concepts (feel free to skip if you’re already comfortable!).
Drawing a line…
Select the Line icon ![]()
Drawing a rectangle…
Select the Rectangle icon ![]()
Drawing a circle…
Find the Circle icon on your toolbar ![]()
It’s not all drawing tools at SketchUp, though. You can also take advantage of modification tools such as…
- Push/Pull: drags a face in 3D space so that it either expands or disappears.
- Follow Me: creates an entity along a specific path
- Offset: creates an entity that’s offset a specific distance from another entity
- Outer Shell: leaves the outer faces of overlapping solids
Of course, we’re just scraping the surface here. SketchUp has a huge selection of tools on offer. With them, users can create just about anything in 2D and 3D. We’d certainly recommend you spend at least an afternoon or so trying out all the drawing and editing tools you can get your hands on!
You might find it especially useful to check out SketchUp’s resources:
SketchUp’s 3D Warehouse

Image source: SketchUp Help
We wouldn’t be able to finish a guide to SketchUp basics without mentioning the incredibly handy 3D Warehouse. If you’re not familiar with SketchUp’s 3D Warehouse, it’s a source for finding models ranging from furniture to buildings to construction materials. What’s more, many manufacturers and suppliers have shared their own products in a 3D format for SketchUp. If you’re modeling a building, for example, you could download Bosch appliances, Marvin windows or even Sherwin-Williams paint colors.
Meanwhile, you can upload your own models to 3D Warehouse. It doesn’t matter if you’re a beginner, professional or hobbyist, you can share all of your models for others to download. You can even receive feedback from those who have downloaded your models. 3D Warehouse is also a great way to get to know other users and network. It’s also a great way to improve your own skills—if you’re curious about how someone went about creating a model, for example, you can ask the creator directly.
To get started with 3D Warehouse, simply head to File > 3D Warehouse > Get Models. A window will pop up, connecting you to the main page. Then, it’s as simple as browsing through what’s on offer. If you already know what you’re on the lookout for, type a keyword into the Search 3D Warehouse text box, e.g. chair. Once you’ve found what you’re looking for, simply click to download it and use it to your heart’s content!
To get more information, head on over to SketchUp’s resource page for Getting Started with 3D Warehouse.
Extra resources
![]()
And there you have it. We’ve finished covering the main basics of SketchUp. If you’re feeling a bit overwhelmed by what we’ve covered, remember that we’ve plowed through quite a lot. Don’t worry if you feel like you need a bit longer to get to grips with everything. That’s to be expected, after all! Whilst we’d definitely recommend testing out everything SketchUp has to offer, we’d also advise you look towards additional tuition.
The best way to get to grips with software, is to first look at whether there are any official resources or blogs. SketchUp is keen on helping its users become pros, which is why they’ve got videos, books and a thriving community to answer all of your questions:
More of a hands-on learner? YouTube is a great resource for finding tutorials for software. SketchUp is an incredibly popular 2D/3D modeler, so you won’t struggle with finding a tutorial for whatever area you’re struggling in. Examples include:
Looking to master the basics of other software packages? Check out our other guides:
