CorelDRAW is a vector graphics editor that is used across the world in a number of industries. It can be used to create logos, illustrations and graphics. But did you know that you could also vectorize using CorelDRAW? CorelDRAW’s LiveTRACE feature enables you to convert your raster to a vector for use in a variety of ways.
Interested? Scan2CAD’s guide will show you exactly how CorelDRAW can be used for vectorization. Plus, we’ll show you when you should vectorize using CorelDRAW, and when you should make use of other resources like Scan2CAD.
Table of Contents
What is tracing?
To convert a raster to a vector, you have to vectorize the raster image—or, in other words, trace it. The process of image tracing or vectorization involves drawing over a raster image with new vector lines, shapes and text. You can either use manual or automatic tracing to convert your image to a vector.
 Manual tracing—as the name suggests—involves tracing over the raster by hand. If you’re using a laptop or computer, you can trace over the image with your mouse. If you’re using a tablet, you can make use of a graphics pen to draw over the image.
Automatic tracing, by comparison, makes use of raster-to-vector conversion software. This software detects the lines and edges of your raster image and redraws them as vector lines, polygons, curves and other entities. In this particular guide, we’ll be showing you how you can use CorelDRAW to convert your raster to a vector—this is an example of automatic tracing. We’ll also be showing you how you can use Scan2CAD for the conversion of technical drawings for a specialized solution.
Of course, some people work with both processes. If you’ve found an old technical drawing, like an electrical plan, you might find that the lines are all faded. You could quite easily trace over the outline by hand and scan this new drawing. You can then vectorize using CorelDRAW or Scan2CAD to produce a vector.
If you’re not entirely sure which method is suitable for you, check out tracing: manual or automatic?
Why convert a raster to a vector?
For general purposes
 Raster images are typically used for photographs. You undoubtedly use them on a regular basis—the images on your computer are likely to be a raster format.
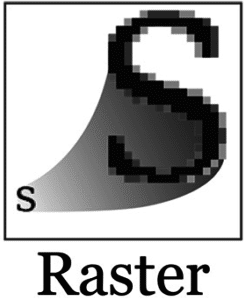
Rasters are made up of millions of pixels, which are essentially tiny blocks of colors. You’ll be able to see pixels when you change the size of a raster. Making a raster image bigger makes the pixels more evident—the more you zoom in, the more pronounced the squares become. As a result, the image loses quality as it becomes more blurry and undefined. Raster images, therefore, are resolution dependent.
The most common raster formats include JPEG, GIF, BMP and PNG. If you’re looking to share images easily with a small file size then you’ll use JPEG. If you want to exchange animations then you would choose a GIF. Alternatively, if you’re looking to vectorize your raster, you’re best off picking a PNG or TIFF.
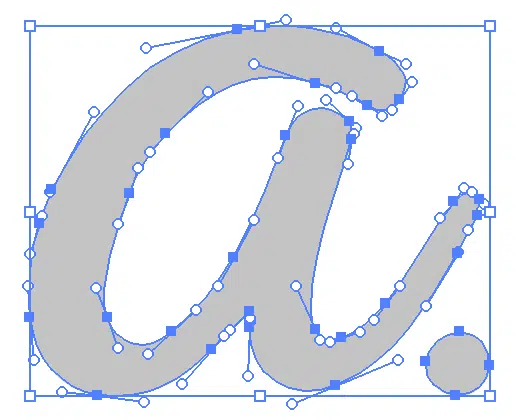
 Vectors are mathematically perfect formats. They’re used in graphic design and engineering because they’re easy to edit and they don’t suffer from loss in quality.
Unlike rasters with pixels, vectors are made up of paths. These paths, or mathematical coordinates, ensure that no matter how much you scale a vector up or down, it retains its quality. If you enlarge the size of a vector then the paths are also enlarged. Essentially, the lines multiply in size. Vector images are therefore infinitely scalable. This means that you could use the same vector as a tiny logo on a business card, or enlarged as a billboard poster.
The most common vector formats include AI, DXF, DWG and SVG. DWG is the native file format for the popular AutoCAD. Alternatively, DXF is the gold-standard exchange format in most CAD software.
For more information, check out raster versus vector.
For graphic design
If you’re working in graphic design or with illustrations, you’ll have undoubtedly used vector images before. If you’re using a logo or a graphic on a website, you need to ensure that the image will be of a high quality no matter what. When you’re advertising with posters and leaflets, you also want to make sure that the image isn’t pixelated. Vector graphics are also an industry-standard file format.
One of the great advantages to vector graphics is that you can make changes to them at any time. You might decide that you only need a web logo, in which case a raster image would be suitable. If you create a vector logo, however, you can use that same vector in a banner or merchandise at a later date. This saves you the trouble of having to create a brand new raster logo—your designs are no longer limited to a single usage.
For CAD
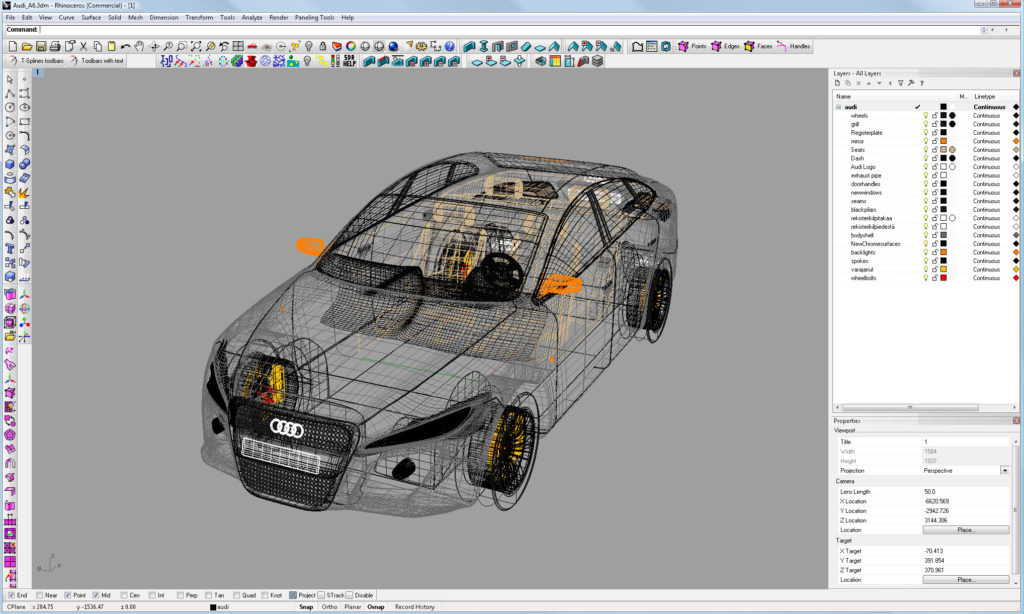
Drafting in CAD software like Rhinoceros 3D makes the design and production process smooth and simple
Before the introduction of CAD, drafters had to draw all of their designs and specifications by hand. As you can imagine, this would make design and production a lengthy process. If an engineer decided that there needed to be changes made to a design, the drafter would have to redo the entire thing.
With the introduction and evolution of CAD, designers and engineers were given access to programs that brought about an entirely new way of doing things. These CAD programs merged the roles of drafters, engineers and designers—nowadays, there’s still a lot of overlap as you can see in AutoCAD careers.
Vector graphics are an industry-standard format in CAD. The use of vector designs means that you can easily edit a CAD drawing, such as an architectural plan, without having to redraw it. You can edit each individual entity, and even reuse them in an entirely new drawing. If you have an old paper drawing or technical drawing, vectorization is the answer. You can scan your drawing and then convert the resulting raster image to a vector. This vector can then be opened in CAD software where you can edit it and create your own 2D or 3D model.
Why should you automatically trace an image?
Automatic tracing has many benefits that tend to overshadow manual tracing. The process is much faster than manual tracing. With some converters or programs, it can take minutes or even seconds. Manual tracing, by comparison, can take you hours or even days.
If you’re at the mercy of looming deadlines and a growing workload, the idea of converting dozens of raster logos or old drawings can be overwhelming. This can lead to many people and businesses to outsource CAD conversion. Automatic tracing can be the best solution to this problem. It’s easy enough to vectorize using CorelDRAW, for example.
Of course, you have to make sure that you’re using an automatic tracer like CorelDRAW for the right reasons. If you’re looking to convert complex photographs with hundreds of colors, then you probably won’t get the output you want—as we’ve shown in what is (and isn’t possible) with converting photos. The best candidates for vectorization are images that have simple lines and few colors. Images that best fit this description include logos, cartoons and technical drawings like site plans and architectural plans.
CorelDRAW
![]() CorelDRAW is a vector graphics editor developed by Corel Corporation. It was released in 1989 as the first graphics software for the Windows platform. It’s used worldwide by designers to create logos, signs and to vectorize images. It can even be used to create new fonts. CorelDRAW covers a range of areas including vector illustration page layout, digital editing, web graphics and animation. It’s often seen as a viable alternative to Adobe’s Illustrator, offering its services as a one-time purchase of $499 or a $25/month subscription.
CorelDRAW is a vector graphics editor developed by Corel Corporation. It was released in 1989 as the first graphics software for the Windows platform. It’s used worldwide by designers to create logos, signs and to vectorize images. It can even be used to create new fonts. CorelDRAW covers a range of areas including vector illustration page layout, digital editing, web graphics and animation. It’s often seen as a viable alternative to Adobe’s Illustrator, offering its services as a one-time purchase of $499 or a $25/month subscription.
It’s possible to vectorize with CorelDRAW by making use of its PowerTRACE tool, which we will discuss in depth at a later section. This is very useful in the design industry, enabling users to turn raster artwork into vectors. The software can also be used in CAD and CNC applications—it works well with CorelCAD. It can, of course, be overwhelming to use CorelDRAW at first. With its vast range of tools, it comes with a steep learning curve.
Did you know that Corel also has its own CAD software package?
CorelCAD
CorelCAD is a Computer Aided Design software package. It comes with 2D drafting tools and 3D modeling tools. Not only is it compatible with all major CAD programs, it also uses DWG as its primary drawing format. CorelCAD can be used with CorelDRAW for a complete technical graphics workflow. For example, users can import graphics from CorelDRAW and convert them into 3D models in CorelCAD.
The software package is available for both Windows and Mac, and supports DXF, DWF, PDF and STL for 3D printing. It costs $699 with an additional $199 for updates. It’s much cheaper than most CAD software packages which is a huge benefit.
If you’re a student, did you know that you could get most popular CAD packages for free or at a discount? Find out more in our students’ guide to free CAD and resources. Alternatively, you can check out Scan2CAD’s list of 14 top free CAD packages.
Vectorize using CorelDRAW
It is possible to manually trace your raster image and vectorize using CorelDRAW, but, as we have discussed, it’s much easier and faster to use automatic tracing instead.
CorelDRAW comes with its own tracing feature called PowerTRACE. This feature allows you to convert raster images to vectors by using specific settings and additional options to create the perfect vector output. To start, you need to have an image in a BMP or TIFF format for optimal results, as they offer lossless compression.
These are the 4 steps to vectorize using CorelDraw:
1. Import the image
2. Launch ‘Trace Bitmap’
3. Define the image tracing settings
4. Preview and export to vector format
Below we delve into detailed descriptions of each step.
1. Import the Image
As with most programs, you start by importing your image into CorelDRAW by going to File > New, then File > Import.
From this import dialog you can select your desired raster image and open directly into CorelDraw.
2. Launch Trace Bitmap
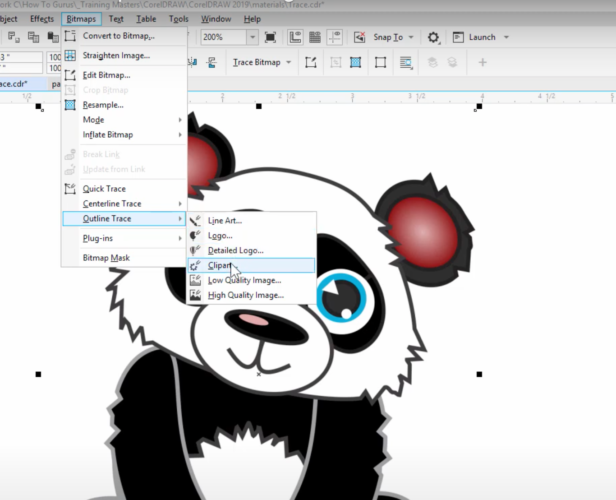
Trace bitmap menu option in CorelDraw (Source)
Once you have imported the image, click the following menu options: Bitmaps > Outline Trace > and select the appropriate next option described next.
For more control over the trace, after selecting the Outline Trace, you will see options for specific image types. These image types include Technical Illustration, Line Drawing, Lineart, Logo, Detailed Logo, Clipart or Low/High Quality Image.
Once you’ve chosen the right image type, a dialog box will pop up. This box is split into two areas; the left displays a preview of your trace and the right features additional options.
3. Define the Image Tracing Settings
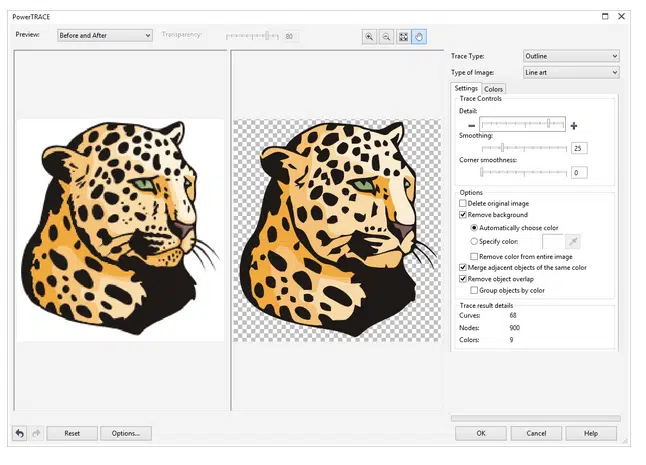
Image source: learn.corel.com
Don’t be overwhelmed by the number of image tracking settings in this dialog. Here’s an overview of each of the settings:
- Preview selector: you can view the results of your trace in one of three ways. You can view it in the standard Before & After pane view, a full Large Preview pane view, or a full pane-view with a Wireframe Overlay. This overlay enables you to see the vector shapes as red outlines over your original image.
- Smoothing slider: this enables you to control the complexity of traced areas. It also affects the number of nodes per object.
- Detail slider: determines the size and color threshold of the traced areas in your image. The higher the detail, the lower the threshold which causes smaller areas of color to be traced. As a result, you have a greater number of objects and colors in the finished product.
- Delete original image: this leaves you with the new vector image.
- Remove background: you can use a manual or automatic option to apply a soft mask during your trace.
- Automatically choose color: the software automatically detects the background color using the color at the top-left or bottom-right corner.
- Specify color: enables you to choose your own color from the color selector.
- Remove color from entire image: this can eliminate a color throughout your entire image.
- Number of colors/color mode: controls the total number of color samples in your trace results.
4. Preview and Export to Vector Format
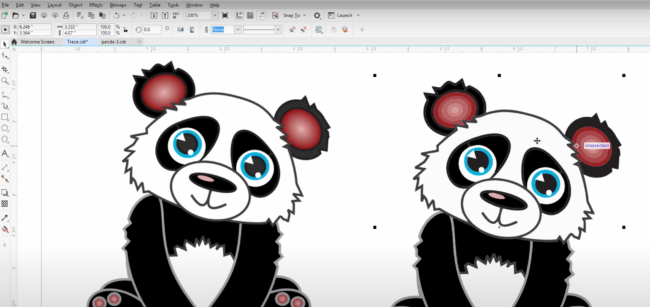
Viewing raster and vector image in CorelDraw (source)
You can check the Preview button at any time to see the results of your trace. Once you’re happy with the result, enable the trace to convert your image to a vector. If you need to make any changes, you can use CorelDRAW’s drawing tools. You can then save your vector image once complete:
- AI: native file format of Adobe Illustrator.
- CDR: native file format of CorelDRAW.
- DXF: a data exchange format used in CAD.
- DWG: AutoCAD’s native file format.
- PDF: used for sharing and printing documents.
- SVG: used mostly for web graphics.
And there you have it—you now know how to vectorize using CorelDRAW. This doesn’t mean that you can use CorelDRAW for any type of vectorization, however. CorelDRAW is used mostly in the graphic design industry, so if you’re looking for a specialized vectorization for CAD or CNC you’ll have to look elsewhere. Read the next section to find out when you should and shouldn’t use CorelDRAW.
Manual Tracing using CorelDRAW
Manual tracing in corelDRAW can be a laborious process. Tracing, when done manually, is the process of drawing over every shape of your raster image using your vector drawing tools. Unlike automatic vectorization, there’s no shortcuts for this process and in most cases users will opt for automatic vectorization rather than manual tracing.
A user could choose to manually trace an image if they are not obtaining the results they desire from automatic tracing.
In the below video demonstration you can learn how to utilize the vector drawing tools to manually trace over a raster image, such as a logo.
https://www.youtube.com/watch?v=PuDnKljtLu8
When you should (and shouldn’t) use CorelDRAW
CorelDRAW is geared towards the design industry, more specifically the graphic design industry. As such, most of its focus is on helping you vectorize and produce images to be used in websites, posters or advertisements. When you vectorize using CorelDRAW, you can be sure that you’re getting vectors with a high level of colors and realism. You could quite easily convert your own raster logo and use it in CAD or CNC software.
Unfortunately, if you’re looking to vectorize scanned drawings or technical drawings, you won’t be getting a specialized solution. In fact, you’ll get the same type of trace no matter if you’re converting contour maps or electrical plans. Scanned drawings also tend to need refining beforehand, especially if they contain text.
Furthermore, not only is there a steep learning curve with CorelDRAW, it’s also rather expensive at $499. If you’re a casual user looking only to convert old technical drawings for example, do you really want to fork out that much when it doesn’t offer you a specialized solution? Surely it would be easier and more cost-effective to invest in a software package that gives you exactly what you need?
And in comes Scan2CAD…
 Scan2CAD is a market-leading raster-to-vector converter, focusing primarily on the conversion of technical drawings like architectural plans. It can be used in any industry—from architecture to mechanical engineering—and by anyone of any experience. It comes with a full raster and vector editing suite so that you can optimize your image before and after conversion.
Unlike CorelDRAW, Scan2CAD offers you a complete specialized solution. With its vectorization settings, Scan2CAD offers a specialized trace for all technical drawings and raster images. These settings enable the software to look at different variables depending on the type of drawing you’re converting. Its picture/photo setting for example, enables you to choose which elements are identified, such as circles, bezier curves and regular polygons.
By using Scan2CAD, you don’t have to worry about text issues. Unlike other converters that struggle with vectorizing raster text into editable and logical strings, Scan2CAD comes with Smart OCR. You could even train the software to recognize new or handwritten fonts. And with features like batch processing, you can automate the conversion of hundreds of files at once.
How does the process work?
Scan2CAD’s conversion process works by detecting the lines and edges in your raster image—redrawing them as vector entities. The conversion takes into account parameters including the type of line, line weights and even the angle of the curves.
Scan2CAD makes use of pre-programmed variables that control exactly how your conversion process is carried out. This means that you get a precise conversion that differs depending on what type of image you’re converting. And the best part? Scan2CAD’s vectorization process takes only a matter of seconds. If you don’t believe us, check out the animation below.
Converting an image to DXF or G-code in Scan2CAD
Why you should avoid online converters
You might decide that you don’t want to buy CorelDRAW, which leaves you at a bit of an impasse in regards to CAD conversion. So what do you do? What you shouldn’t do is look online for the easiest-to-find converter. Take our word for it, you won’t get a good vector output.
Online converters are free for a reason. And that’s because they come with a vast range of limitations. Firstly, you’ll be limited as to how many files you can convert. Secondly, you won’t be able to convert images with a large file size—so don’t even bother trying. And if your image has text in it, then good luck, because it probably won’t be converted into editable vector text.

The text on the left was converted using Scan2CAD. The text on the right was converted using a different CAD program, and hasn’t been correctly reassembled into strings.
And that’s not even the half of it. If you use an online converter, you run the risk of opening your computer up to a variety of risks including trojans and viruses. Furthermore, you might end up having your online files stolen—the last thing you need is someone taking credit for your work. We’ve discussed this further in the 5 pitfalls of online file converters.
In short, it’s just not worth investing your time in online file converters. You just end up spending extra time fixing the finished product. What you really want is software that keeps your files and your system safe and secure. If you’re converting technical drawings in particular, you might find that CorelDRAW isn’t giving you the output you want. Instead, you might want to consider using specialized software like Scan2CAD.
Tips for Scan2CAD conversion
Common problems with conversion
The process of conversion is completely dependent upon your input file. If your scanned drawing or raster file is full of shadows or incomplete, you won’t get a great output. Site plans, for example, are completely useless if you can’t actually see the lines and annotations clearly. You’ll know your image is unsuitable if it contains any of the following image problems:
- Heavy pixelation. This makes your image blurry and unfocused.
- Dithered lines. This is common with scanned pencil drawings.
- Merged lines. Sometimes software won’t be able to differentiate between text and shapes.
- Hairy lines. This means that the lines have fuzzy edges.
- Low resolution. If you want a good output, lines should be around 5 pixels thick.
- Broken lines. If lines are too thin, the software won’t detect them which may result in incomplete lines.
- Shadows. This is primarily an issue with scanned drawings.
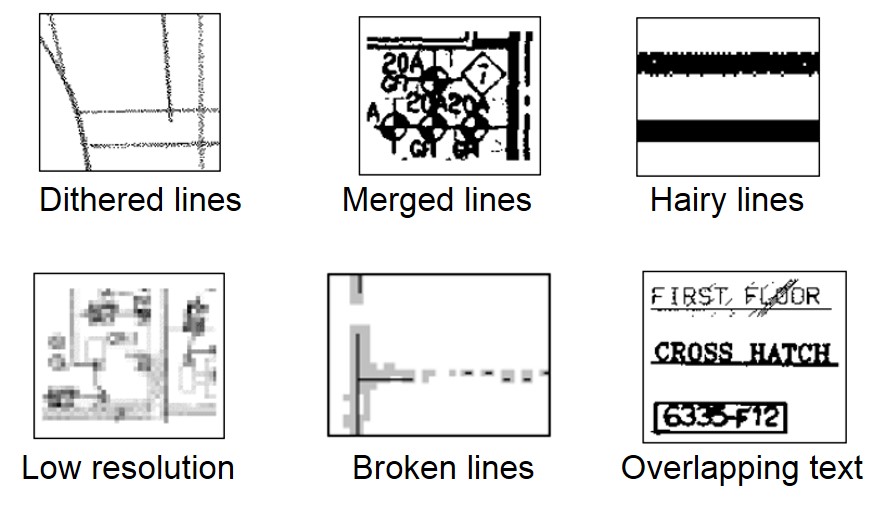
Don’t bother converting any raster image that sports any of these problems…
How to get the best results
- Choose the right image and format. If you’re working with scanned images, you need to make sure that you drawing is as clean as possible. In addition, you should save the image in a TIFF format because it comes with lossless compression. You need to start with the right kind of input to get an optimal output.
- Reduce the number of colors. The best images to convert are ones that have the least amount of colors. This will give you a clear contrast between the background of the drawing and the foreground. Scan2CAD will then be able to detect every shade and shape and produce separate vector entities as a result.
- Thresholding. Scanned images in particular tend to suffer from grayscale and compression artifacts. The thresholding tool enables you to divide your drawing cleanly into black and white pixels. There are two types of thresholding:
- Simple thresholding: applies it to the whole image.
- Adaptive thresholding: applies it to different parts of your raster image.
- Clean up the image. Scan2CAD comes with a range of cleaning tools that can be used to combat the issues highlighted in the previous section.
- Thicken lines to fix broken or dithered lines.
- Remove holes or speckles.
- Smooth which removes hairy edges.
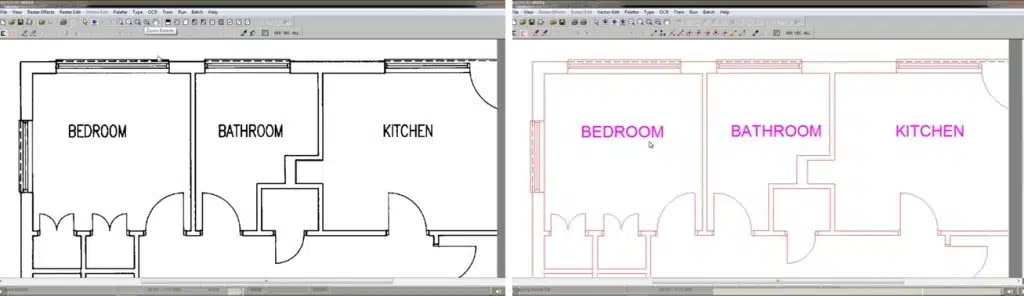
Here’s a floorplan — before and after conversion! We’ve used Scan2CAD to convert it from a scanned image (left) to an editable vector (right); and saved it as DXF
For more tips, check out Scan2CAD’s raster quality checklist or our top 10 raster effects to see how you can optimize your image before and after conversion.
All sorted?
Once you’re happy with your image, you can move on to the easiest part of the entire process. Scan2CAD can convert your technical drawings and raster images in a matter of seconds—boasting one of the fastest conversion process times out there. Once this fast vectorization process is complete, you can save your new vector as a DXF, DWG or even a PDF. It truly couldn’t be simpler.
Scan2CAD: free download
If you already have CorelDRAW then you should definitely test out the PowerTRACE tool—it might give you the output you want. However, if you’re still uncertain as to whether you should fork out for CorelDRAW, then why not try out Scan2CAD for free first? If you’re looking to convert technical drawings or even something like raster logos for CNC, you can’t get better than Scan2CAD.
The one setback to programs like CorelDRAW is that their vectorization tools don’t offer a specialized solution. Scan2CAD, in comparison, can be used for all of your vectorization needs. It doesn’t matter if you’re converting a site plan or an electrical plan, Scan2CAD can convert them using different specialized solutions suited to the image. And it’s not just useful for CAD: Scan2CAD can also help you bring your designs to CNC. This means you can take your drawings and create your own CNC projects.
Rather than vectorize using CorelDRAW, download Scan2CAD in a free 14-day trial and find out exactly why it’s the ultimate vectorization software. You don’t have to worry about any limitations—you can convert as many files as you want without so much as a watermark. Just click on the button below to get started.
Want to stay updated on all things CAD and CNC-related? Check out Scan2CAD’s blog covering everything ranging from CAD training courses to how CAD changed product design.
