Creating a CAD drawing can be time-consuming. It can take an age to master each different piece of CAD software; even simple CAD projects require experience with lots of different tools. Choosing Scan2CAD is just one way to help speed up the design process. If you want to really turbo-charge your CAD work, though, you’ll need to get to grips with some hand keyboard shortcuts. Check out our useful slideshow, and we’ll teach you how to navigate Scan2CAD like a keyboard ninja!
Transcript:
Scan2CAD already helps CAD users around the world save hours of time every working day by automating the raster-to-vector conversion process. But what if I told you that you could save even more time? Scan2CAD has a number of great keyboard shortcuts that can help to speed up your workflow and boost your productivity. Want to learn how to use them? Here’s a guide to our top 10 shortcuts. You’ll learn how to…
- Move around the screen
- Zoom in and out
- Get set up
- View vectors
- View vector grab points
- View vectors by color or type
- Vectorize
- Undo
- Rotate raster image
- Tidy up vectors
1. Moving around the screen
Thoroughly checking your image before and after conversion is the best way to avoid errors and ensure best results. Using the keyboard shortcuts in the list on the right means that you can view your image in great detail whilst still ensuring no part of the image is left unchecked. This means you can take a systematic approach to checking your image.
| Up | Pan up incrementally |
| Down | Pan down incrementally |
| Left | Pan left incrementally |
| Right | Pan right incrementally |
| Ctrl + Up | Pan up by a page |
| Ctrl + Down | Pan down by a page |
| Ctrl + Left | Pan left by a page |
| Ctrl + Right | Pan right by a page |
2. Zooming in and out
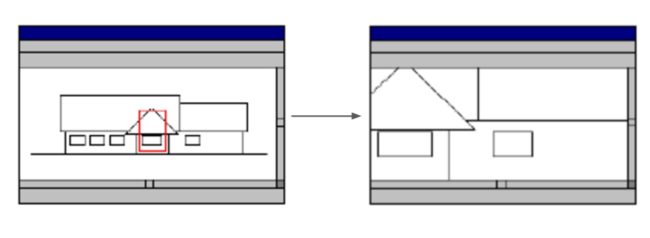
Zooming is an intuitive and simple process—just click on the magnifying glass, or use a keyboard shortcut! Please note, though, that these shortcuts are different to those you may be familiar with from programs such as Google Chrome or Microsoft Office. When you select an area of your image, you can also use the F key to enlarge it to fill the screen.
| M | Magnify |
| D | De-magnify |
| F | Fill screen with the selected area |
| Scroll wheel on your mouse | Zoom in around your cursor position |

3. Getting set up
Every designer will have different preferences as to how their workspace is set up. Scan2CAD is no different—that’s why you can select from a number of different viewing settings. In the next few slides, we’ll also be going into detail on how some of these settings can be used.
| Toggle these on and off | |
| Shift + I | Grid display |
| Shift + P | Palette display |
| Shift + F | Raster display |
| Shift + G | Vector ghost display |
| G | Grab point display |
| P | Polygon and polyline endpoint display |
| E | Bezier control point display |
| C | Viewing vectors by color/type |
| T | Text extents display |
| Shift + L | Vector line width display |
| Shift + H | Polygon outline display |
4. Viewing vectors
You can choose whether to display your vector image only, raster image only, or both. This is a useful tool for comparing your original raster image with the vector image created by the conversion process. These keyboard shortcuts are a quick and easy way to toggle between the different views and compare and contrast between the images.
| V | View Vectors only |
| R | View Raster only |
| B | View Both vector and raster |
5. View vector grab points
It’s easy to see where your vectors start and end by viewing grab points. Grab points are placed:
- at the ends of a vector line
- at the centre and 12 o’clock points of a vector circle
- at the mid points of an arc
- at text origin points
You also use Grab Points to move vectors around the screen – just position your cursor over the grab point and drag the vector to its new position.
| G | Toggle between Grab Points On/Off |
| P | Toggle between Grab Points On/Off (applicable for polyline and polygon end points) |
6. View vector elements by type
Choosing to view vectors by type means that different types of vectors will be differentiated from one another on screen by being displayed in different colors. The full list of colors for each line type is:
- Continuous lines: Red
- Dash lines: Black
- Arrow lines: Gray
- Hatch lines: Brown
- Polylines: Green
- Circles: Dark blue
- Arcs: Magenta
- Bezier curve: Pale blue
- Text: Magenta
| C | Toggle between viewing vectors by Color or by Type |
7. Vectorize
Scan2CAD makes vectorization a one-click process — but if you’d rather use your keyboard, it can just as easily be a one-stroke process using the commands on the right. You can choose whether to vectorize text, lines, or both — and if things don’t go to plan, it’s just as easy to undo them by hitting the same key again + Ctrl.
| F5 | Vectorize raster text only (OCR) |
| F6 | Vectorize raster image without text |
| F7 | Vectorize raster image with text |
| Ctrl + F5 | Undo raster text recognition |
| Ctrl + F6 | Undo vectorization |
| Ctrl + F7 | Undo vectorization and raster text recognition |
8. Undo
Everyone makes mistakes from time to time, so you’re almost definitely familiar with this one. If not, then say hello to the most useful keyboard shortcut on your computer. Using Ctrl + Z gives you the freedom to take a trial-and-error approach whilst perfecting your vector image. With Scan2CAD, you can undo up to 256 actions!
| Ctrl + Z | Undo Edits |
9. Rotate raster image

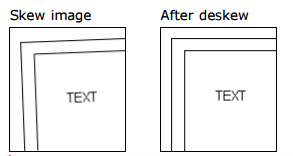
Using the Deskewing tool on very skewed images usually results in a significant loss of quality, so best to avoid that!
Need to deskew a raster image before you vectorize it? This is one of our favourite tips to do just that! When you select the Rotate by Line tool, Scan2CAD will prompt you to draw a reference line. Draw this line on top of a skewed line which should be exactly horizontal or vertical. Scan2CAD will use this line as a reference to detect the angle by which the image is skewed. The tool will then automatically rotate the image, giving you perfect alignment!
| Ctrl + L | Rotate by Line |
10. Tidy up vectors
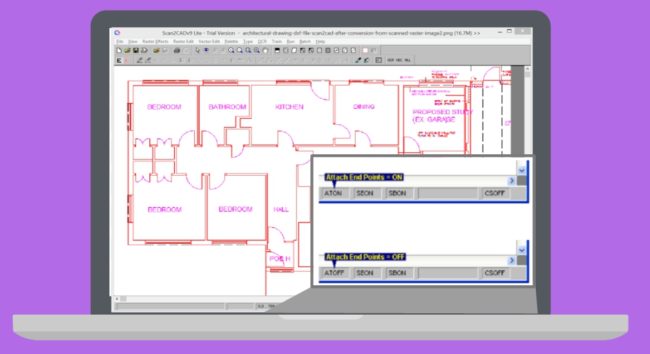
Attach End Point determines which grab points are moved together. Extend Grab Point ‘stretches’ one vector to meet another vector. Grab Snap Distance defines how close two vector end points must be for them to snap together.
| A | Attach End Points On/Off |
| E | End Point Snap On/Off |
| \ | Extend a vector |
| . (period) | Increase Grab Snap Distance (by one value up) |
| , (comma) | Decrease Grab Snap Distance (by one value down) |

Can’t tell whether Attach End Points is switched on or off?
Just check at the bottom of your screen!
For more tips and tricks, be sure to check out our blog! Each week, our team explores a different topic from the world of CAD and its related fields. We’ve got guides to file conversion, introduction to the different CAD file types, as well as DIY tutorials to get you started with Scan2CAD!

