CNC brings about a realm of possibilities in the maker movement. By using tools like CNC mills, laser cutters and routers, you could produce anything from laptop decals to wooden signs. And the best part? Taking your design to fabrication doesn’t have to be a complex process. All you need to do is convert your raster design to a vector, and off you go!
This guide will show you how you can use Scan2CAD to vectorize your logo for CNC—and we’ve even included tips to help you optimize your logo before you take it to your CNC machine. Plus, we’ll show you examples of vectorized logos and how you can get Scan2CAD free for 14 days—letting you convert as many logos (and files) as you want.
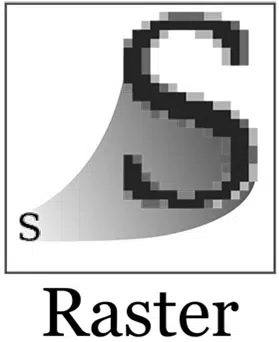
Rasters are commonly used for photographs—most of the images you see on your computer are stored in a raster graphics format. You’ll no doubt recognize formats like JPG, BMP and GIF. Unfortunately, rasters come with a range of disadvantages. They’re made up of pixels, so when you alter the image, it can become blurry and undefined. They’re also resolution dependent, so your logo would need to be at the right scale to appear correctly.
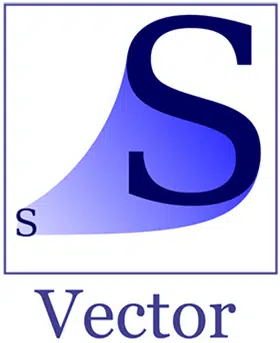
Vectors by comparison, are mathematically ‘perfect’ formats. They’re popular in graphic design and engineering because they don’t suffer from loss of quality. Vectors are made up of paths and rely on mathematical coordinates. This means that no matter how many times you change the scale of the vector, it won’t lose quality. This is useful if you need different sizes of your logo, e.g. on a business card, on your website or on a billboard. The most popular vector types are AutoCAD’s proprietary format DWG, and the exchange file format DXF.
CNC stands for Computer Numerical Control. CNC machines work by using subtractive manufacturing techniques. This means that they remove material from your initial piece. Examples of CNC machines include:
Routers
Milling machines
Lathes
Plasma cutters
Laser cutters
CNC machines work by executing a series of pre-programmed commands. The most common programming language is G-code, which controls how your machine’s tool moves—controlling its position and depth on the X, Y and Z axes. It also controls the rate at which your tool moves, the speed it rotates at and the type of motion required.
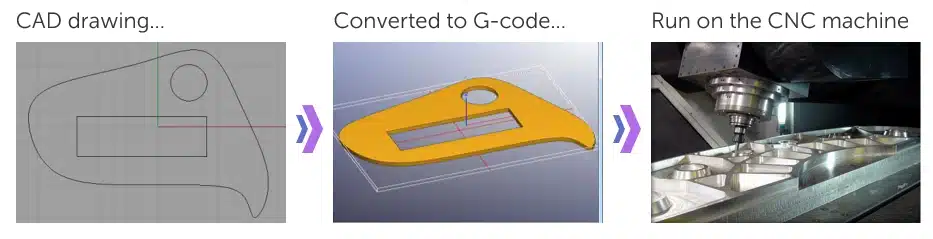
You need your logo in a vector format to take your design to fabrication. The process starts with converting your logo to a vector file format, which will dictate how your image is rendered. You can then convert the vector to G-code which will be read and turned into motion by control software. This control software will then run your CNC machine.
Don’t just be tempted to go for simply milling your logo. Why not try something more innovative? You could create laptop decals of your logo or even mill it onto acrylic sheets with an LED light to illuminate the card. These ideas are just the tip of the iceberg—check out 11 CNC project ideas for more.
What Is Vectorization?
Vectorization is the process of converting a raster to a vector. This process typically involves tracing over a raster image with vector lines. This can be done manually or automatically.
Manual Tracing
Originally, manual tracing was the only way you could create a vector from a raster image. You would have to create a vector layer on top of your raster and then trace over it with vector lines. You could either use a mouse to trace over every line, or make use of a tablet and graphics pen to draw over it.
Manual tracing can be advantageous, as you’re far more likely to understand the image than a computer. You can look at your logo, for example, and know exactly where each line is and how the image is supposed to look. This is particularly useful if you’re using an image that is faded or of low quality. A computer, meanwhile, can only work off of the lines it can detect. Tracing manually can, however, be a time-consuming process which is why many opt for the more time-efficient process of automatic tracing.
Automatic Tracing
Automatic tracing typically involves a conversion program—such as Scan2CAD—which can instantly convert your raster image to a vector. The software will detect the lines and edges present in your logo, and redraw them as vector lines, curves, arcs and other vector entities. This process is much faster than manual tracing. However, you need to be working with high-quality images with few colors for it to work well.
Some artists work with both types of tracing, e.g. printing out their raster image, tracing over the outlines by hand, and scanning the image back into vectorization software.
It can be tempting to choose the first online converter that you come across—there are dozens available after all. They all promise to convert your logo quickly, with no downloads necessary. The problem is that the quality of your output vector depends on the quality of the converter you pick. Disadvantages to these types of converters include:
Online converters often cut corners and don’t always provide a full range of vector entities.
The finished product is often difficult to edit with CAD software.
They don’t allow large file sizes or batch conversion.
They struggle with converting text in images to editable vector text.
You run the risk of downloading viruses or trojans.
The real question is: is it worth facing the many pitfalls of online converters? The answer is no—there are plenty of cost-effective conversion software solutions out there, like Scan2CAD.
Scan2CAD
Scan2CAD is a market-leading raster-to-vector conversion software. Its primary focus is the conversion of technical drawings—ranging from engineering drawings to site plans—to usable editable vector images. Scan2CAD can be used in a variety of ways, from routed signs to glass reproduction to metal sculpting.
What Makes Scan2CAD Different To Other Converters?
Scan2CAD doesn’t just convert your raster images. It also comes with a raster and vector editing suite so you can fully optimize your image before and after vectorization. The vectorization isn’t a ‘one size fits all’ process either—Scan2CAD offers a range of vectorization type settings. These come with pre-programmed variables that control how your conversion is carried out—for example, controlling how the software looks out for arcs or Bezier curves.
And the best part is, it only takes a matter of seconds. Don’t believe us? Take a look at the animation below.
And that’s not all! Scan2CAD isn’t just useful for converting your files to a vector file format, it can also be used for CAM applications. Once you have a vector, you can use Scan2CAD to convert it directly to a G-code format—Scan2CAD currently supports three of the most popular G-code file types including CNC, NC and TAP.
If you want to convert your logo for CNC, you will need to complete some pre- and post-processing work to ensure that your logo is fully optimized. CNC machines require ultimate precision, which is why there are some guidelines in place to ensure you get the best possible output. We’ve included tips on how to pick the right logo, how to optimize it before conversion, and a few post-processing tips to complete before you send your logo to your CNC machine.
Choosing The Right Image
Ensure that it’s of high resolution. You don’t want any pixelation as it will affect your vector output. This is even more vital if you’re vectorizing your logo for CNC purposes.
No shadows. If there are shadows present on your logo, it might confuse the software.
Make use of lossless compression. You should ensure that your logo is in a raster file format that uses lossless compression, e.g. BMP, PNG or TIFF.
Try to pick a logo with as few colors as possible. We recommend 2-bit color which is crucial in CNC—one color represents the cut path and the other represents the area that the machine doesn’t cut.
The logo should be as clean as possible—without blurred sections or overlapping elements.
Don’t use compound curves. CNC machines don’t like curves like splines or ellipses. They prefer polylines, which can only include line and arc segments.
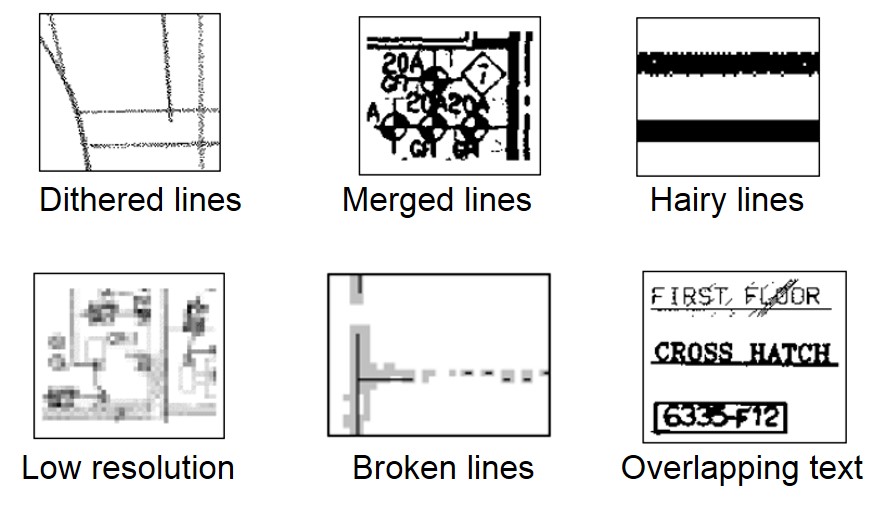
Examples of common problems with raster images.
Pre-Conversion Tips
Thresholding. This tool enables you to divide your logo into black and white pixels. This eliminates the issues caused by grayscale images or compression artifacts. There are two types:
Simple thresholding: applies to the whole logo.
Adaptive thresholding: applies to different parts of your logo.
Thicken lines: this will fix broken or dithered lines.
Clean: this will remove holes or speckles in your logo.
Smooth: usually the last tool to use, this removes the ‘hairy’ edges surrounding your logo.
Of course, Scan2CAD has many more features on offer. Take a look at our raster quality checklist, or our top 10 raster effects for more tips on how to optimize your raster before the conversion process.
Post-Conversion Tips
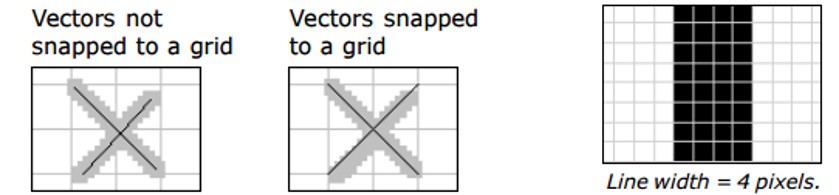
Your image isn’t 100% complete, even after you’ve converted it. You still need to do a bit of post-conversion work by checking that all of the elements in your logo have been correctly recognized. A dashed line for example, could be mistaken as short lines. A great tip to help with the tidy-up process is to use grids (the shortcut is Shift+l). You have to zoom in closely to view the grid, as each square is one pixel. By using the grid, you can check whether your lines are clean and straight.
Here are few clever uses of the grid when tidying up images: to align shapes and ensure clean lines
Post-conversion tidying is even more vital if you’re converting for CNC:
Check that the vector contains single line cut paths. You can join multiple separate lines or polylines by using Scan2CAD’s Snap tool.
Remove as many node counts and intersections as you can without compromising your logo.
Check that the lines are connected perfectly, as you’ll want one coherent cut path. Pay close attention to this near corners and curves.
CNC machines prefer to work with polylines rather than broken entities like arcs and Beziers. You can convert by using Scan2CAD’s vector editing tools.
Once you’re happy, you just need to start the vectorization process and off you go.
If you’re still skeptical regarding Scan2CAD’s capabilities, check out our vectorization of Ford and Nike’s logos.
The process was simple enough—we started by loading our raster logos into Scan2CAD. We then made use of Scan2CAD’s pre-conversion tools to optimize the rasters, including: ‘Threshold‘, ‘Clean‘ and ‘Thicken‘. The optimization process was finished off with the ‘Smooth‘ tool. The vectorization settings type varied with both logos—we found that the Ford logo was suited to the ‘Outline‘ setting. In comparison, the Nike logo was better suited to the ‘CNC profile‘ setting. Once we were happy with the result, we started the vectorization process.
The screenshots below show four stages of the entire process. The first image is the original logo and the image next to it was taken after using the Threshold tool. The third image is the vectorized logo. The fourth image allows us to view the vectors by color—green shows polylines, which CNC machines prefer to work with.
Prefer to see Scan2CAD in action? The video below shows you how you can make a laser-etched plaque. It takes you through the process of vectorizing a picture of a minion (using the Picture/Photo option) with added text and a vintage frame. It couldn’t be any easier!
Extra Resources
We all know how confusing it can be to be a beginner in the world of CNC. With that in mind, we’ve grouped together a few extra resources that will help you get to grips with CNC that much faster.
Software and Hardware
If you’re new to CNC, you might not know what kinds of software or hardware are available. Do you know what type of CNC machine you should use? Are you familiar with CNC control software? If you’re not sure or you’re just looking for a few extra tips, check out Scan2CAD’s ultimate CNC-related articles below:
As we’ve shown, it can be a very quick and simple process to vectorize a logo or an image. But what if you don’t want to go through the entire conversion process? If you want to head straight to the good stuff and start designing with CNC, you might be better suited to using ready-to-cut DXFs. We’ve included a list of websites offering free DXFs that you can export directly to G-code using Scan2CAD to use with your CNC machine: