
Converting from raster to vector is a pretty complex process. Whilst both types of file display graphical data, they operate entirely differently. Raster images are like paintings; composed of thousands of tiny, individually-colored pixels. Vector images, meanwhile, are more like a set of instructions. Vector graphics are composed of paths (or lines) which can either be straight or curved. A vector graphics file will contain data about these paths: where they start and end; how much they curve; and information about line colors.
As such, the simpler the raster image, the easier the vectorization process. The ‘ideal’ raster image to vectorize is extremely basic: black and white; and composed solely of lines and curves. Unfortunately, photos are rarely that simple. That’s not to say that you can never vectorize a photo. However, it’s important to be realistic about what is (and isn’t) possible when converting from a photo image to a CAD format.
How does vectorization work?
The basic principle of vectorization is image tracing. To produce a vector representation of an image, vector lines must be drawn over the existing raster image. This can be either a manual or an automatic process. Manual tracing involves tracing over the entire image by hand – an extremely time-consuming process.
Automatic tracing software, meanwhile, works to detect lines and edges within the raster image. It then redraws them as vector lines and curves. As an automated process, it is far quicker than manual tracing. The downside to this, however, is that automated software does not have the same ability to judge an image as a human would.
Vectorization software detects patterns within a raster image. It is trained to recognize lines, angles, curves, and text. It cannot, however, determine what the image represents. Take, for example, the image below.
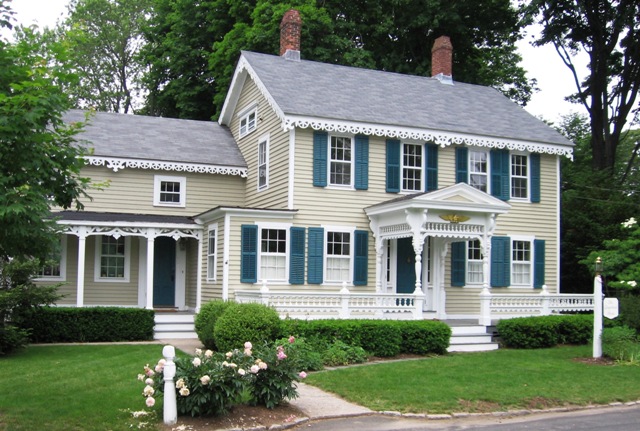
A human looking at the image would easily be able to tell that the image depicts a house, with a lawn at the front and a tree to one side. Vectorization software is unable to make such a complex judgement. Instead, it will pick out lines, edges, and areas of light and shade, and will ‘trace’ over what it deems to be the relevant parts. This doesn’t always go smoothly.
Imagine, for example, that a customer wanted to use the image above to produce an accurate line drawing, ready for use in architectural planning. They might try to simply vectorize the image using Scan2CAD’s architectural settings. Unfortunately, if you converted the above image using these settings, this is what you’d get out at the end…

I think it’s fair to say that this isn’t what was intended. It’s clear what went wrong here: the software simply separated out the dark and light areas of the photo. Could this have been salvaged? Or was it doomed to fail from the start? Let’s take a look at some of the factors behind the failure…
Choosing the right image
The most common reason why vectorization fails is due to an unsuitable raster image. For vectorization to be successful, your image must be suitable for its intended purpose. For the above image, there’s simply no way to convert it into an architectural line drawing short of redrawing it entirely. An architectural draft needs to be monochrome and generally simple, with just the right amount of detail to faithfully display the design of the building. This image falls short on all of those counts:
- The image has far too many colors
- The most relevant parts of the image are too dark
- The level of detail is far too great
Scan2CAD picked out the most obvious contrast in the image: the contrast between the house and the sky. The detail of the house, meanwhile, was too hard to detect.
So, is it impossible to vectorize this image? No – but you have to be realistic. Using this kind of image to create an architectural drawing is not possible. You are able, however, to reproduce the original image in vector format using Scan2CAD’s Picture/Photo vectorization type settings. The outcome would look something like this…

This is a much more faithful reproduction of the original, albeit with far fewer colors. Individual elements within the image can now be edited separately. The image can also now be scaled up or down without loss of fidelity. However, this image would be just as unsuitable as the original raster image for architectural purposes.
The key tip here, therefore, is that you must choose a suitable image for your intended purpose. For example, an architectural drawing requires…
- a monochrome image
- simple, clean (and mostly straight) lines
- clear text
A good example of an image that follows these guidelines is shown below. This image is made up of clean, straight lines, has hatching rather than different colors, and has clear text:

The above image is easily vectorized using Scan2CAD’s architectural settings, and can then be edited using CAD software. Whilst this example only covers one type of setting, the principles of simplicity and few colors apply far more broadly to vectorization.
If your starting image is a bit more complex than that, don’t despair. There are still some steps you can take to get your image vector-ready.
Getting your raster image up to scratch
Whilst it is possible to put an unedited raster image through the vectorization process, it’s not recommended. Photo-realistic vector images are unsuitable for most practical purposes. Take, for example, the following image, vectorized in two different ways.

|

|
| This image has been vectorized in a photo-realistic way. It faithfully displays the original range of colors. However, it cannot be used for most purposes normally associated with vector images. | This is a simplified, line art version of the image. It can be used for vector purposes, such as logos and illustrations. |
| Image source: vector-conversions.com | |
It’s worth noting that while the photo-realistic vector uses many different colors, the line art version simplifies the image to white, black, green, and pink. This reduction in colors is necessary for most practical vector purposes.
It’s clear, therefore, that not all vectors are created equal. To be able to get a usable vector, some pre- and post-processing steps need to be taken prior to conversion. The best raster images to convert are clean and simple.
First, let’s focus on how to get your raster image up to scratch before conversion. One of the most common problems in vectorization is poor image quality. Even if your image looks ready to convert, there may be problems that aren’t so easy to see. Some of the most common issues with raster images can be seen in the image below…
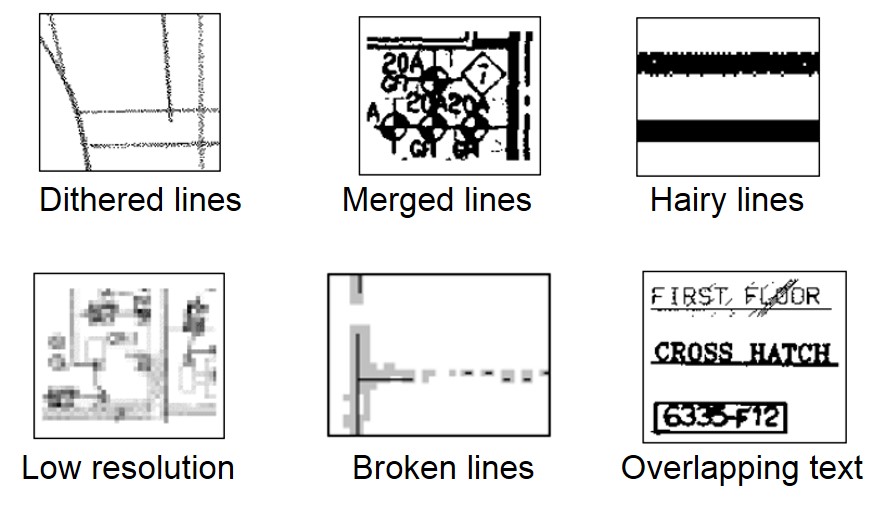
Luckily, Scan2CAD have put together a Raster Quality Checklist. This provides you with simple steps to help you clean up your image. These include…
- Typing over illegible text
- Cleaning up the image by removing speckles
- Smoothing the image to remove ‘hairy’ lines
- Thickening lines or pixels to fix broken lines
- If the image is of very poor quality, re-scan it!
As well as cleaning the image up, we can also simplify it. Monochrome images are ideal for vectorization, and can be achieved by:
- Using monochrome settings when scanning your image
- Using thresholding after scanning to reduce your image to two colors
- Removing the background (as seen in the image above)
Following these steps should leave you with a simple raster image and an optimal chance of getting a great vector output. For even more information on how to get your image in shape, check out our top 10 tips on how to optimize your raster image.
Scan2CAD is the market-leading tool for all stages of the vectorization process. Far from just a converter; Scan2CAD also comes equipped with image editing tools, enabling you to get optimal vectorization results. Try out Scan2CAD’s full range of features completely free with our 14-day free trial.
