As a raster-to-vector conversion software, Scan2CAD has applications across a wide range of fields. One of the most common uses of Scan2CAD, however, is the conversion of images for CNC machining purposes. With Scan2CAD, it’s easy to convert a raster image (such as a sketch) to a vector image. That vector image can then be transformed into G-code data, which will in turn be used to machine parts. However, there’s another important issue to face: how to efficiently use materials for machining. That’s where nesting comes in.
Nesting, quite simply, aims to reduce material waste by laying patterns out in a certain way when cutting out multiple parts. However, whilst this may sound straightforward, it’s often more complex than you’d think. In this article, we’ll provide you with a rundown of the key facts about nesting, from the leading software through to the industries that use it. Read on for everything you need to know.
What is nesting?
Creating new products often means machining a number of parts from a block or sheet of material. However, it’s unlikely that this sheet or block will exactly match the size or dimensions of the parts you wish to create. As a result, the machining process will generally create material waste.
Whilst it’s difficult to avoid creating some waste in manufacturing, it is possible to reduce the amount of waste. One way of achieving this reduction is through nesting. For the uninitiated, nesting essentially involves changing the way you lay out cutting patterns. The best way to demonstrate the power of nesting is through a series of examples. First, look at the image below:
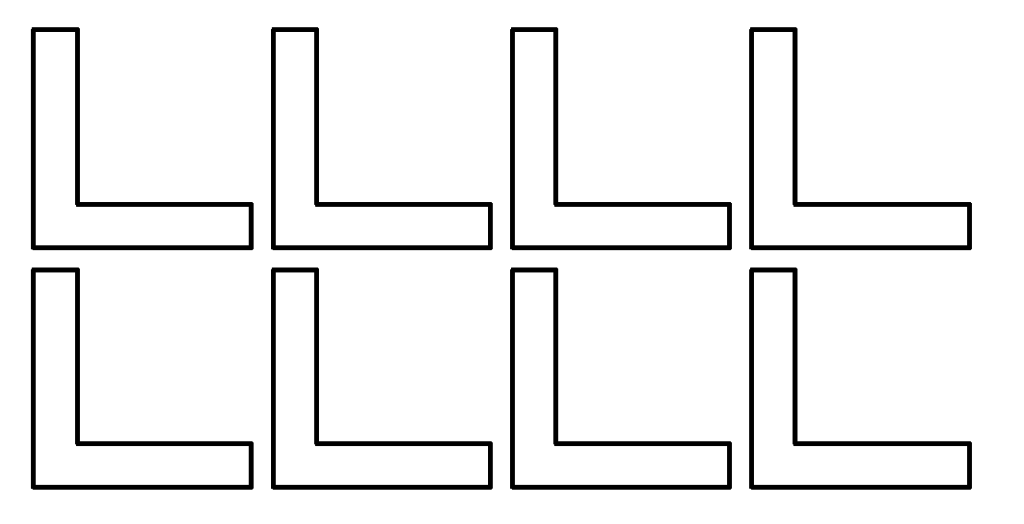
The above image displays a cutting pattern without optimized nesting. If you were to cut the L-shaped parts out of a sheet of metal following this pattern, you would create a large amount of material waste. However, through using better nesting techniques, it’s possible to get more parts out of a single sheet of metal, whilst reducing waste. A better example can be seen in the image below:
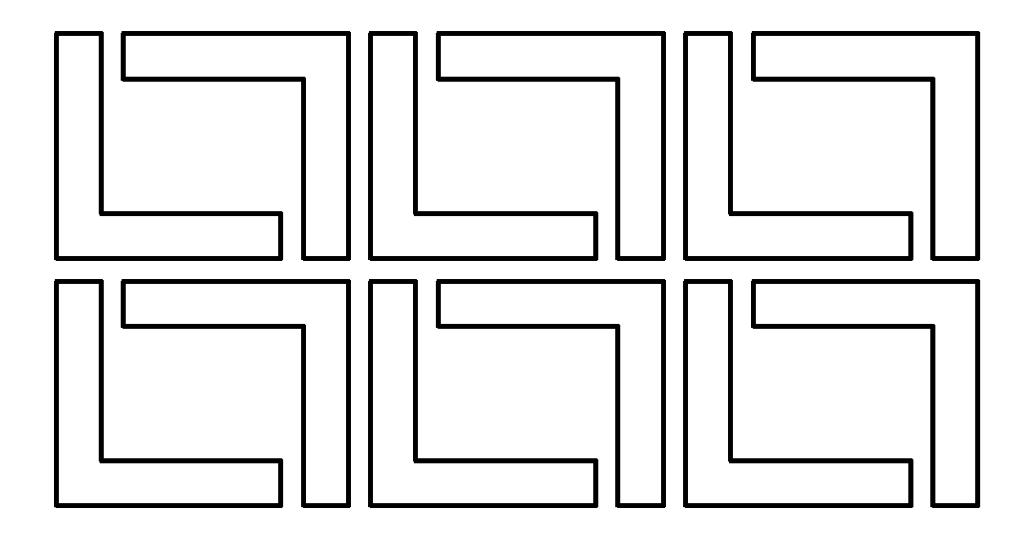
As you can see, using the above image allows users to get 50% more out of the same sheet of metal, as it is now possible to machine 12 parts rather than 8. Additionally, this pattern creates less material waste than the first. If a company only wished to machine a single type of part, this could be the optimum solution. However, most products require a range of different parts. If these parts can be machined from the same material, nesting allows users to fit them together. The image below shows an example of how this can help minimize waste:
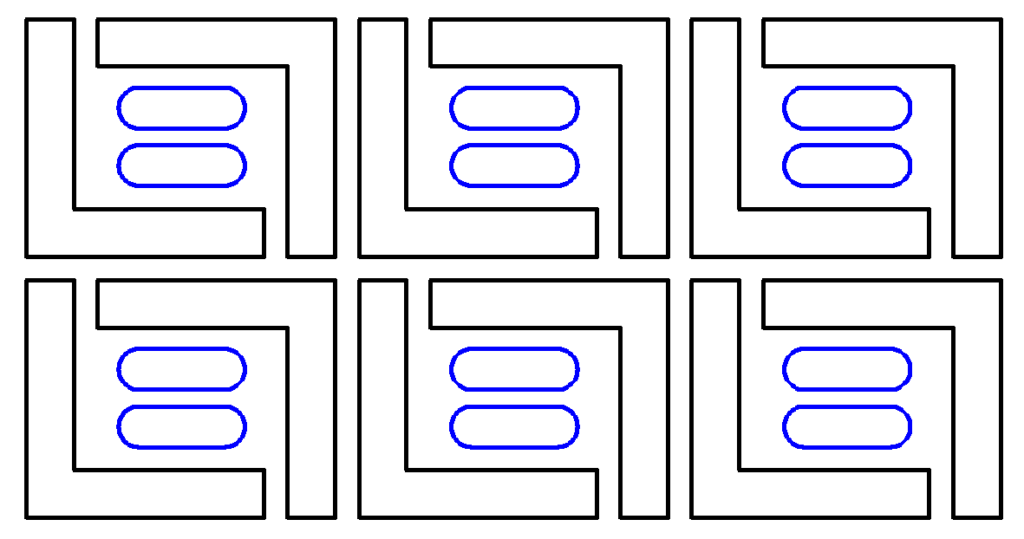
Using this pattern allows users to cut out 12 blue parts as well as the existing 12 L-shaped black parts. It also produces substantially less waste than both previous patterns.
It’s worth noting that, whilst these examples use relatively simple parts, nesting has much wider applications. Thanks to specialized nesting software, users can now fit together complex and irregular parts in the most efficient way possible.
Nesting software
In the past, the only way to carry out the process of nesting was manually. Now, however, there is a wide range of software on the market which provides for automated nesting. This works using algorithms which determine the optimal way to lay out the required number of parts whilst minimizing waste.
As well as simply finding efficient ways of laying out cutting patterns, nesting software also has to take into account the constraints of the machine in use. It also has to deal with the specific characteristics of the material used.
If your business relies on CNC machining, then nesting software could be a valuable investment. However, you may be a little unsure as to what is available. Here at Scan2CAD, we’ve compiled just a few of the top nesting software providers to help you to make an informed decision.
SigmaNEST
SigmaNEST describe their software as “simply… the best nesting software in the industry”. It’s a bold claim, but they certainly have the chops to back it up. SigmaNEST runs on all types of CNC machine, offering businesses flexibility. It’s also incredibly rich in features, allowing for faster cutting whilst maintaining excellent cut quality. With SigmaNEST, you can…
- Avoid cutting in dangerous areas with feature avoidance
- Use intelligent cutting sequencing and work order nesting
- Minimize your time spent handling waste material thanks to integrated crop-cutting and scrap cutting
- Take advantage of quick part search, repositioning and bevel cutting
- Use your machine as intended thanks to SigmaNEST’s post-processors
There’s plenty more on offer—visit SigmaNEST to learn more.
TruNest

TruNest is Autodesk’s nesting software. Image source: Autodesk.
Any eagle-eyed readers of our blog may have noticed our guide to Autodesk software compared. However, for a company with its fingers in so many pies, we couldn’t cover every Autodesk program in a single article. One of the ones we didn’t get around to is TruNest, Autodesk’s very own nesting software.
There are three different tailored versions of the software: Contour, Multi-Tool, and Composites. Features vary across these versions, though they all share etching and labeling tools, multiple machine setup and automatic common line cutting. Get more information about TruNest by visiting Autodesk.
Deepnest

Purchase one-off nest credits with Deepnest. Image source: Deepnest.
Deepnest is specialized nesting software specifically for laser cutters, which combines desktop software with online-based technology. It distinguishes itself not only with its user-friendly interface, but also with its unique credit system. Its credit system means that users need only pay for their exports, making it one of the most affordable nesting options. A single nest credit costs just $7.50 at the time of writing—ideal for hobbyists and makers.
The simplicity of using Deepnest stands out, too. Everything happens in just three steps: import your file, select the largest part as your sheet, then hit start. Deepnest will then look for better nesting solutions until you hit stop. It’s capable of handling DXF files, SVG files, and Corel CDR files. Interested in learning more? Head to Deepnest.
Optimation
If you’re looking for highly specialized software, then Optimation’s range of nesting products could be a great choice. The company offers no fewer than six applications: OptiLaser, OptiNest, OptiRout, OptiPunch, OptiJet and OptiComp. Respectively, they cover lasers, plasma and oxy, routers, turret punch, waterjets and knives.
If you’re not sure whether Optimation’s software is right for you, the company also offers a free test run with any of their products. To learn more, visit Optimation.
SVGnest

Looking for free, open source nesting software? Try SVGnest. Image source: SVGnest.
Whilst investing in dedicated software often produces the best results, sometimes it’s worth considering freeware options. If this sounds like an option for you, then you should try out SVGnest, an open source nesting software.
SVGnest is remarkably easy to use, as you can see immediately using the onsite demo. It’s also cloud-based, meaning that you can effectively take it with you to any workshop. All you have to do is upload your SVG to the site and start the nesting process. It is, however, worth mentioning that (as the name implies) SVGnest only supports SVG files. Visit SVGnest to learn more, and get the code for yourself.
Looking for freeware CAD choices? Check out our guide to 14 top free CAD packages.
Benefits
Each specific nesting program will come with its own advantages. That’s why it’s crucial to put in the research to ensure that you buy or subscribe to a program that meets your needs. However, there are some more general benefits that apply to virtually any nesting software on the market. A few of these advantages include:
- Less waste. Though we’ve already mentioned this point, it’s so crucial that it bears repeating. Wasting less means you’re getting the most out of the materials you use, and it reduces the amount you dispose. Nesting software can also offer you ideal solutions that may not normally come to mind.
- Cost savings. Wasting less material means purchasing less of it in the first place. This can mean more money in the bank for your business, providing up to 20% material savings. In turn, this reduces costs across a wide range of areas, such as machine usage time, storage, logistics, and disposal.
- Environmental benefits. Whilst some material waste, including some metals and plastics, can be recycled, other waste cannot. As such, this reduces the need for mining, logging and manufacturing of these materials. This means that nesting doesn’t only help your company, but it also helps the planet.
- Speed. Manual nesting is, to some extent, a process of trial and error. This means that it often takes a lot of laborious (and potentially mind-numbing) work to find a good cutting pattern. Nesting software practically eliminates the need for this step, saving valuable hours of labor.
- Improved productivity. With nesting software, you can create cutting patterns for a large number of complex parts, allowing you to increase production and machine parts in high volumes. It also helps ensure more accurate calculations, reducing the number of incorrect and damaged parts.
Why human input is still needed

With so many benefits to nesting software, it could almost be tempting to exclude humans from the process. However, nesting software can only work with the parts that engineers and designers create. As such, it’s up to those who design the parts in the first place to start optimizing those parts. Here are some top tips:
-
For starters, the key aim of nesting is to reduce material waste. However, it’s also worth considering whether you’re designing parts that create more waste than they need to. If it’s possible, reduce the size of your part, and cut out superfluous details.
-
When designing your part, bear in mind the size, shape and scale of the material you’ll be machining. Use fractions of this size whilst designing, and try to ensure that parts (or groups of parts) are close to rectangular in shape.
-
Parts with straight edges are generally less wasteful than those that use only curved lines. This is because parts with straight edges can more easily share a single cutting line, meaning that there is little to no wasted material along this line. It is, however, occasionally possible to use parallel curved lines.
-
Whilst it’s sometimes possible to use shared cutting paths, it will usually be necessary to build in some space around each part. Ensure that you input the right amount of space for the material you use.
-
Use digital prototyping before machining your parts. This helps to ensure that the parts you ultimately create will be suitable for your final product.
-
Avoid any accidental waste by double checking your CAD files for any errors. Remember that these may not be immediately visible: objects may overlap, leading CNC machines to perform the same action twice. You should also ensure that objects are drawn to the correct scale.
Need more guidance around creating the right parts? Read our guide covering how to avoid the pitfalls of designing for CNC.
Ready to get straight to cutting—but need some designs for inspiration? Check out our cut-ready CNC DXF designs.
