If you’re a regular Scan2CAD reader, you’ll no doubt be familiar with DraftSight. A popular 2D CAD product from none other than Dassault Systèmes, DraftSight is used by hundreds of industries every single day. If you’re familiar with CAD software, you won’t find it too difficult to acclimatize yourself to the interface. If you’ve not yet delved into the realm of CAD, however, you might struggle getting to grips with DraftSight basics.
To help you along your DraftSight journey, Scan2CAD has put together a guide to learning DraftSight basics in 1 hour. In this article, we’ll cover the DraftSight interface, its draw and modify tools, the coordinates system, and much more. We’ve even included top resources for you to take advantage of.
DraftSight basics: orientation
While it might be tempting to just get stuck into DraftSight straight away, you have to first get to grips with the actual interface. After all, you won’t be able to go far if you can’t locate certain tools or don’t know how to type in commands. We’ll take you through a quick overview of the DraftSight interface, which will probably take you around 10-15 minutes to complete.
If you’ve used software like AutoCAD before—particularly the 2000 to 2007 editions—you’ll find the DraftSight interface to be relatively familiar. This is pretty beneficial, as it means you don’t have to spend days trying to get to grips with a new CAD software. You can find the basic ribbon toolbar at the top of the screen, containing standard pull-down menus, toolbars and palettes. If you’re not overly familiar with other CAD software, you don’t have to worry. All you have to do is do a bit of extra exploring to get a better idea of what DraftSight has to offer you.
You can find the ever-familiar command line at the bottom of the interface. There, you can execute commands and actions by typing in a key phrase or letter—type LINE to activate the line tool for example. You can customize command aliases (keyboard shortcuts) by right-clicking and heading to Drafting Options > User Preferences > Aliases. We have discussed this further in top tips and tricks for DraftSight newbies.
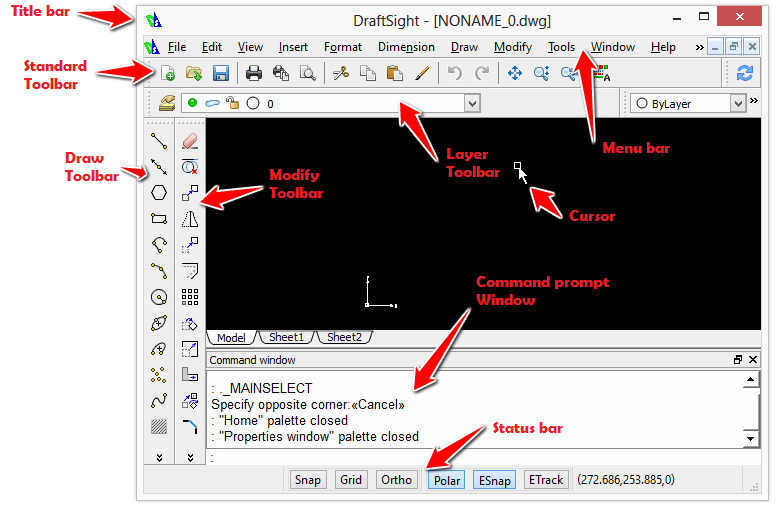
Image source: computeraideddesignguide.com
Before you start drawing
Now you know what to expect with the DraftSight interface, but that doesn’t necessarily mean you’re ready for your first drawing. Before you start drawing, you have to make a few preparations. Firstly, you’ll want to check that you’re using the right unit system. With DraftSight, you can change the base angle, length and angle of units in your drawing. It’s also possible to alter the drawing scale you’re using, which can be very important. Type Units into the command line > Drawing Settings > Unit System.
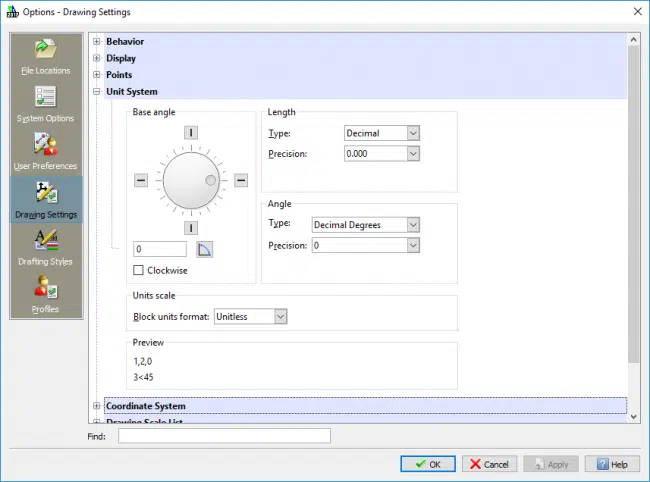
Image source: DraftSight Blog
Additionally, you might want to change the background color to best suit your preferences. For example, many people prefer to draw on a plain white background. Simply head to Tools > Options > Drafting Styles > Display > Color. You might also find it useful to have the grid onscreen as a reference for when you’re drawing. This isn’t visible when you print out your drawing, so don’t worry.
The next step is to group your toolbars and palettes into the same place to ensure everything’s exactly where you want it to be when you finally start your first drawing. Right-click on an empty space in the toolbar, click Tool Matrix. A blank box will appear; you can then click and drag tool palettes into it. This makes it easier to find tools and reduces the time it takes you to draw. You could essentially have your draw, modify and dimensions palettes in this one tool matrix.
Coordinates system
Much like AutoCAD, DraftSight makes use of two different coordinate systems: the Cartesian coordinate system and the Polar coordinate system.
The Cartesian coordinate system works by defining points by their position on the X and Y axes. The Polar coordinate system is probably something you’ll be less familiar with—particularly if you’ve never used CAD software before. It works by defining points by the distance from the origin and the angle from a line that starts in the origin. The angle increases as it moves counterclockwise around the origin point.

Coordinate systems are further broken down into absolute and relative coordinates:
- Absolute coordinates: input points are specified using standard Cartesian coordinates. Absolute Cartesian command: x,y [Enter]; Absolute Polar command: length<angle [Enter].
- Relative coordinates: once you’ve inputted your first coordinate, the next one can be entered by specifying it as relative from your first coordinate. Relative Cartesian command: @x,y [Enter]; Relative Polar command: @distance<angle [Enter].
It might take you a while to get used to these systems—particularly if you’ve never used CAD software before. That being said, it’s all about practice—try out as much as you can, and you’ll be an expert in no time at all.
Drawing and editing
Now, we’ll move onto the actual drawing and editing side to DraftSight. As with most CAD software, DraftSight comes with a wide range of geometric shapes that can be used in 2D drawings. Examples include:
- Line: creates straight line segments
- Polygon: creates equilateral closed PolyLine
- Spline: quadratic or cubic Spline curve
- Make Block: defines a Block from selected entities
- Hatch: fills specified boundary with a pattern
DraftSight also comes with a wide range of modification tools that allow you to make changes to elements within your drawing. Examples include:
- Mirror: copies entities onto opposite side of a mirror line
- Rotate: rotates entities through an angle around a base point
- Scale: enlarges/reduces entities while keeping proportions the same
- Chamfer: connects two Lines with a beveled corner
- Split: erases part of an entity between two Points you select
You can find further examples of what DraftSight has to offer in Dassault’s official Getting Started guide.
Drawing couldn’t be easier in DraftSight. Even if you’re not familiar with CAD software, the icons are so self-explanatory that it won’t take you long to get to grips with them. It is essentially a case of clicking on each icon to get a better idea of what each entails. It should take you the rest of your hour to explore all of DraftSight’s draw and modify tools. If you don’t think that’s the best method of learning for you, check out the YouTube tutorial below for a more visual approach.
Extra resources
![]()
A great way to get better acquainted with software is to read up on relevant blogs and guides. Here, you can find anything from DraftSight lessons to the latest news and software updates. Here are a few of our top picks below:
For a more hands-on approach, take a look at some YouTube channels and other video resources. You can follow tutorials and lessons with an experienced DraftSight user from the comfort of your own home:
Don’t know much about the company behind DraftSight? Check out Dassault Systèmes – Everything You Need To Know.
