Founded in 2012 by Jon Hirschtick, Onshape is a cloud-based 3D modeling software that combines CAD, collaboration, and data management. This software is delivered via a SaaS (Software as a Service) model. Therefore, it does not require download, installation, or update. To make use of Onshape, all you need is a compatible internet browser on a smartphone, tablet, desktop, or laptop.
Onshape’s SaaS model makes it different from traditional CAD software. This can make navigating the software a problem, even for experienced CAD users. For this reason, we at Scan2CAD have created this compact guide that would intimate you about Onshape’s capabilities, basic concepts, how to navigate the software’s GUI, designing and many more, in as little as one hour.
Table of Contents
Onshape capabilities
The first things to learn about software are its capabilities and features. The main features of Onshape can be broadly classified into the following. CAD, Data management, Collaboration tools, Security and Audit controls, Analytics and Reporting, and Integration and Partners.
Using the CAD features, you can model complex parts, create well-structured assemblies, and produce highly detailed working drawings. You can also import and export data of various formats. In addition to these, the CAD features include standard content libraries.
Data management is very important in design as it can save a lot of design time. The Data management features of Onshape are so comprehensive that you don’t need a separate PDM (Product Data Management) software. These features enable you to handle release management, version control, advanced flow works, bill of materials, branching and merging and product data with ease.
Collaboration is a core aspect of Onshape and this is evident in its Collaboration tools. These tools allow several stakeholders in a project to collaborate with the lead designer in real-time. You can grant real-time access to design files to customers, design teams, business associates, and vendors. You can also share your finished designs with stakeholders or the general public for viewing, commenting, or editing.
Security and audit control. With Onshape, every step of your design process is saved and logged. Whether it is an edit, a modification, or an alteration, the activity is tracked and recorded for review or reversal. Onshape does not store data as files, but as virtual documents in databases (cloud-hosted databases); therefore greater monitoring and control are guaranteed.
Onshape recognizes its limitations in certain aspects of design. This way, the software allows you to make up for these limitations using Integration and Partners. Using partner apps from the Onshape App Store, you can increase the functionality of Onshape to include simulation, CAM, and many other features.
Before You Get Started (Basic Concepts)
In Onshape, all data is stored in the cloud and so the software does not make use of files. Thus, Onshape has no native file format. All design data is stored in Documents. A Document is not a CAD file, rather it’s a project-level container that can contain any type of information related to one or more projects, such as assemblies, subassemblies, parts, drawings, imported parts and any other project-related data such as PDFs, images, and videos. When you open a document, all related data are arranged as tabs within the document window. If for example, you have a project to design a bicycle, you don’t need to open separate files for parts, assemblies, drawings, etc. All you need to do is open a document and utilize the different tabs to switch between interfaces.
Documents keep all your data together in one place to make projects easier for you to manage. There’s also what is known as Folders. A folder can contain more than one document. It helps to keep individual documents organized and clutter-free.
While Onshape has no native file format, the software allows you to import and export files in various industry-standard file formats. Since Onshape is cloud-based, you need to sign in on a compatible browser to start using the software.

The launch screen
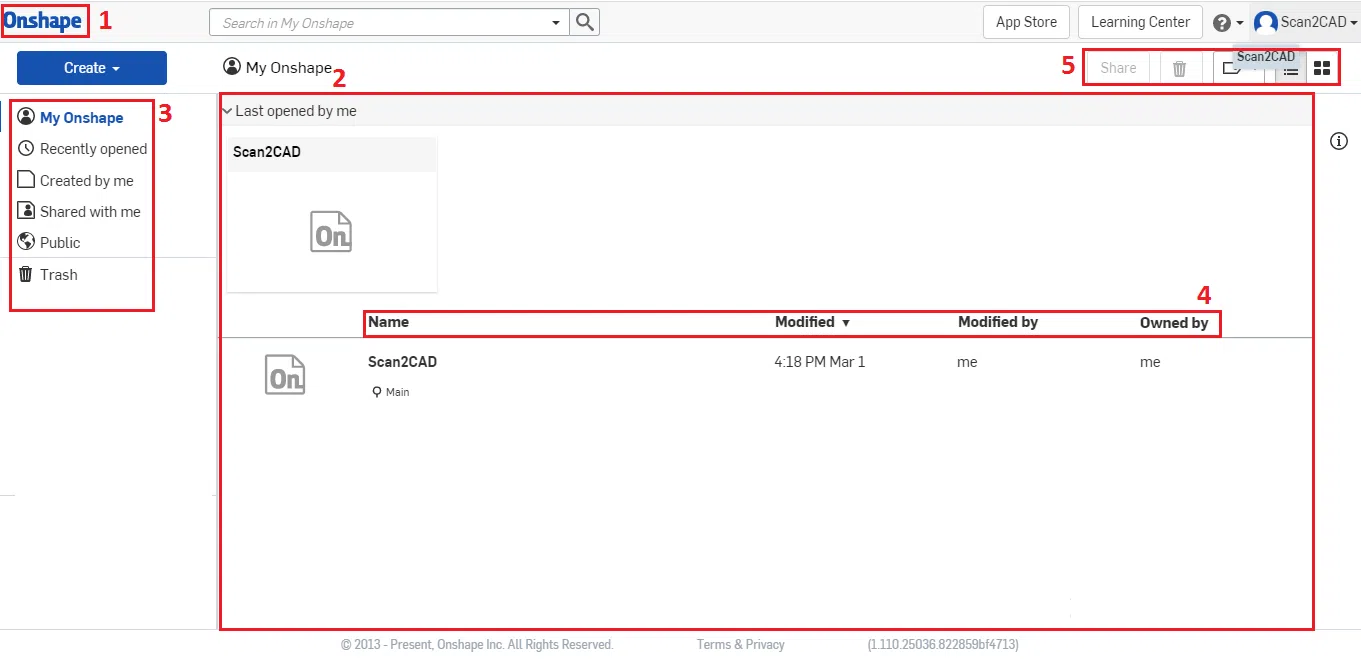
The first page you see after signing in to Onshape is the Documents Page. Whatever page you are in Onshape, just click the Onshape logo (1) in the top left corner to return to the Documents page at any time. The Documents Page is where you view and manage all your Documents. These include both documents created by you and documents shared with you by other users. Note that for documents not created by you, access may be limited by permissions as set by the creator. The Document Page layout is customizable and would remain in the last setup until it is changed.
In the middle portion (2) of the screen is displayed the Document list. This area can be collapsed or expanded if you wish. Folders can be used as one method of managing Documents. Any other Documents that are not in a Folder are displayed at the bottom, with the most recently modified appearing at the top. The Document list includes all the Documents you have access to. If you want to filter this list to show only Documents created by you, shared with you or recently opened you can use the filters explained below.
Down the left-hand side of the page, under the create icon, are your Document filters (3) with which you can limit and group the number of documents displayed at a time.
- When the “My Onshape” filter is active, every Document and Folder that you have access to (whether created by you or shared with you) is listed and divided into three sections.
- The “Recently Opened” filter makes it easy to find and open a recent Document so you carry on where you left off.
- “Created by me” lists only documents that you created yourself.
- “Shared with me” displays only documents that were created by others and shared with you.
- “Public” lists all documents that have been shared publicly by other Onshape users.
- “Trash” displays your deleted documents.
Other filters such as “Teams”, “Labels”, “Google Drive”, and “Dropbox” would be available if/when you: are part of a team, create labels, integrate Google Drive, and Integrate DropBox respectively. In addition to the filters, there are also Sort buttons (4) that allow you to arrange the displayed documents by name, date modified, and modifier.
Each Document listing shows you a thumbnail image, the Document name, and last opened Workspace, any labels that have been added, when the Document was last modified and by whom, and the Document owner. To interact with a document, click on the document to highlight it. Once highlighted, you can share, trash, or label a document using the appropriate buttons at the top right corner (5)
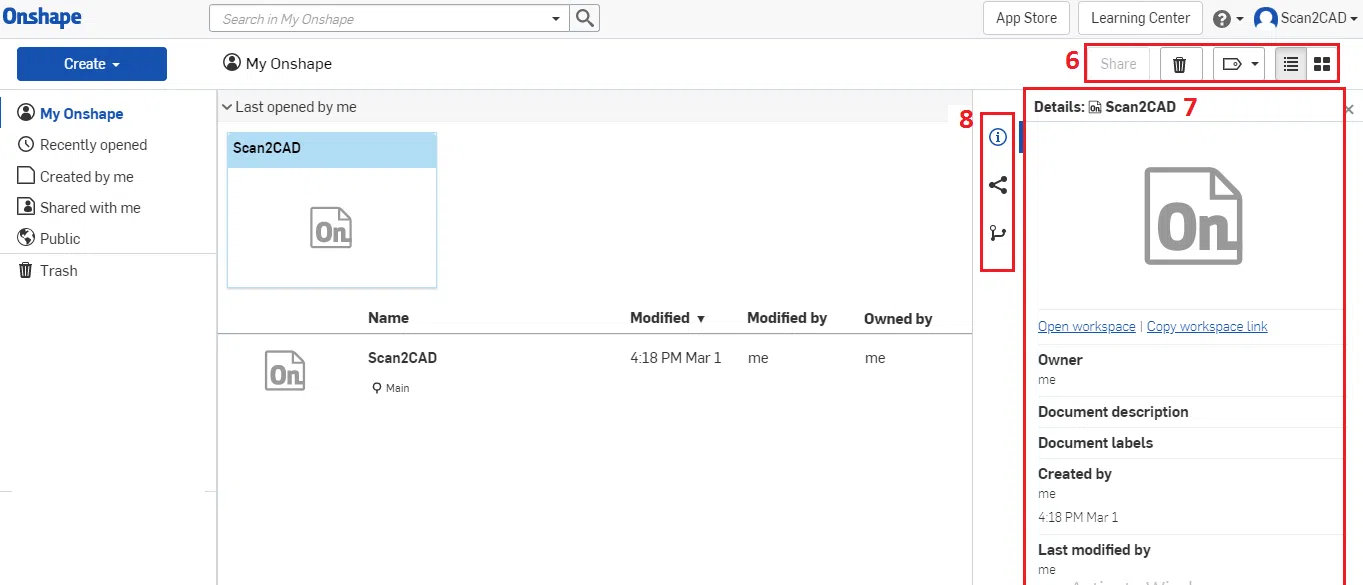
Clicking a Document will also display more information in the Details panel (7) (also known as the Details flyout, as it can be toggled on or off, and can be resized) on the right, including a description and a detailed list of who the Document has been shared with and their access permissions. The Details panel also contains the Share details icon and the Versions and history icon (8).
If you right-click on a Document a menu appears allowing you to open, rename, copy, move, transfer ownership, copy workspace, or trash that Document. You can also select multiple Documents at the same time by holding down either the Control key on Windows or the Command key on Mac or the Shift key to select many at once. The right-click context menu now only allows you to set labels, move the Documents to a folder or send them to Trash
To open a Document, left-click the Document name or double-click the thumbnail image or anywhere within the highlighted area.
You can change the way Documents are displayed in the Documents page, switching between list view and grid view using the appropriate icons (6) in the top right corner. Each tile displays the same information but in a larger format to make it easier to browse your Documents.
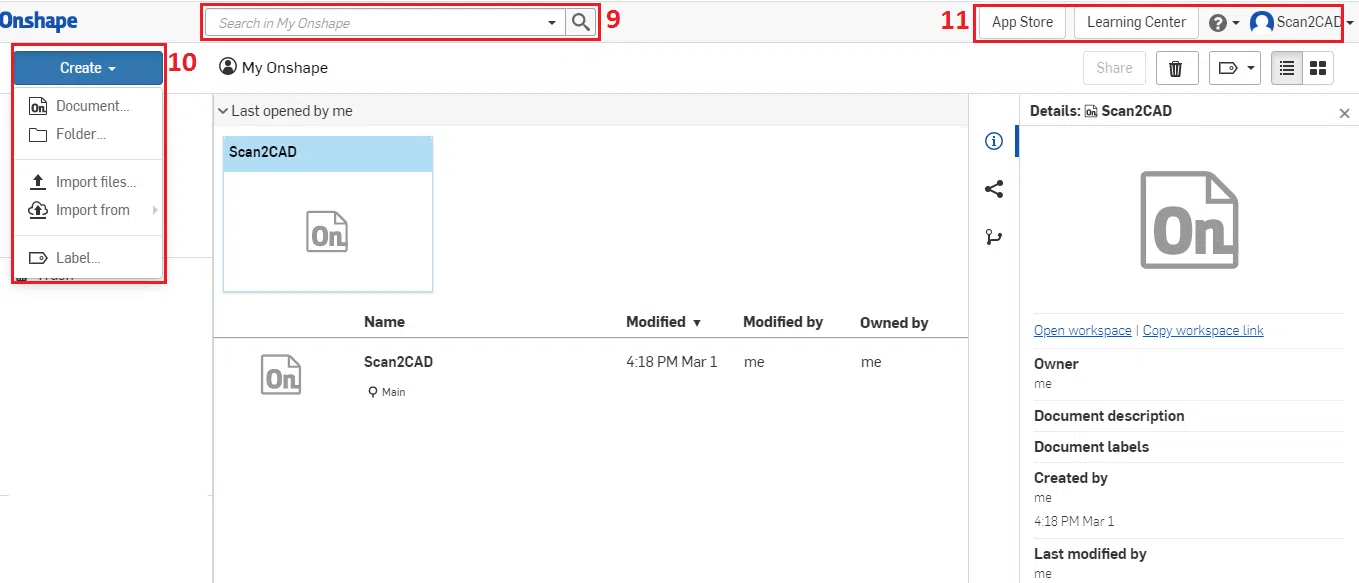
At the top of the Document page is the Document search bar (9). This feature makes it very easy to find things in Onshape. To search, type in a partial name and press enter. Search will find Documents, Parts, Assemblies, and Drawings or any file that matches the name you typed in. To streamline the search, click on the small arrow in the search bar to drop down the search menu. Here you can further limit your search by type, name, description, etc.
Note that if a filter is activated, only documents, parts, assemblies, or any other files that fall under the filter category will be displayed in the search results. For example, if you only want to search Documents that were created by you, click the filter first before entering a search term.
In the top left corner is the Create button with 4 options (10). One to create a new Document, one to upload either a 3D model from another CAD system or any of the other file types we saw earlier, one to create a new Folder and one to create a new Label.
Finally, in the top right corner, there are buttons in the title bar to access the Onshape App Store (for complementary applications such as rendering, simulation, and CAM), and the Onshape Learning Center (11). A bell icon that indicates notifications can be found on the title bar. There is also the help menu and then your profile picture and account preferences menu. These last two options may look different depending upon which level of Onshape subscription you have.
Getting started
Completing your profile and setting your default units and mouse controls is an important first step.
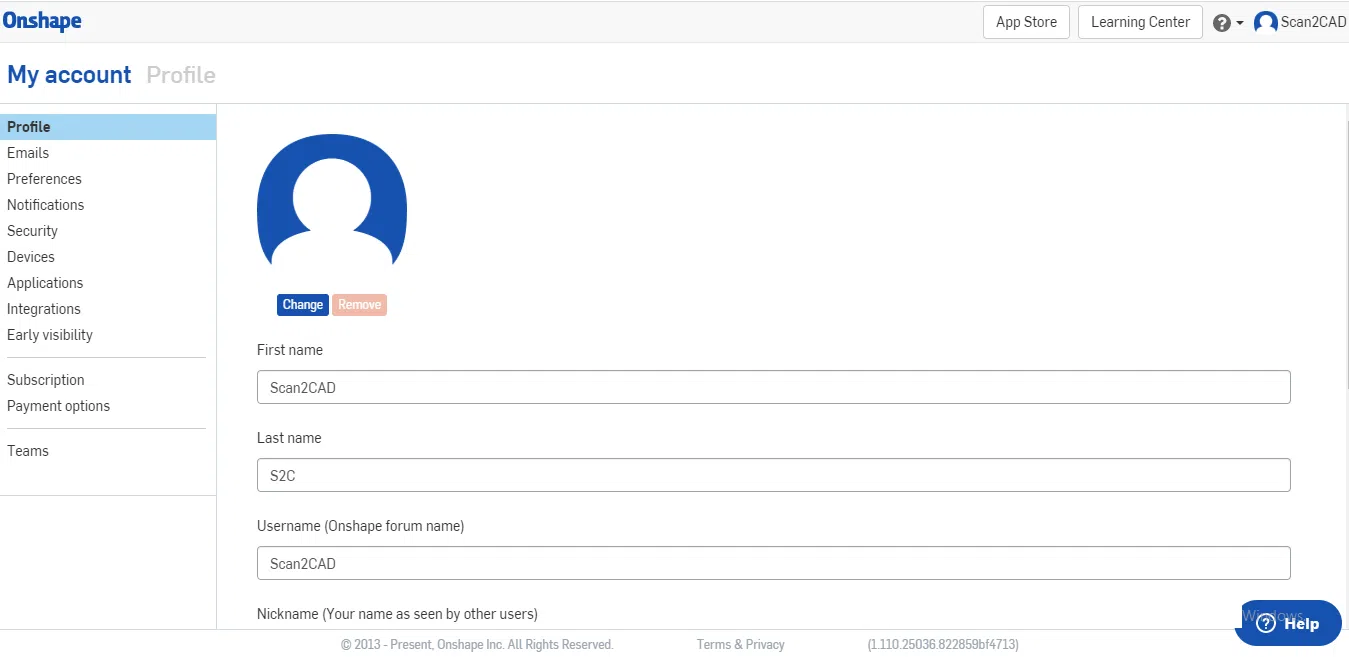
To set your preferences, click your name in the top right corner of the screen and select Manage Account. Here you can set your name, forum name, and nickname which is your name as it will appear in the top right corner. If you share a document or are working on the same document as someone else at the same time, then this is how your name will be seen by them. The Bio section displays more information about yourself in the forum and is optional. If you make a change and press Update profile, then those changes take effect immediately.
You can also add an image of yourself by clicking the change button under the avatar at the top of the page. Using a picture is very useful if you are collaborating on a Document with several other users at the same time.
Under the preferences menu down the left-hand side, you can set your default units and view manipulation preferences.
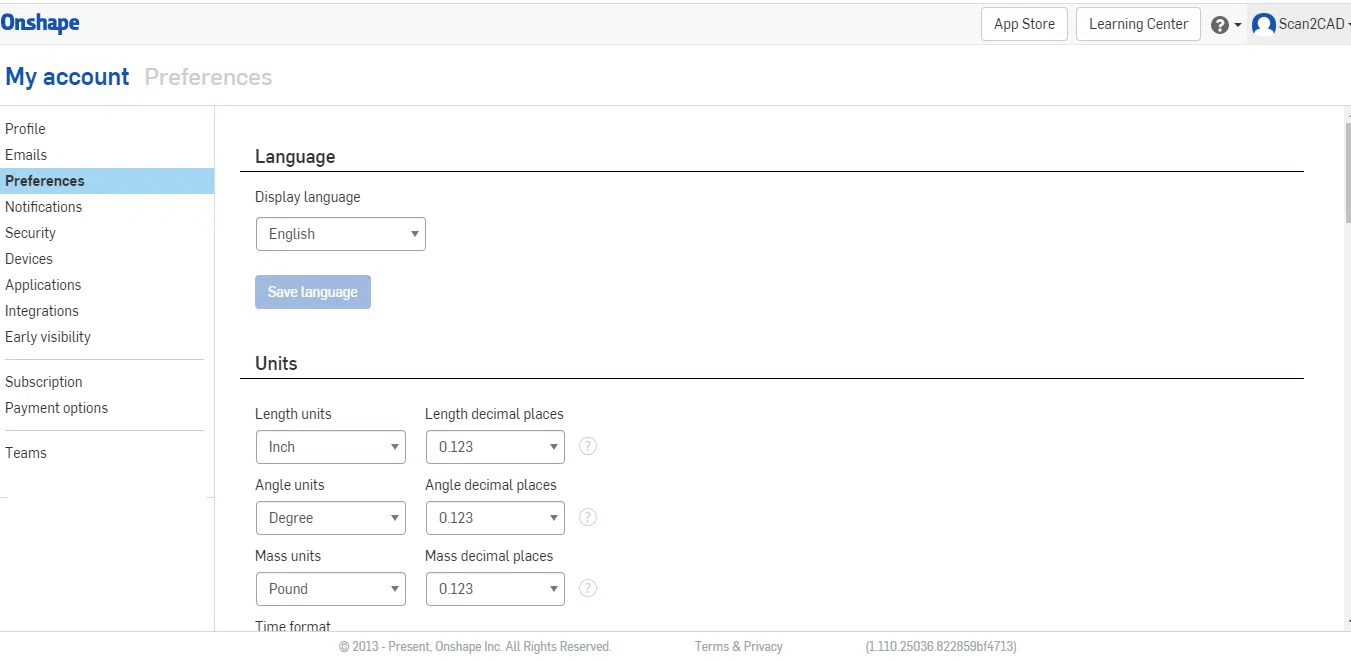
The unit settings here apply to new documents only, any existing documents or documents that have been shared with you will not be affected by these settings. You can also select the number of decimal places you want to see when creating sketches, features, parts, and assemblies.
The view manipulation settings alter the way you interact with a 3D model in Onshape. In Onshape, you rotate a model using the 3rd mouse button, pan a model using the middle mouse button, and zoom in by scrolling the mouse wheel up and zoom out by scrolling it down.
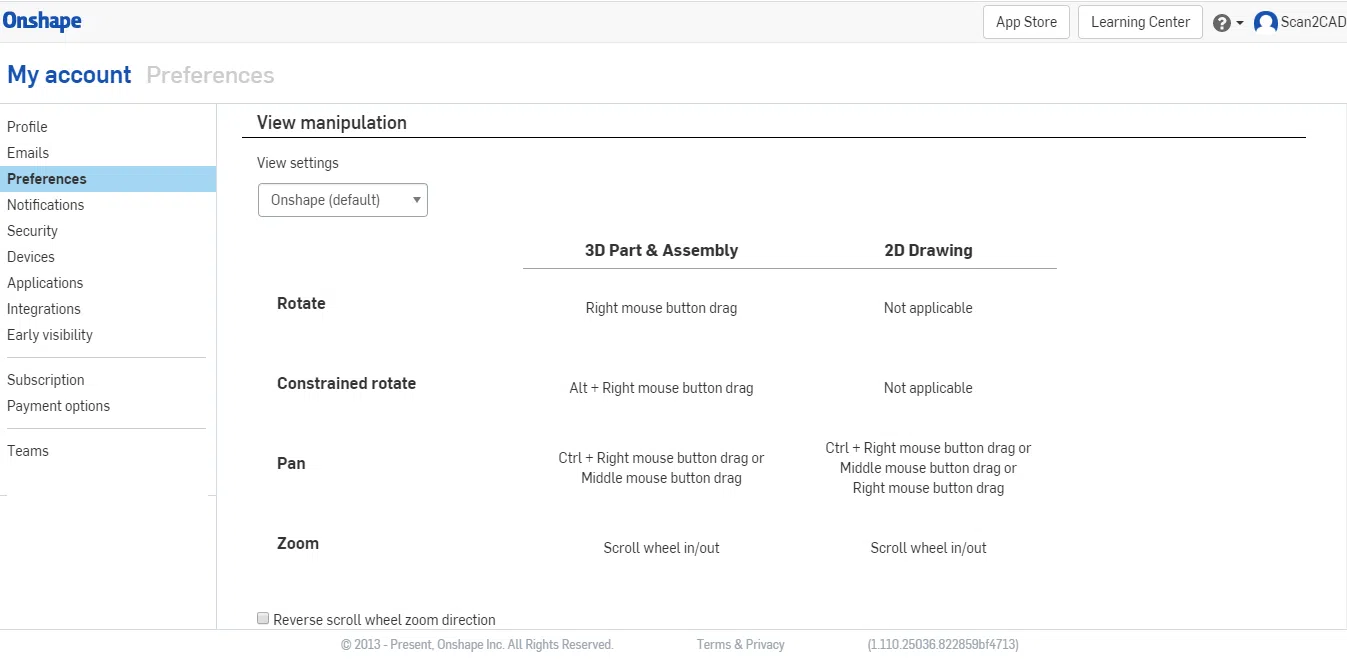
If you’re a seasoned user of a traditional CAD system, you can change these settings by selecting the CAD system you would like to mimic and all the mouse controls will be set to these preferences every time you use Onshape. Press save view manipulation settings when done.
All these settings apply to your account, so every time you log in to Onshape, from any device, these settings will remain until you decide to change them.
The Creation Graphical User Interfaces
To begin working in Onshape, create a Document or open an existing one. For this guide, we’ll be opening an existing document. The first interface you come across after opening a document is the Part Studio.
One of the fundamental differences between Onshape and other CAD systems is the Part Studio. It’s called a Part Studio because you can create more than one part at a time and add robust relationships between them. When there are more than part in a Part Studio, it’s called a subassembly and all the parts are fixed relative to each other. To add motion, you need to create an actual assembly.
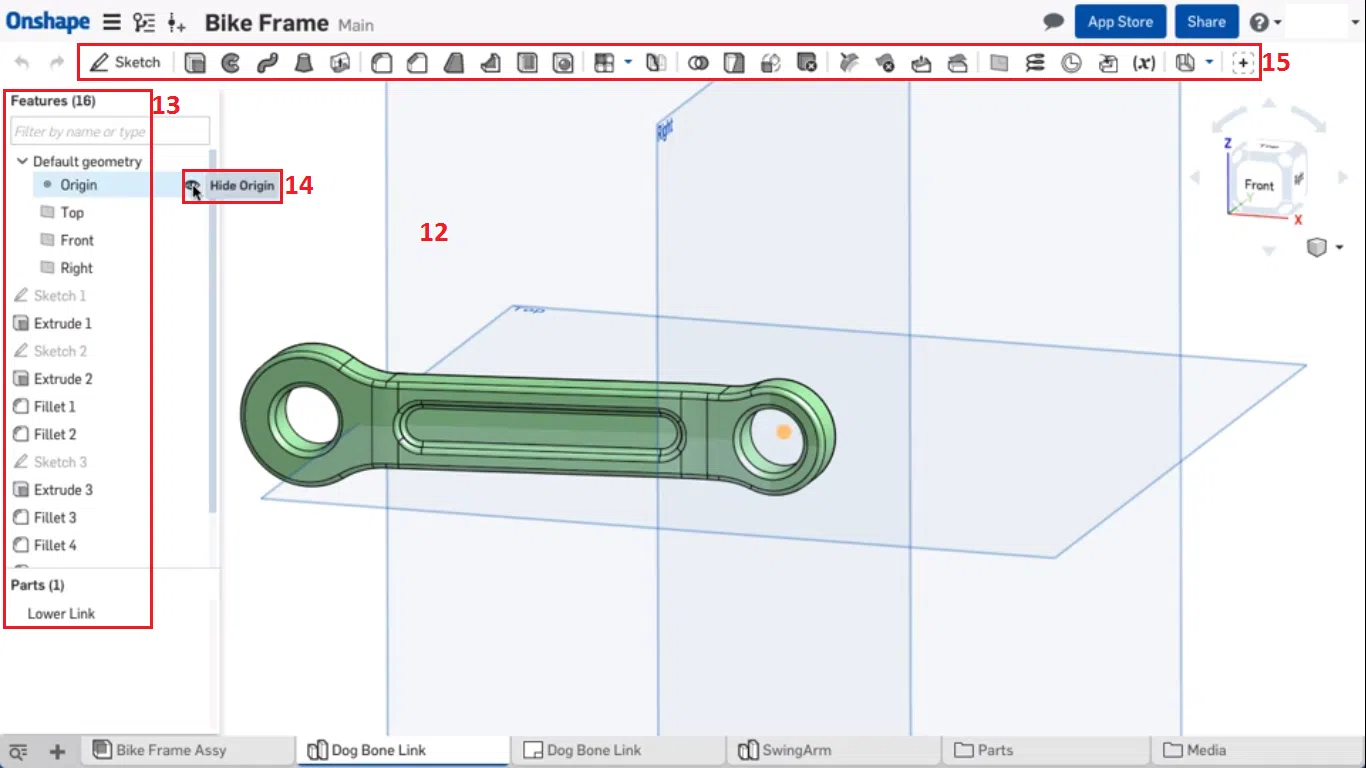
When you open a new Part Studio, it will contain just an origin and three orthogonal planes (12) labeled top, front, and right. In a finished design, you will see more features below these that are the building blocks or the recipe that was used to create each part. Each feature is built in order and listed in the Feature List (13).
The origin and the planes should be used to help you add design intent to your parts. The origin can be used to locate the center of an important feature, like a bore, and the planes can be used to infer symmetry.
These features can be hidden at any time by clicking the eye icon (14) in the feature list. To hide or show all planes at once, use the keyboard shortcut, P.
Above the Feature list is the Feature toolbar (15). This shows you the available commands and is context-sensitive, so in a Part Studio it will show you feature creation tools, and in a sketch, assembly, or drawing, it will show you tools applicable to the task at hand. The wider your screen, the more tools will be shown at once. If your browser window is narrower the tools will be collapsed into groups with pull-down menus.
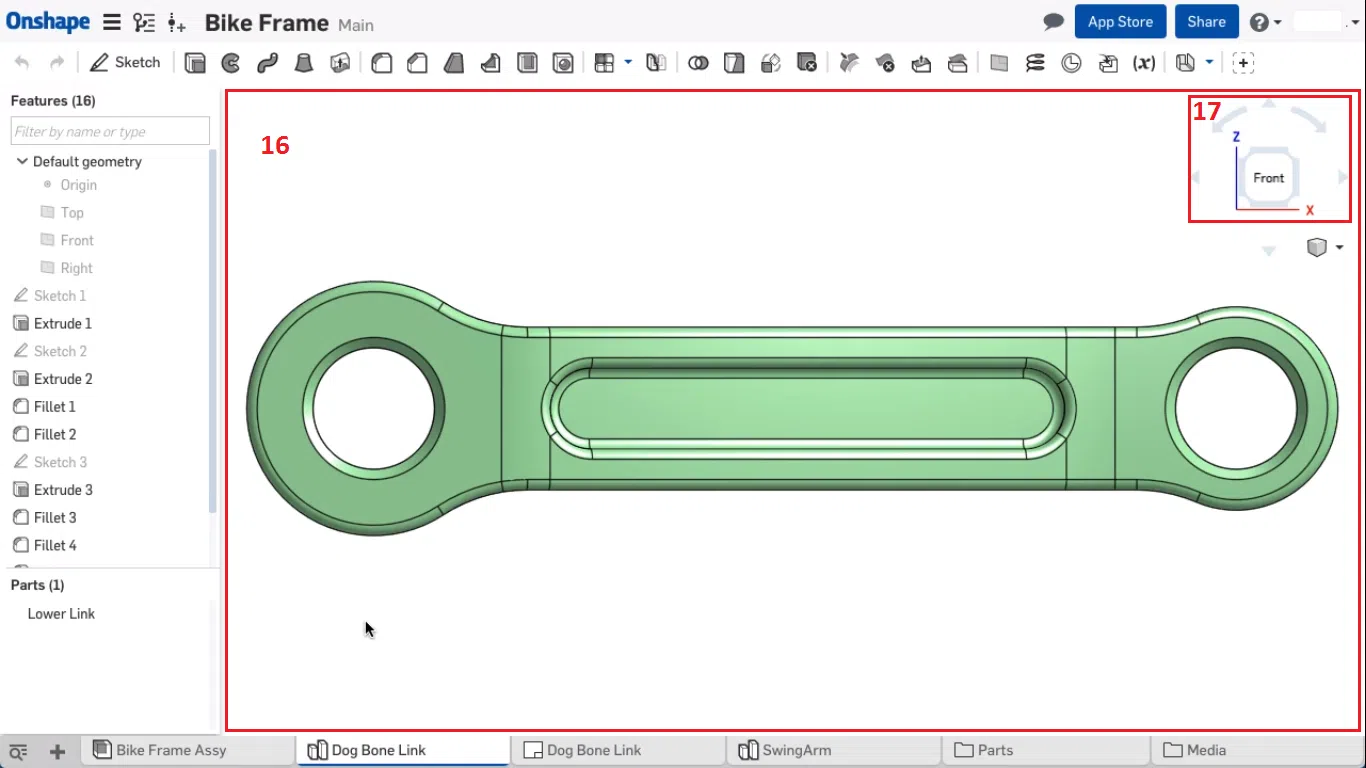
In the center of course is the large graphics area (16). This is where all your design work is done.
The View Cube (17) in the top right corner of the graphics area can be used to help you understand your current orientation and help you manipulate your model. First, you can see the orientation of the XYZ coordinate system, which is useful when taking measurements from your model. If you click on one of the named faces of the cube, your view will be oriented with the selected face normal to the screen. Clicking around the outside of a face selects the face behind it, so it’s a quick and easy way to rotate your model 180 degrees. Clicking one of the corners of the cube will take you to an isometric view, clicking the small arrows at the top, bottom, left, and right will rotate your model in those directions, and the two curved arrows rotate your model normal to the screen.
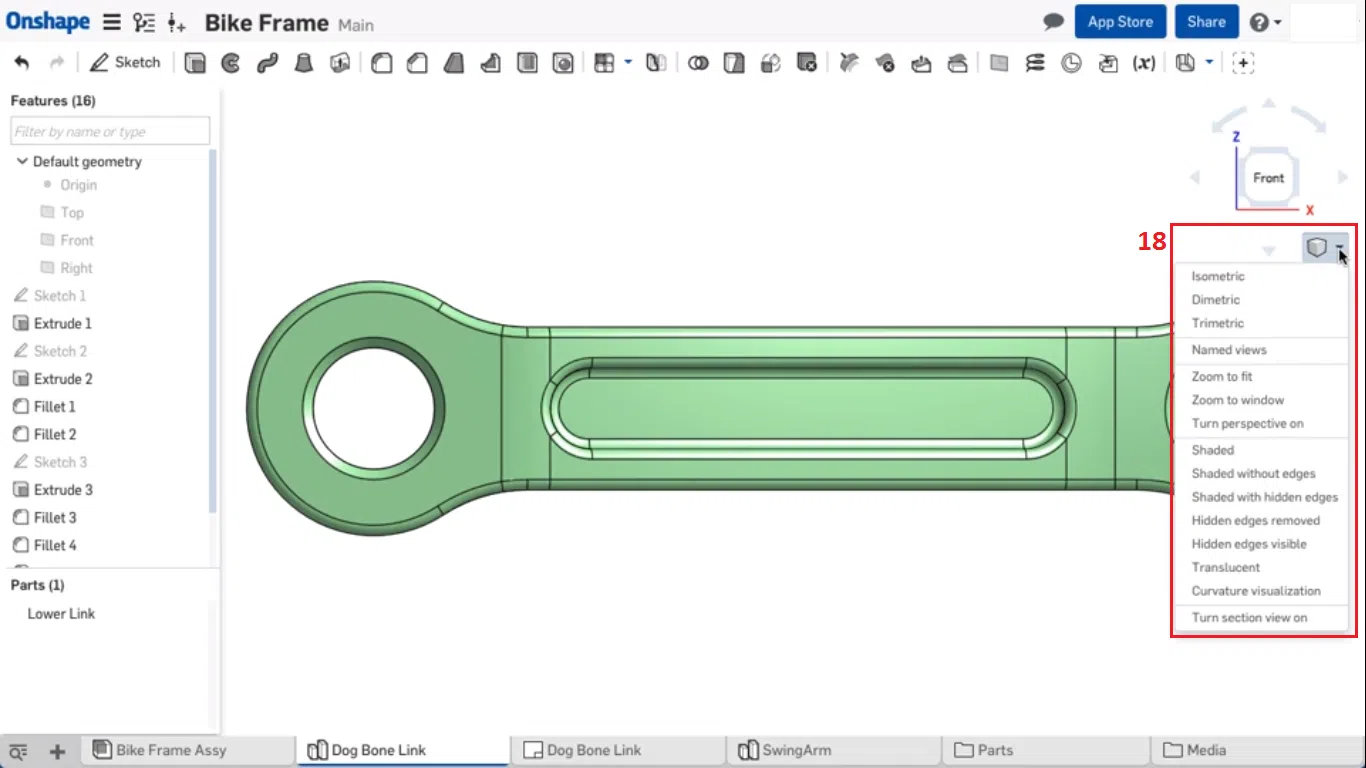
Below the View Cube is the View Tools icon (18). Here you can rotate your model to an isometric, dimetric or trimetric view, save a named view, zoom your model to fit the screen or zoom in, turn Perspective view on or off, and choose from a selection of shading modes.
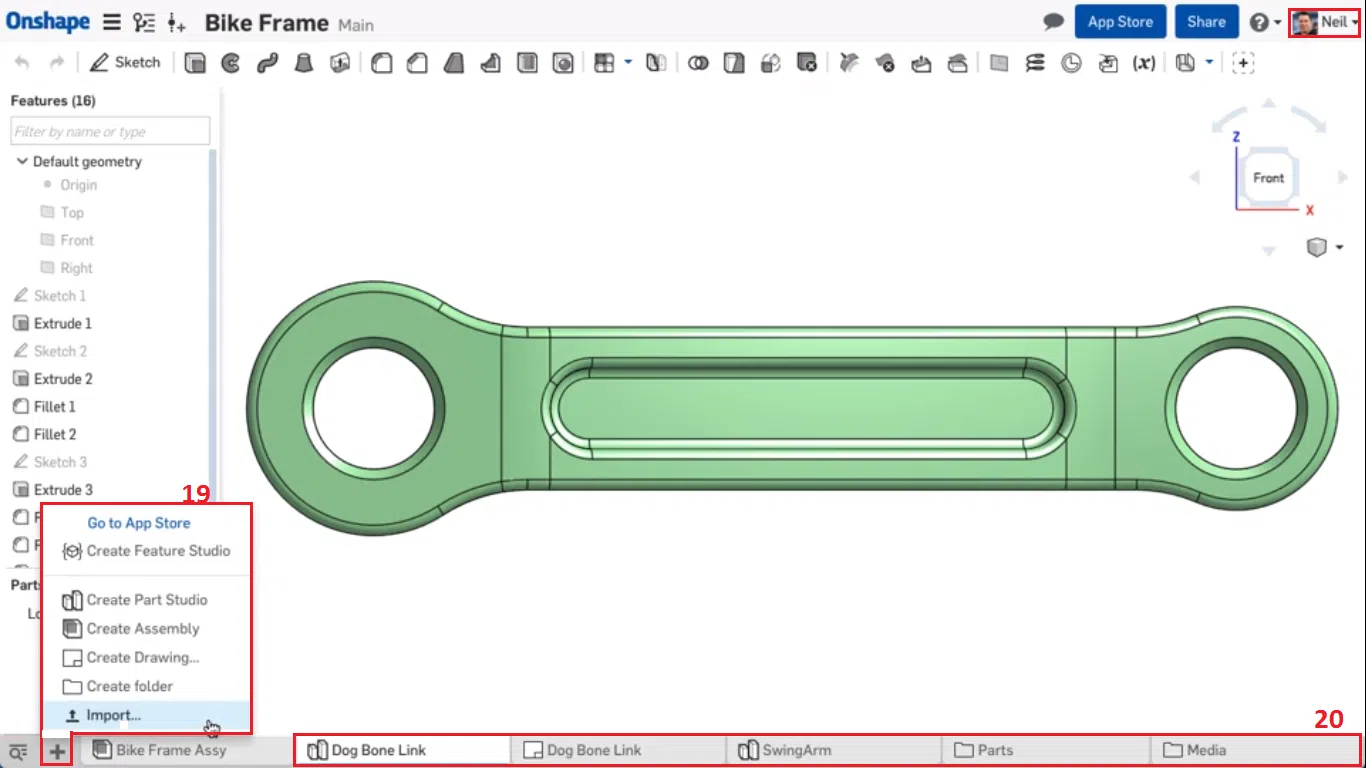
The Part Studio is where you create parts, create assemblies, produce 2D working drawings, create folders to organize your tabs, and import files such as images and videos or 3D files from other CAD systems. The interfaces to do all these are different. To access these interfaces, all you need to do is add tabs, also known as elements, by clicking on the + icon (19) in the bottom left corner of the studio. This way, you can easily switch between interfaces using the tabs (20) at the bottom of the screen. The Part Studio is itself a tab; the first that is encountered when a document is opened.
Learn Further
Now that you have mastered the basics of Onshape as well as how to navigate the software, your foundation is strong. Continue your journey to Onshape mastery via any of the following learning platforms.
