
Have you ever heard of diecast model cars? Popular among the car enthusiast community, these collectible model cars are produced by injecting molten metal or plastic into a reusable model under extreme pressure. The result? A replica of a vehicle, new or vintage, that, when painted, can be used as an interior decoration piece. If you visit a website that sells these diecast models, you will notice fractional numbers such as 1/12, 1/18, 1/24, 1/64, 1/87, and so on. What these numbers indicate is the model scale. For instance, a 1/18 scale means that the diecast model car is one 18th the size of the actual car.
The diecast model scale helps the manufacturer create an accurate and somewhat exact replica of the life-size vehicle. And it introduces us to the concept of scaling and what it is meant to achieve, especially in computer-aided design, which has changed product design. Scaling a drawing is central to generating paper-based designs for presentation to a client. The drawing should be large enough to fit all the different sections of a part, house, or road section, for example, such that all the details are visible without much hassle. Still, it should not be so massive that it cannot fit in a particular paper size. Thus, a lot of thinking goes into the choice of the scale.
Perhaps you are venturing into an AutoCAD career in engineering, product design, drafting, interior design, industrial design, or architecture but do not know how to use the AutoCAD scale function, or you just have a rough idea of scaling in AutoCAD. In that case, this guide is designed for you. We will discuss the SCALE command, how to scale by factor, plot scaling, and how to scale text and dimensions, just to mention a few. Let’s get started.
Table of Contents
What is the AutoCAD SCALE Command?
The SCALE command in AutoCAD allows you to proportionally enlarge or shrink the size of an object. It achieves this by prompting you to enter a scale factor. A scale factor that is greater than 1 will enlarge the object. On the other hand, a scale factor between 0 and 1 reduces the object’s size.
How to Scale by Factor in AutoCAD?
To use the AutoCAD SCALE command to scale a drawing by a particular factor, follow the procedure below:
- Type the word SCALE on the command line in AutoCAD and press Enter.
- Specify the object you want to shrink or enlarge by clicking (left-clicking) on that particular object
- Set the base point
A base point acts as a reference point from which the object is enlarged outward or shrunk inward. It is worth noting that you can use the AutoCAD Osnap feature to increase your accuracy when selecting a base point. In particular, you can utilize it if you wish to use a midpoint, endpoint, or a circle’s center or quadrant as the base point. For more on this feature, check out the complete guide to AutoCAD object snap feature. - Input the scale factor
Again, remember that a figure between 0 and 1 shrinks the object, while any scale factor greater than 1 enlarges the object. - Press Enter to complete the scaling.
How to Scale Drawings in AutoCAD?
AutoCAD normally allows you to create drawings in a somewhat unlimited workspace known as model space. Here, the default AutoCAD scale is set as 1:1, meaning 1 paper unit equals 1 drawing unit. Even so, you can change this default scale using the Annotation scale of the current view button on the status bar. To scale drawing based on a custom scale, do the following:
- Click the Annotation scale of the current view button, which displays a pop-up menu containing various AutoCAD scale options
You can select one of the various options, but if what you are looking for isn’t among the list, you can create a custom scale by proceeding to step 2. - Click the Custom option on the pop-up menu, which opens the Edit Drawing Scales dialog box
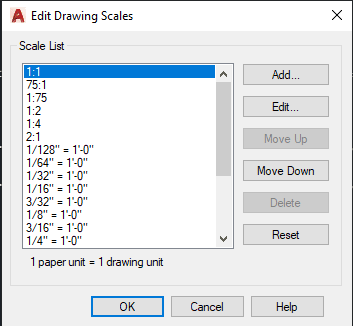
Edit Drawing Scales Dialog Box in AutoCAD
- To add a new scale, press the Add button > Enter the new scale’s name, which will appear on the scale list > define the scale properties > click OK
- Click OK to apply the changes and close the Edit Drawing Scales dialog box
- To choose the scale added in steps 3 and 4, refer to step 1

How to Scale Images and PDFs with Reference in AutoCAD?
AutoCAD allows you to insert an image or import a PDF directly into the model space, even when these files are raster-based. Ordinarily, this CAD software creates vector drawings that are based on mathematical formulae that define the geometric object. In contrast, raster files are made up of pixels and lose quality whenever you zoom into the image. However, while you can import raster files into AutoCAD, you cannot work on them as they are meant to act as a reference based on which you can create a vector drawing.
Sometimes, however, the dimensions of the raster reference file may be too small or too large relative to the size of existing geometric objects in your drawing. This calls for resizing the image or PDF using one of the AutoCAD scale commands called ALIGN. Follow the procedure below to scale with reference:
- Insert your image or PDF into the AutoCAD model space using the Attach button on the Reference ribbon panel in the Insert ribbon tab
- Draw a reference line whose length is equal to one of the known dimensions in the attached drawing
For instance, if there is a dimension in the image or PDF that is 5,000 millimeters long, draw a reference line that measures 5,000 millimeters in AutoCAD - Next, type AL or ALIGN and press enter
- Select the object you want to align to the reference line and press Enter
In this case, your object is the attached image or PDF - Specify the first source point
The first source point is the first endpoint of the known dimension in the image or PDF - Specify the first destination point
The first destination point is the first endpoint on the reference line you have drawn in step 2 - Specify the second source point
The second source point is the second endpoint of the known dimension in the image or PDF - Specify the second destination point and press enter
The second destination point is the first endpoint on the reference line you have drawn in step 2 - Choose the Yes option when AutoCAD asks whether you want to scale objects based on alignment objects
The software will automatically scale the image or PDF accordingly such that the length of the known dimension will now equal the length of the reference line. This means the image or PDF will acquire a scale of 1:1.
How to Scale Blocks in AutoCAD?
When creating/defining a block, AutoCAD prompts you to choose whether or not to allow it to scale the block uniformly. In cases where the Scale uniformly option is not checked, you have to specify the scale of the X, Y, and Z axis when inserting a block. To do this, follow the procedure below:
- Type INSERT on the command line or on the text box that accompanies the cursor and press enter
- The Insert pop-up window/dialog box pops up, allowing you to choose the block you wish to insert into the drawing
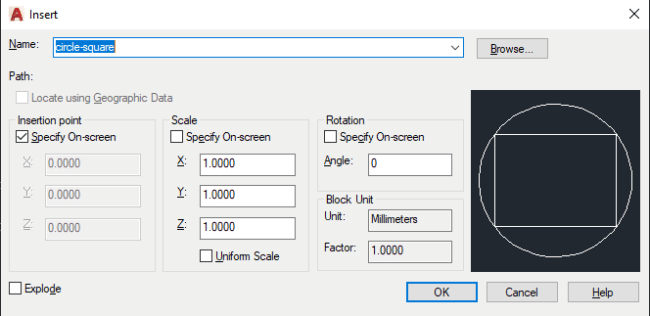
Insert Dialog Box in AutoCAD
- Specify the scale along the X, Y, and Z axes by inputting a number of your choice in the three boxes
- Click on OK and specify the insertion point within the model space.

How to Scale Hatches in AutoCAD?
Hatch patterns can sometimes be so densely packed within an object that they appear as solid hatch. Fortunately, AutoCAD allows you to change the scale of the hatches, thus enabling the patterns to pop out and become visible without much strain. To scale hatches, follow the steps below:
- Create a hatch pattern within an enclosed space
This step will open the Hatch Creation contextual ribbon

Hatch Creation Ribbon Tab in AutoCAD
- Under the Properties ribbon panel, locate the Hatch Pattern Scale option
The Hatch Pattern Scale functionality expands or contracts a predefined or custom hatch pattern by allowing you to input numbers into the box. - Enter different numbers within the Hatch Pattern Scale box to expand or contract the patterns
Do note that the higher the number is, the more spaced out and larger the hatch patterns appear. - Close the hatch creation ribbon tab when you are finally satisfied with the size of the hatch patterns

How to Scale Text and Dimensions in AutoCAD?
To scale a text and dimensions in AutoCAD, follow the procedure below:
- Click the Annotate ribbon tab
- Next, click the dialog box launcher (denoted by an arrow pointing to the bottom right part of the screen) on the Dimensions ribbon panel
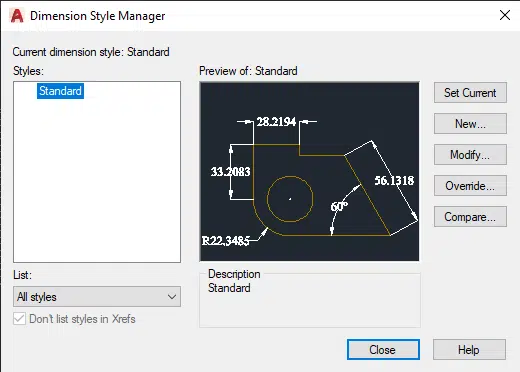
This opens the Dimension Style Manager dialog box

Dimension Style Manager
- Click on the Modify option, which opens the Modify Dimension Style pop-up window
- To change the size of the arrowheads, click on the Symbols and Arrows tab and input the desired size in the Arrow size box
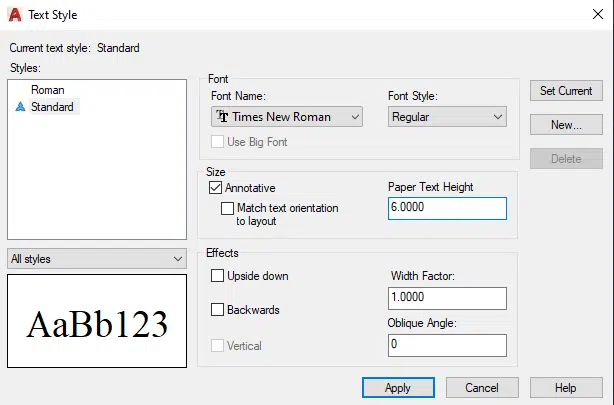
- To scale the text, click on the Text tab > the ellipsis next to the Text style option
This will open the Text Style dialog box. Next, set the Paper Text Height, which defines the size and scale of the text. Finally, click Apply > Close.

Text Style Dialog Box in AutoCAD
- Click on OK to close the Modify Dimension Style pop-up window > Close to shut down the Dimension Style Manager dialog box
AutoCAD will save the changes to local temporary files and use the new scale every time you create a new text or dimension.
How to Scale Annotative Objects in AutoCAD?
Annotative objects refer to annotation objects that are scaled automatically and thus have the same size regardless of the plotting scale or size of the drawing itself. For this to happen, however, you must first make the object annotative. Do note that an annotation object refers to any object or symbol that adds information to your drawing. Examples of annotation objects include notes (text), dimensions, hatches, multileaders, blocks, and geometric tolerances.
Also, note that an annotation object can be non-annotative, meaning it requires a fixed scale or size that is arrived at based on the plot scale of the drawing. The image below shows what happens to non-annotative objects (the dimension and hatches in black) and annotative objects (in green) when you change the drawing’s scale.

Effect of Changing Scales on Annotative and Non-Annotative Objects (source)
To scale annotative objects in AutoCAD, simply follow the procedure below:
- Place your cursor above the annotation object and press the right mouse button (right-click)
- On the menu that pops up, click on Properties
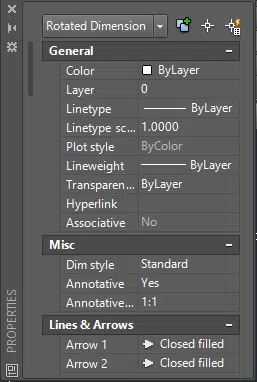
- Under the Misc section of the Properties contextual menu, set the annotative property to Yes
With this property set, AutoCAD will automatically maintain the same size of the annotation object regardless of the scale of the drawing.
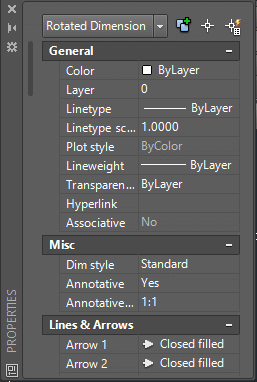
Properties Contextual Menu in AutoCAD
- Alternatively, if you want to set a hatch pattern as an annotative object, left-click the hatch and select Annotativeon the Options ribbon panel under the contextual Hatch Editor ribbon tab. The ribbon panels in this ribbon tab are similar to those found in the Hatch Creation ribbon tab (refer to the How to Scale Hatches in AutoCAD above).
How to Scale Viewports in AutoCAD?
A viewport in AutoCAD is a partition of the display graphics area that shows different scaled sections or views of the same 2D drawing or 3D model. This feature allows you to have dedicated partitions that show specific sections of the drawing, either zoomed in or out. It, therefore, reduces the time – or even eliminates it outright – you would have taken to zoom into each of those particular sections.
As stated earlier, AutoCAD allows you to create a drawing in the model space. However, if you want to plot or print the drawing, you have to use the paper space. Indeed, both the AutoCAD model and paper space have viewports. However, all viewports in the model space have a scale of 1:1, regardless of the level of magnification. And if you modify a scale in one of the viewport’s, this change will be replicated on the other viewports. Thus, you scale the objects in the model space similarly to how you would a typical AutoCAD drawing (as described above).
In contrast, the AutoCAD scale in the paper space differs from one viewport to another, and it depends on the level of magnification. Given that these viewports show the various sections at different levels of magnification, it goes without saying that they each have their own individual scales. Do note that this only applies in paper space. So, how do you scale viewports in paper space when using AutoCAD? The process is simple as it includes the following steps:
- Click on the viewport in the paper space whose scale you want to change
- On the status bar, the Scale of the selected viewport button in the paper space to choose the appropriate scale
Alternatively, you can zoom in or out, and the scale will be automatically recalibrated to match the level of magnification - Lock the viewport scale by clicking the Padlock button in the paper space
Doing this ensures that the scale does not change whenever you zoom into or out of the drawing.
What is Plot Scaling and How to Use It?
The plot scale in AutoCAD describes the relationship between the paper size and the size of the model. This means that the AutoCAD scale associated with an A4-sized paper will be much smaller than that associated with an A1-sized paper, for example. To plot a drawing to scale:
- Define the paper size
You can do this within the Page Setup dialog box.

Page Setup Dialog Box in AutoCAD
- Set the scale under the Plot scale section of the window.
- Click OK

Conclusion
You can use the AutoCAD scale functionality in many different ways as an engineer, product designer, drafter, or architect. At its core, it enables you to represent life-size models and objects in miniaturized plans. The software also allows you to plot at scale. There’s so much you can do using this feature, and we hope you are more informed on scaling in AutoCAD.
